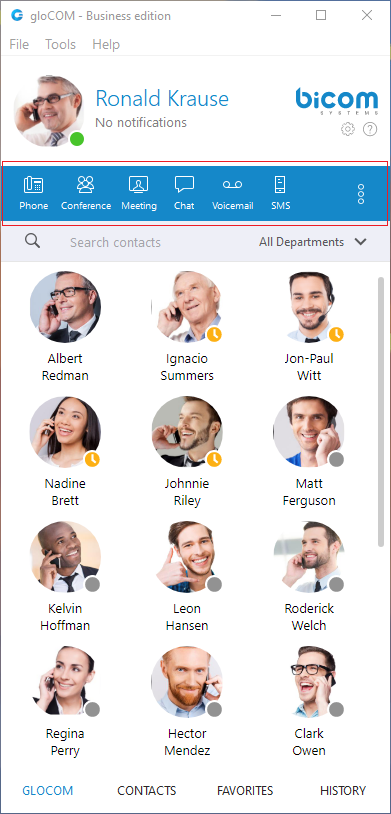
¶ Toolbar
- User image: Represents the user’s profile image that can be changed at any time. Clicking on it brings a Personal Information window. Click the avatar image and select the new image from a computer as a new avatar image. gloCOM now supports higher resolution avatars, allowing users to set up resolution between 256x256 and 512x512 pixels.
- Username: Represents the user name displayed within the application.
- Notifications: Displays any notifications (unread messages, missed calls, pending meeting invites, new voicemails), otherwise displays No notifications.
- Phone: Opens a softphone window next to the gloCOM main window.
- Voice Conference: Opens a Voice conference window next to the gloCOM main window.
- Chat: Opens a Chat window with all user's conversations.
- Voicemail: Opens a Voicemail window next to the gloCOM main window.
- SMS: Opens a SMS window with all user's conversations.
- Fax: Offers the choice to send a fax or view received faxes. Based on the user's choice, an additional window will open next to gloCOM.
- Personal Dialer: Opens a Dialer window next to the gloCOM main window.
To get access to the Fax and My Dialer modules, please contact your Administrator.
![]()
- Surveillance Camera: Opens up a Surveillance Camera preview. This option will work only if the user has their surveillance camera set up on the IP address in Tools --> Preferences --> Video --> Surveillance Camera.
- Online Self Care: In order to login to Online Self Care, the user needs to point their browser to: http://$IPADDRESS/ (For Example: http://192.168.1.1/).
- Email: The email address assigned to the extension (ex. The provided email address is used as a username for logging into Online Self Care (e.g. email@example.com)) ([a-z] [0-9] [@_.-]).
- Password: Password assigned to the extension ([a-z] [0-9] [@_.-]).
- Parked calls: Once a call is parked, anyone can pick it up by pressing the Pick Call button next to the parked call or dialing the number of the parked extension. On the PBXware, a default parking lot is defined within the Access Codes section. Pressing the Park button during a call will display a drop-down menu that allows the user to select a parking lot.
The user can filter parked calls by checking the option "Show my calls only". This way, they will see only their parked calls within the parked calls window.
- Show Login QR Code: Show Login QR Code as a part of the gloCOM Desktop allows users easier login to their mobile app by scanning QR Code generated by the gloCOM Desktop app.
- Preferences: Opens a Preferences window. Refer to the Preferences chapter for detailed instructions.
- Help: Redirects to our official website: www.bicomsystems.com. Additional documentation and guides are available on our official website www.bicomsystems.com If you still have any questions, please feel free to contact our support department.
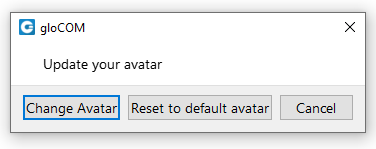
- Reset Profile picture to Default: Allows users to reset their profile picture to the default value (no profile picture). Clicking on the avatar image within the Personal Information dialog opens a pop-up window with the following options: Change Avatar, Reset to default avatar, and Cancel. Clicking the Reset to default avatar option resets the profile image to its default value.
If the user has not set their avatar image, clicking the default avatar image within the Personal Information dialog opens File Explorer (Finder on macOS) window, which allows them to select their avatar image.
If the SMS feature is not included in the license, you will not see the SMS module within the gloCOM toolbar.
System notification provides the user with some important information about the system. For example, the user is using an outdated version of the application. The notification will be shown every time the user logs in to the application. To dismiss the notification, click the Dismiss button.
¶ Personal Dialer
Personal Dialer enables users to load a CSV file inside gloCOM and to dial numbers from that file one after another. This is useful for people who dial the same list of numbers every day, so they don’t have to copy-paste each number. When you open the Personal Dialer module, you are presented with this window:
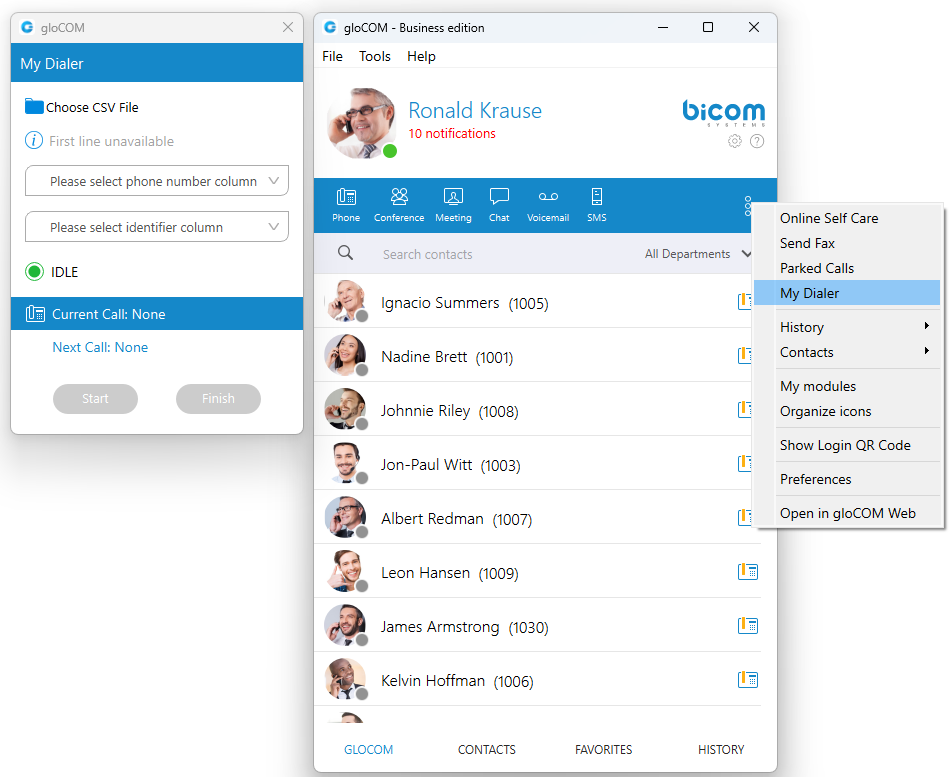
Personal Dialer is not supported in the Office Edition.
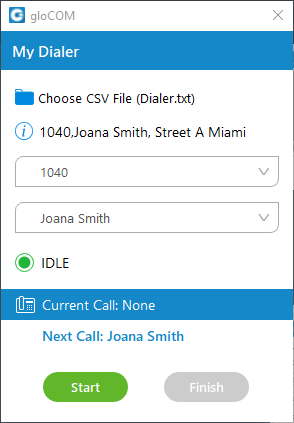
After loading a file first line from the file is shown in the info section, so a user can have a preview of the file structure. Then they have to select the phone number column, so gloCOM knows what to dial. Optionally they can choose an identifier column which is useful for labeling numbers with a name.
For example in the file:
- 101, Joana Smith, Street A Miami
- 102, James Tartos, Street B London
The first column would be a number, and the second would be an identifier (person name, company name, etc.). This identifier is used in the Current Call and Next Call labels so a user can have an idea of who is going to be dialed next. After he presses the Start button gloCOM proceeds to call the first number from the list if there are no other calls at the moment. Numbers are being dialed one after another, but a user can pause the dialer at any time if they want to. Dialing is finished after the end of the list is reached, or if a user finishes dialing.
¶ Destinations and gloCOM Modules
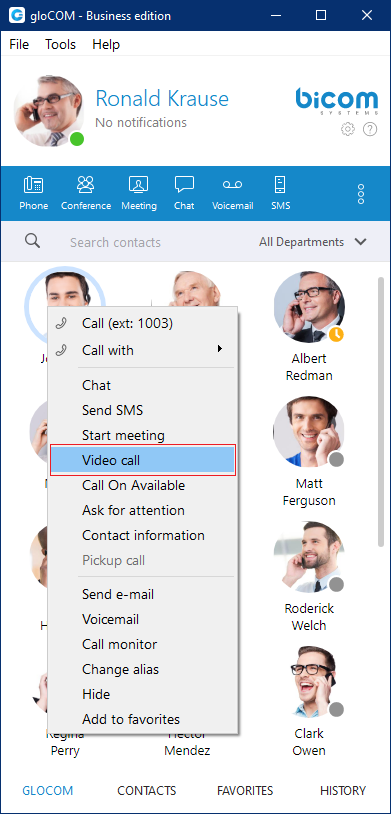
gloCOM can place a call to any system destination, for example: extensions, queues, conferences, voicemail, system calls, or parking. Through PBXware GUI an administrator can hide non-gloCOM extensions so they are not displayed in the user list. Calls can be placed with a drag-and-drop motion from one extension to another, or directly from the phone display to the extension, for example. Right-clicking on a contact name offers more possible actions regarding the selected extension.
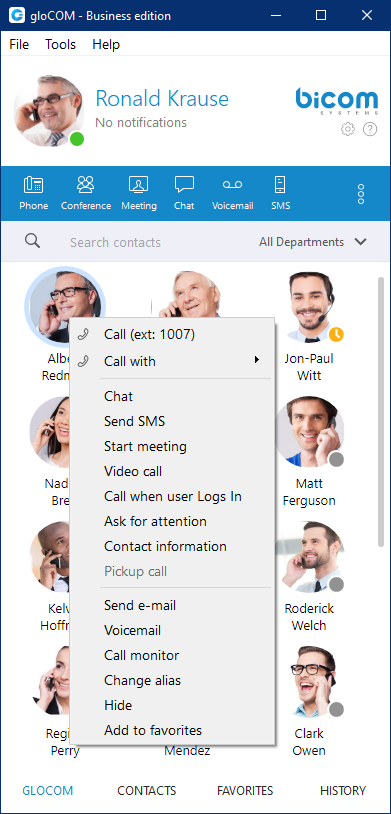
This way the user can:
- Make a call from gloCOM
- Chat with the selected contact
- Start a meeting with the selected contact
- Make a Video Call from gloCOM
- Call the selected contact On Available
- Ask for attention
- See more information about the contact
- Pickup call
- Send an email to a contact
- Leave a Voicemail
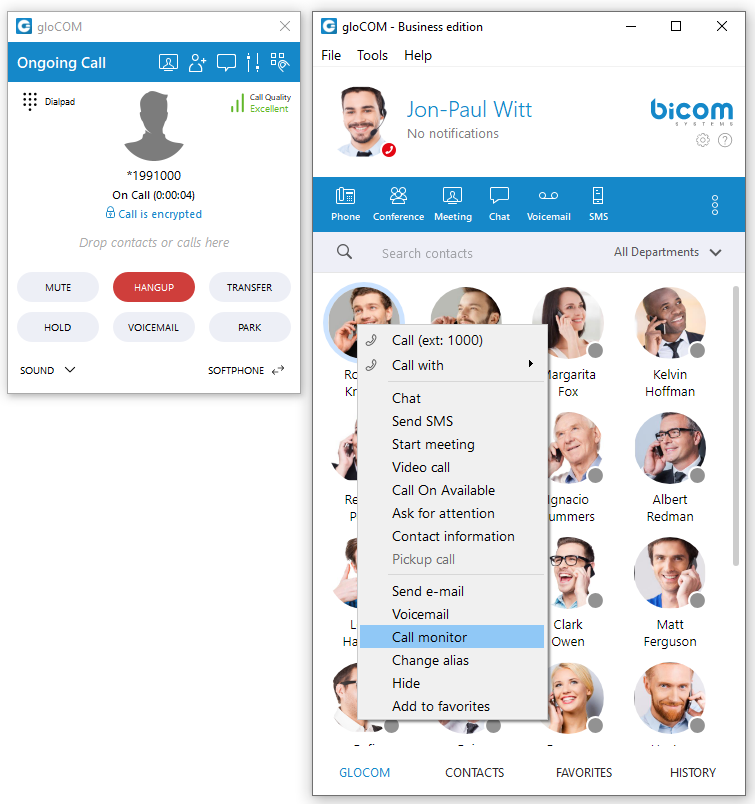
- Monitor calls
- Change the contact's alias
- Hide contact
- Add the selected contact to Favorites
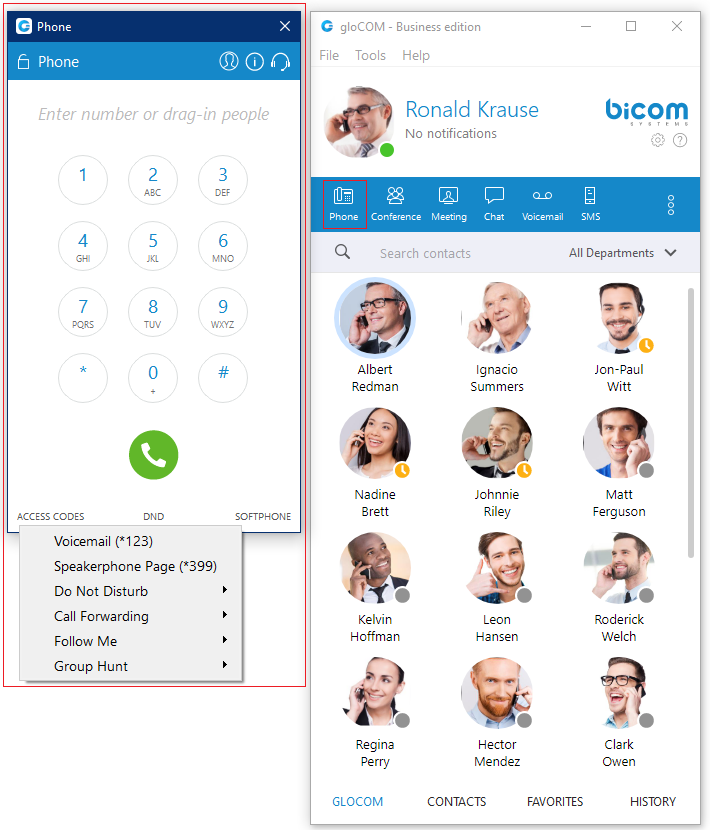
¶ Phone
The phone module area where information about possible missed calls is shown.
- From the phone module you can set up an office and mobile phone by clicking the settings icon next to missed calls information.
- Select your audio device by clicking the Headset icon. The drop-down menu with the following options will appear:
- Select the microphone device: Allows you to select which device you want to use as an input device.
- Select the speaker device: Allows you to select which device you want to use as an output device.
- Select the ringing device: Allows you to select which device you want to use as a ringtone device.
- Preferences: It points to the Preferences → Phone → Audio devices section where you can also select which input, output, and ringtone device you want to use or to test your audio devices.
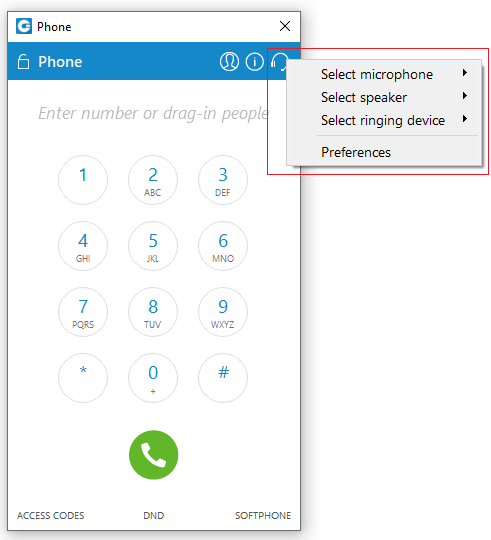
Also, you can change your audio device during a live call by clicking the Sound button.
Default ringtones are different for inbound and outbound calls when using a softphone.
- A green (or eventually red) circle shows the Phone module connection status. If green is shown, the Phone module is connected and the user can place calls. If a red circle is shown, the Phone module is not connected and the user is unable to place a call, in which case the user should contact their system administrator.
- In the Phone module, you can see which phone mode is set by default. Click on the dropdown menu, and choose between Softphone, Deskphone, and Mobile App. Next to this dropdown, there is a DND icon with the option to set your status to Do Not Disturb.
- Phone module area where contact is shown after the Drag-and-Drop action.
- Phone module area where a dialed contact's phone number is shown.
- Speaker volume tuner. Adjust the speaker volume by moving the slider up or down. Do not increase volume more than needed because it can induce hearing loss.
- Microphone volume tuner. Adjust the microphone volume by moving the slider up or down.
- Phone module dial keypad. Used for entering phone numbers.
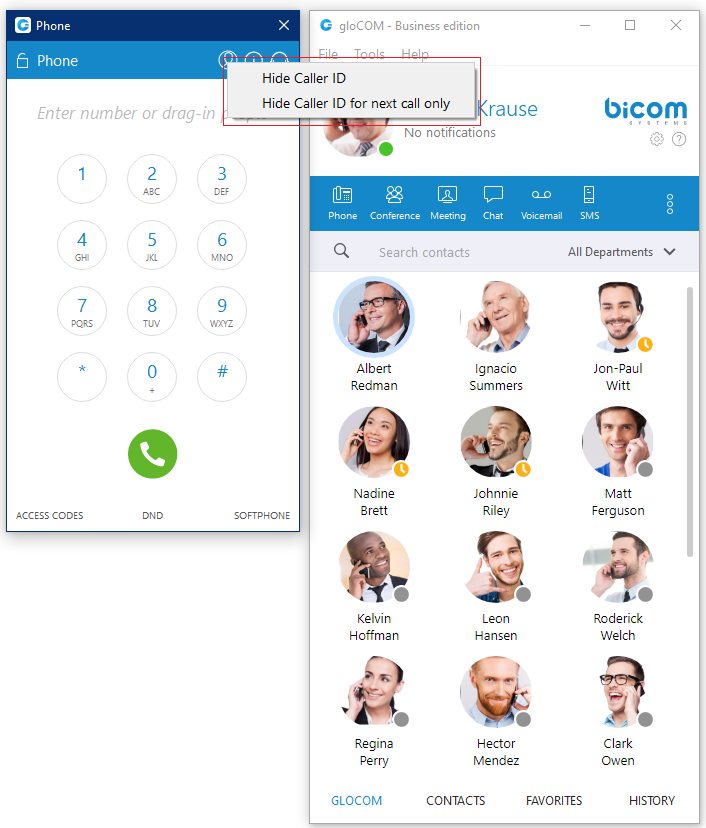
Users are able to block caller ID directly from gloCOM. Two options are available: Hide Caller ID and Hide Caller ID for the next call only.
When a user presses and holds down any key inside the Phone Dialer except 0, it will display the pressed number or sign. However, when the user presses and holds down the 0 key, it will display the + (plus) sign.
¶ Placing Phone Calls
1. Open Phone module
- Click on the Phone module icon to show the Phone module.
2. Dial entering the phone number
- Use the Phone module dial keypad or keys on your keyboard to enter the phone number you want to dial.
- Click on the Dial button to place a call.
1. PCI compliance
The user is on a phone call with an agent, and the caller needs to perform a payment, he needs to say his credit card obviously. Agents turn on an option in gloCOM that will detect DTMF from the caller, and enter them into a text field by simulating keypress with DTMF digit. This way caller does not send credit card by voice, but rather through DTMF, straight into the field on a website for payment. Inside the call window, there is an icon for activating this feature. After activating, DTMF that other side inputs are written wherever your cursor is positioned. You can stop receiving remote DTMF by either pressing the icon again, click on the Stop Remote DTMF button or by ending the call.
2. Show entered DTMF
This feature enables you to see entered DTMF in the call window, so you can make sure you have entered the correct digits.
3. Dial with Drag and Drop
- With your mouse click and hold any contact from the contact list, then drag the selected contact from the gloCOM list to the phone module area, and Release (Drop) the contact.
- Click the Dial button to place a call.
Live call
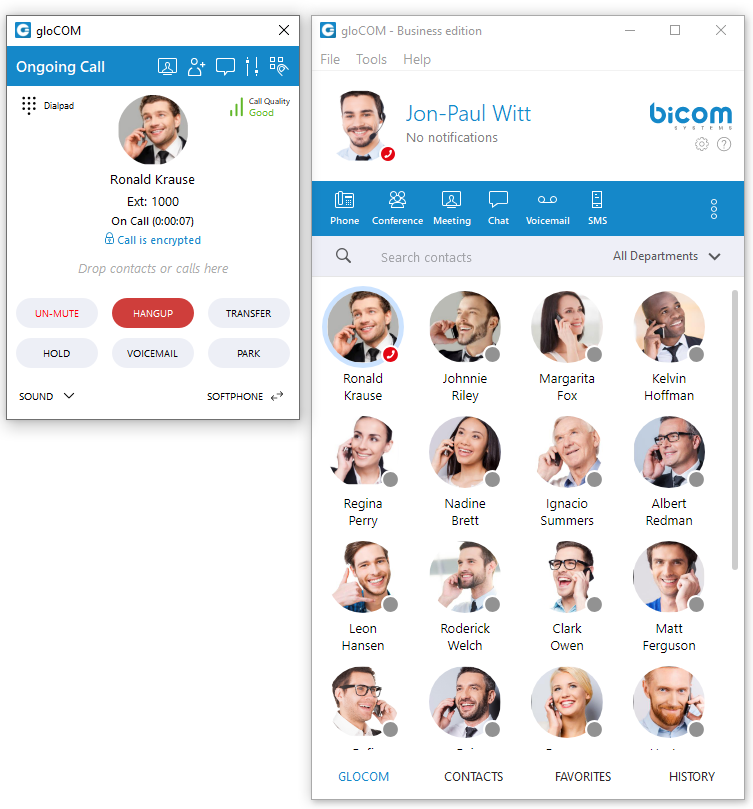
4. Transfer options:
- Blind/transfer to a phone number: Type in some number (i.e. mobile phone) and transfer the call to it.
- Transfer to another ongoing call: If a user has 2 or more active calls, he can transfer the calls from one to another.
- Transfer a call using drag and drop: Users can transfer an ongoing call by dropping it onto the desired contact inside the contact list within the main gloCOM window. While dragging, a transfer indicator will be displayed. The call can be transferred using the Blind and Attended transfer options, or it can be transferred directly to the contact's Voicemail. Transfer using the drag-and-drop option does not apply to conference calls.
One simple scenario is:
A gloCOM user is talking to John Doe. He receives a call from Allison Smith while speaking to John Doe. The gloCOM user is now able to add Allison Smith to the existing call with John Doe and all 3 participants will now hear each other.
When trying to transfer a call via gloCOM, when choosing a contact from your list you can now see the google and outlook contacts in a dropdown list. Also, users can press enter to confirm the transfer.
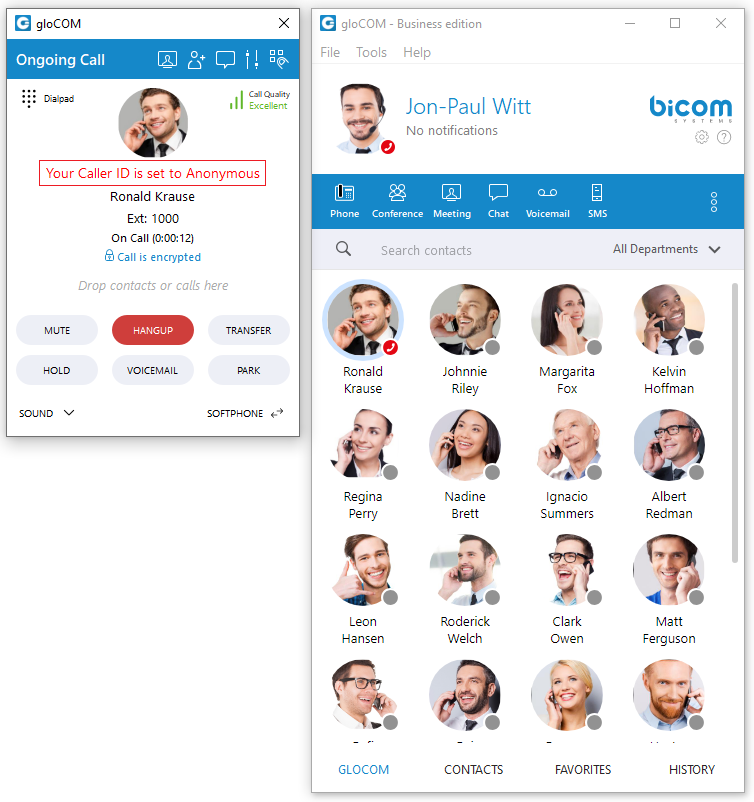
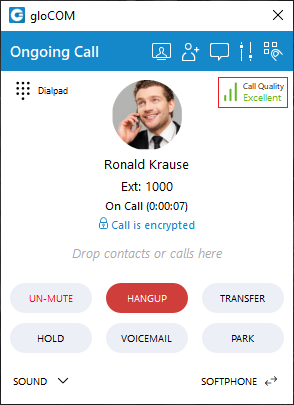
5. Call encryption
During an ongoing call, there is an indicator that shows call encryption if a call is encrypted. Call encryption settings are configured on the server by default, but the user can override them within the gloCOM app by going to Preferences → Phone → Advanced.
There is a checkbox that indicates the use of the default encryption set by the PBX. By unchecking it, the user can change options between TCP, UDP, and TLS. The user is required to log out and log in after changing these options.
The indicator should only be present when the TLS encryption is enabled and if the softphone is in use (in all other cases, the indicator will not be displayed). Clicking it will bring up a pop-up message explaining the encryption.
6. Echo Cancellation
Echo Cancellation as a part of the gloCOM Desktop app is a method used to improve voice quality by preventing an echo from being created or removing it after it is already present.
The time required for Echo Cancellation to start removing echo is up to 10 seconds. It is important to note that the Echo Cancellation only works for softphones.
7. Switch phone
During a live call, you can use the Switch Phone button to initiate ringing across all registered devices or a specific device (softphone, desk phone, and mobile app), so the user can continue the call on another device. A perfect example would be switching from your desk phone to your mobile when you need to leave your office but would like to continue your call. The same applies to conference calls.
Switch phone is not supported in the Office Edition.
8. Copy number from an active call
Copying a number during a call can be done by selecting it and pressing the CTRL+C keys on the keyboard or clicking on it.
The following tooltip message will be displayed while hovering over the number: "Click the number to copy it."
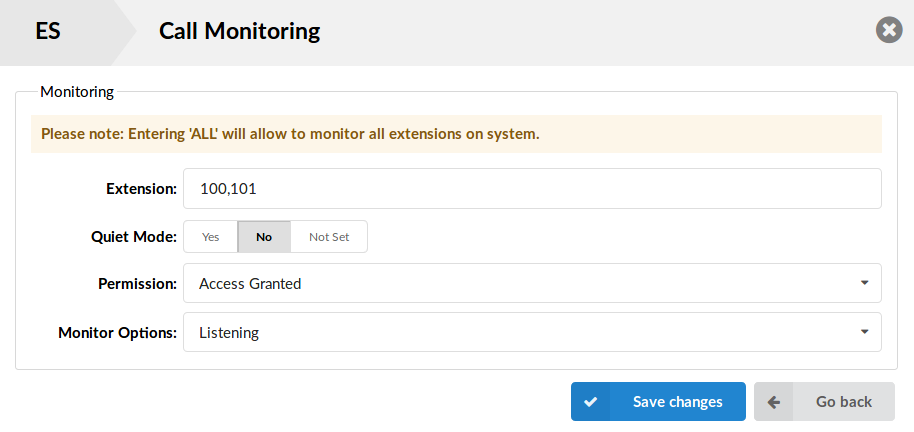
9. Call Monitor
If your administrator enables Call Monitor on your extension in PBXware Enhanced Services, you will be able to listen to any call-in in real-time. When a call is placed, right-click on the user that is on call and choose Call Monitor. You can escalate from silent monitoring to barging in to speaking with all parties.
gloCOM brings a unified call history between Desktop, Web and Mobile applications. Call history is stored for up to a month on the server and synced between all user devices. It means that the user will be up to date with their recent calls all the time. The application makes sure that the user’s call history is synced on every login and that they have recent calls available on their device.
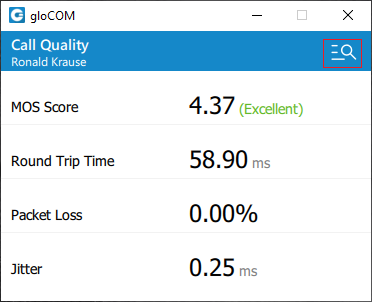
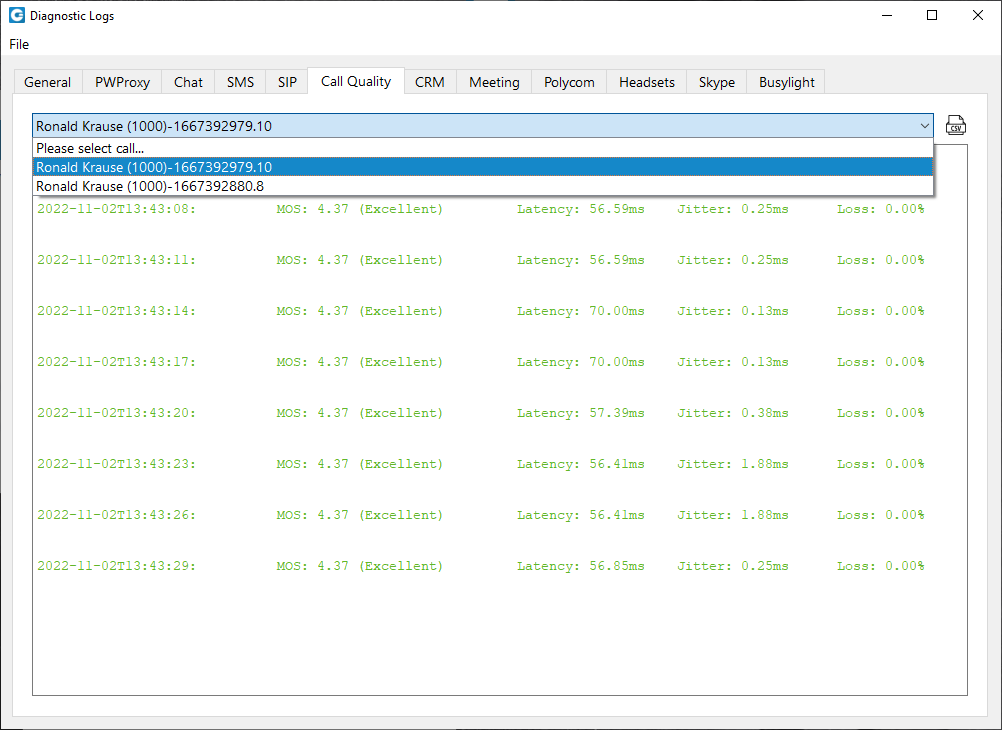
¶ Call Quality Metrics
Call Quality Metrics provides the user with details about the call and network quality during a call.
These details include information like:
- MOS Score
- Round Trip Time
- Packet Loss
- Jitter
For example, if the quality of a call is Excellent, there is no problem with the connection, there is little latency, and there is no packet loss. Otherwise, there are some problems with connection, latency, and packet loss.
In a word, it helps with troubleshooting potential network issues during a call.
During a call, a Call Quality indicator will appear in the upper right corner of the call window, giving rough information about the call and network quality. The Call Quality window will appear by clicking on it, providing more detailed information about MOS Score, Round Trip Time, Packet Loss, and Jitter.
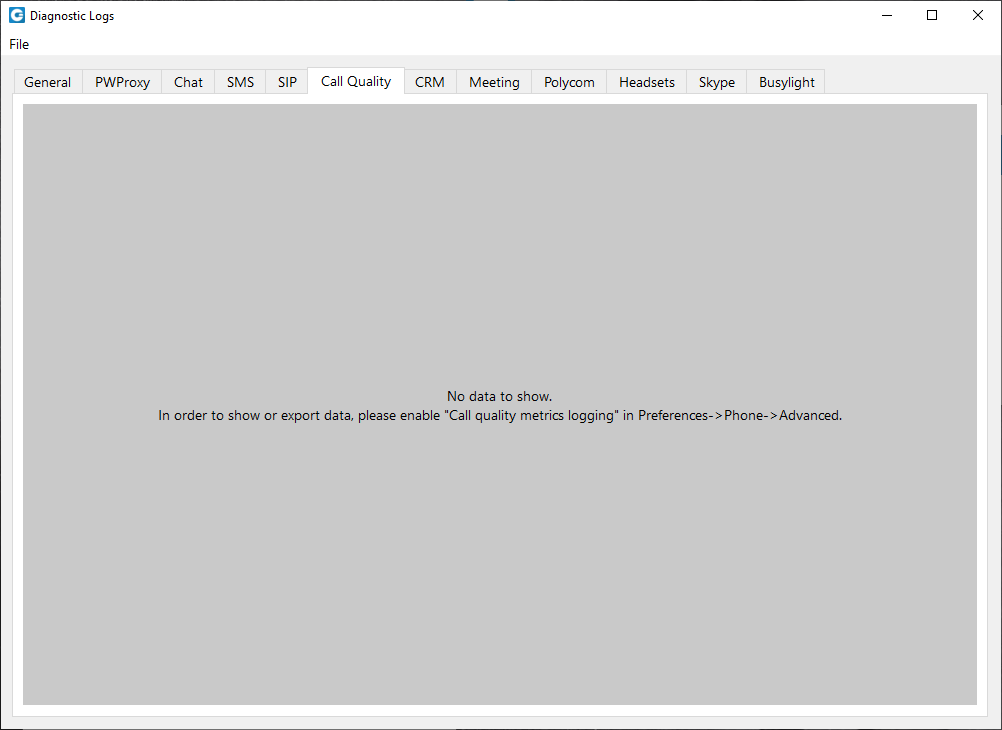
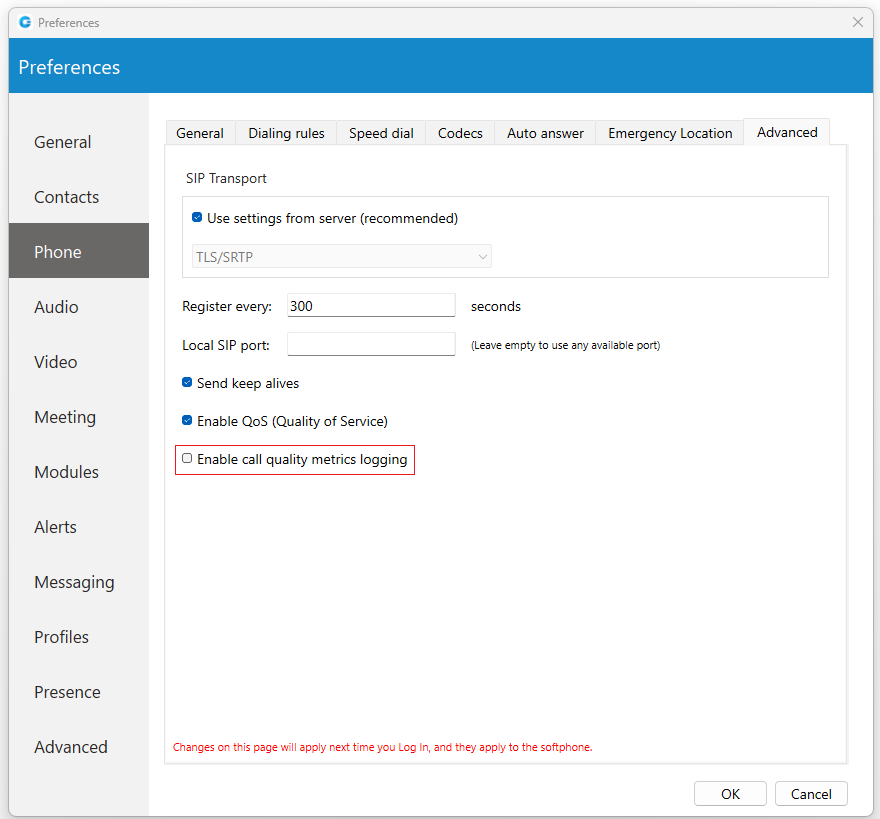
To export this information, click on the Open call quality diagnostic logs. By default, this option is disabled, and to enable it, please navigate to Preferences -> Phone -> Advanced and check the Enable call quality metrics logging.
After enabling it, under the Call Quality tab within the Diagnostic Logs, the user will be presented with the Call Quality information for the last 50 calls. To export the Call Quality information, the user needs first to select the call from the drop-down menu for which they want to create a report and click on the Export call quality report button.
Call Quality Metrics is not supported in the Office Edition.
¶ Auto Answer
Auto Answer, as a feature, allows users to answer incoming calls automatically without using the answer button.
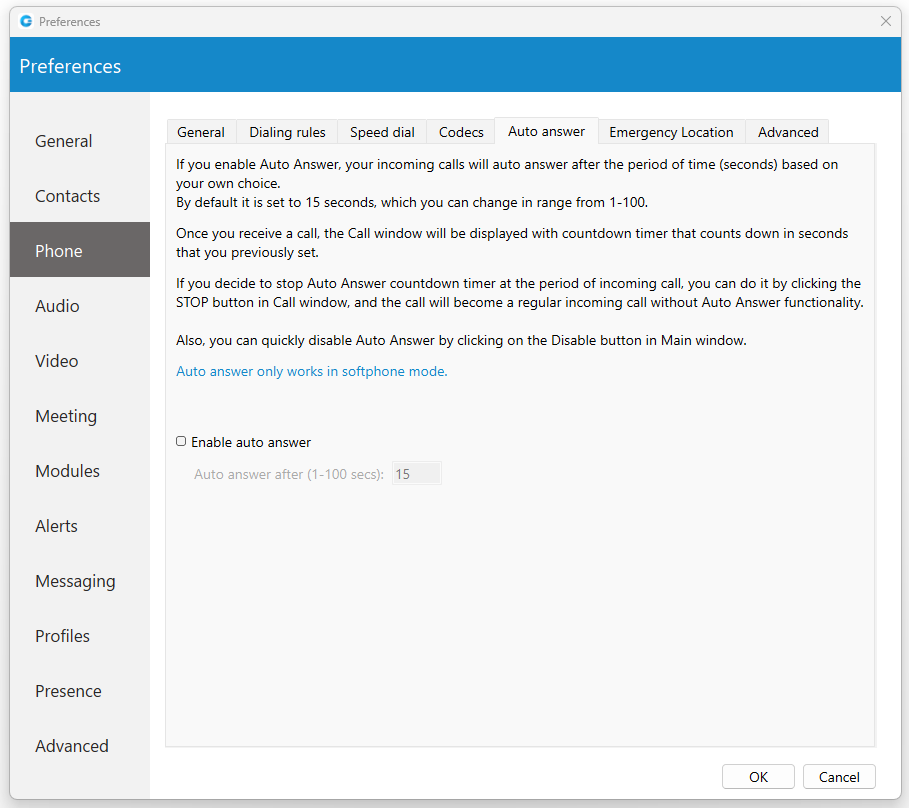
To turn on this feature, please navigate to Preferences -> Phone -> Auto Answer section and check the Enable auto answer option. By default, this option is disabled.
If the Auto Answer option is enabled, incoming calls will be automatically answered after a certain period of time (seconds) based on the settings within the application.
By default, it is set to 15 seconds, which can be changed in a range between 1 to 100 seconds.
Once the call is received, the call window will be displayed with a countdown timer that counts down in seconds previously set by the user.
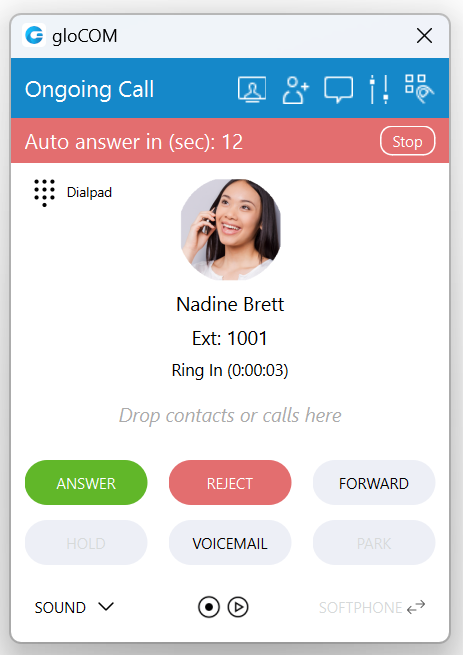
In case of another incoming call, an Auto Answer functionality will not be triggered while there is already an active call. Instead, it will wait until the active call ends.
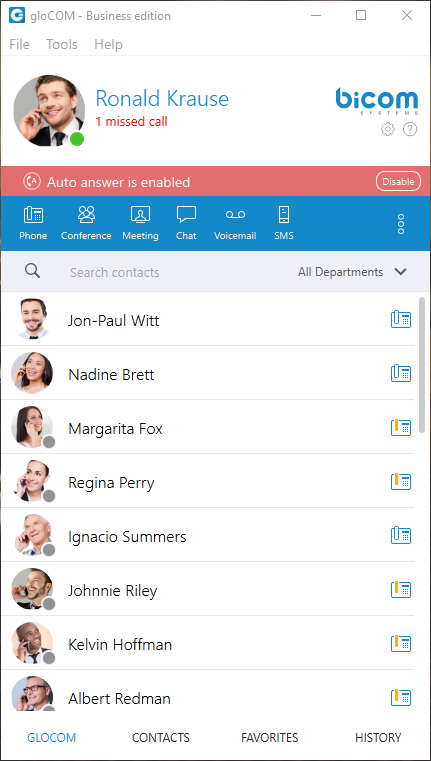
By clicking the Stop button, the Auto Answer countdown timer within the call window will be stopped. The call becomes a regular incoming call without Auto Answer functionality.
To disable the Auto Answer functionality, the user can click the Disable button in the main gloCOM window. Additionally, the user can navigate to the Preferences -> Phone -> Auto Answer section and uncheck the Enable auto answer option.
Auto Answer only works in softphone mode.
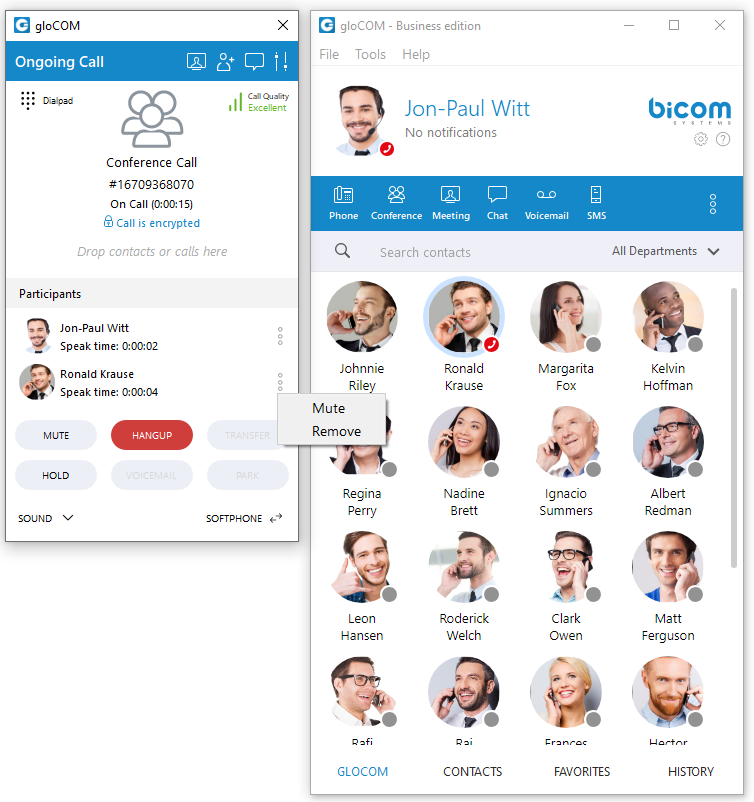
¶ Voice Conference
- Plus sign used to invite a contact using his landline or mobile number.
- Select a box to choose from a conference room
 .
. - The Voice Conference module area where contact is shown after Drag-and-Drop.
- To remove a contact from a list, click
 .
. - Click on the Start button to start the Voice Conference.
- Click on Close to close the Voice Conference.
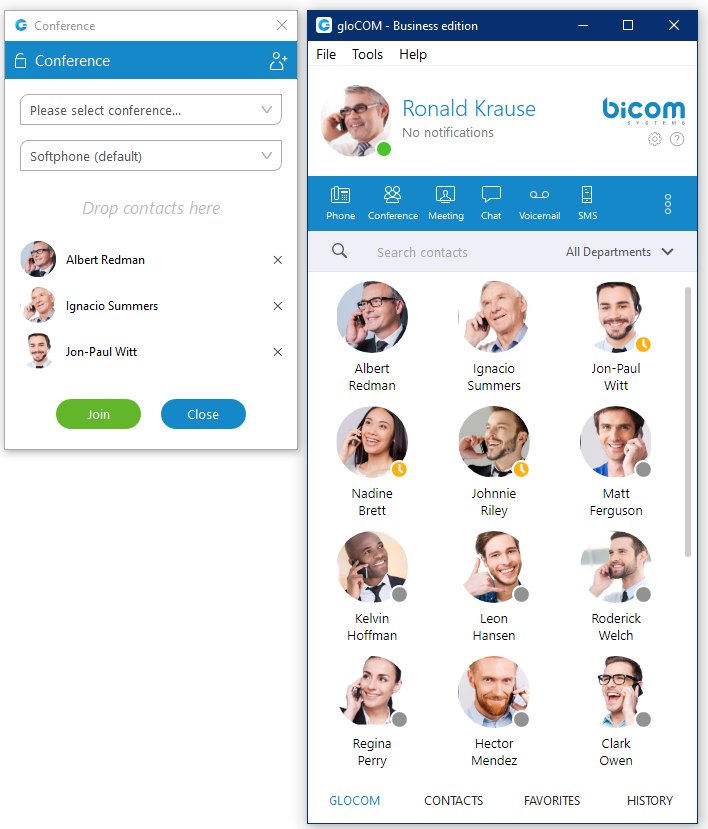
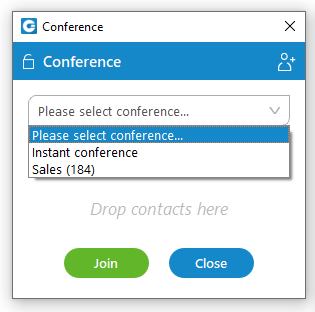
Conference can be created from the dropdown list, and Instant and Predefined conferences can be selected.
- Instant conferences: User can create a conference by adding one or more people to an ongoing call. With this option, you can add extensions or any number available from your contact list. If you missed the conference call, you are still able to join the conference from the Call History tab provided that a conference still exists. There are two ways to do that: double-click on the conference number or right-click on the conference number and then choose a call or call with.
- Predefined conferences: Users can join predefined conference rooms and add other participants.
Parked calls can be added to the conference either by using drag-and-drop or by accessing the Add to conference window, selecting the Parked call option from the drop-down menu, choosing the desired call from the drop-down list, and clicking the OK button.
¶ Presence
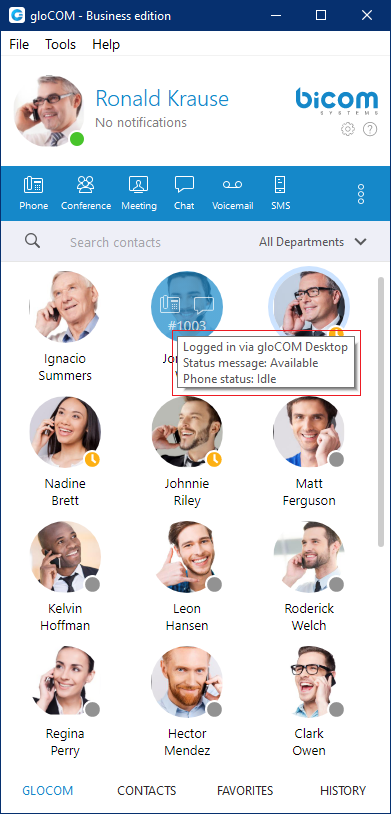
gloCOM brings a unified presence that is synced across all of your devices (Desktop, Mobile, and Web). For a currently online user, you can see if they are connected via Desktop, via Mobile, via Web, or even all three. For users who are not currently connected, you can see when was their last activity, in order to have a better understanding of their availability. For example, if you see that the user was last seen a few minutes ago, you might assume they will probably be able to respond to your calls/messages. On the other hand, if a user has not been seen for a few days, it might indicate they have limited availability and are out of the office. User’s presence and availability are represented by the icon visible in the bottom right of their avatar. Details about a user’s presence are shown in a tooltip after hovering over them in both grid and list view. The tooltip contains information such as: the device that the user is connected with, their last activity, their status message, and their phone status (idle, on-call, do not disturb, etc.).
Status icon indicator can be any of the following:
 If there is no icon in the bottom right of the user’s avatar, it means that they are currently online and available.
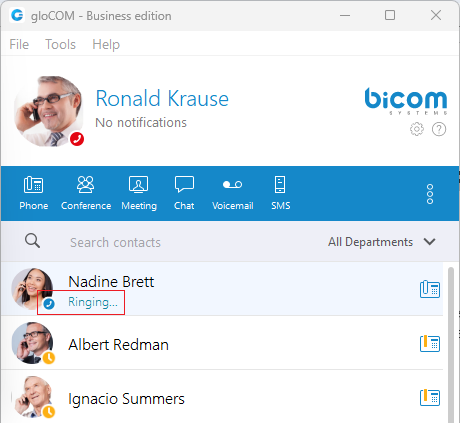
 This icon defines the "Ringing" status of the extensions. It will be displayed when the user is being called, except when the user is already on a call, in which case the status will be “On Call”.
 The user is currently on a phone call.
 The user is currently online, and they’ve set their status to Busy.
 The user is currently online, and they’ve set their status to Do not Disturb.
 This icon has multiple meanings:
- The user is currently online, and they’ve set their status to Away.
- The user is currently connected via Desktop, but they are Away from Desktop.
- The user is not currently connected, but they were last active less than N hours, where the N represents the value that depends on the settings set on the server (For example, 8 hours, 15 minutes, etc.)..
 The user was not active in the last N hours, where the N represents the value that depends on the settings set on the server (For example, 8 hours, 15 minutes, etc.).
¶ MS Teams Presence Sync Integration
This integration synchronizes Microsoft Teams' presence status with the Bicom client application (gloCOM Desktop, gloCOM Web, and gloCOM GO) extension’s presence. For example, if users change their presence to "Do Not Disturb" in Microsoft Teams, their presence status in gloCOM will automatically change to "Do Not Disturb" as well.
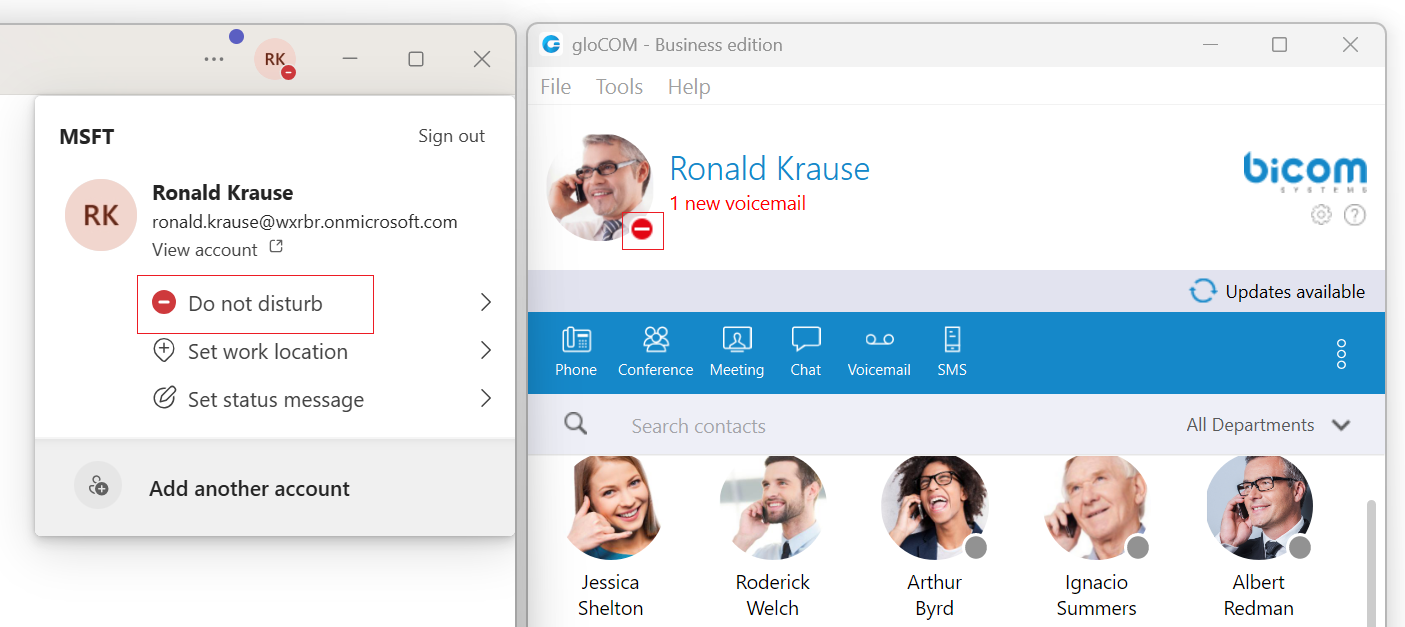
This synchronization only works from Microsoft Teams to gloCOM. It is not bidirectional. Changes made to gloCOM's presence status, such as setting it to "Busy", will not impact the presence status in Microsoft Teams. However, there is an exception that applies only when gloCOM Extension is on a call while Teams' presence is set to "Available" or "Busy".
To use MS Teams Presence Sync integration, it must be configured on PBXware version 7.5 or higher.
¶ Status and status message
You can choose your own status by clicking on the status icon in the bottom right of your avatar in the main window, or by clicking on the tray icon.
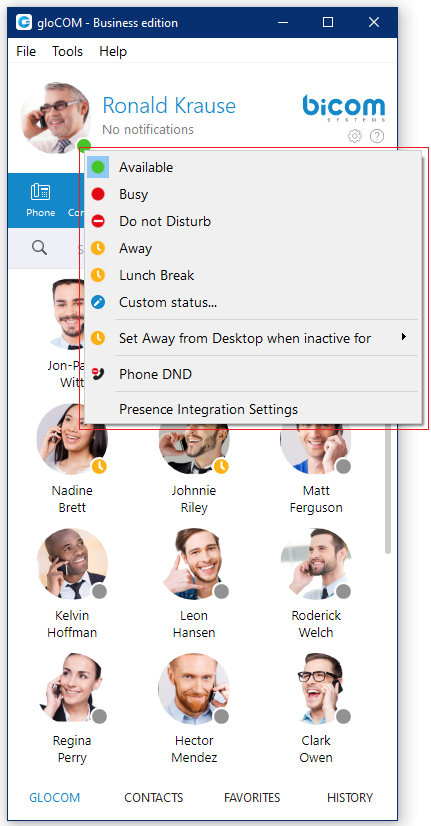
A menu will pop up and you can choose between:
- Available
- Busy
- Do not disturb
- Away
- Any of the statuses defined by the PBXware administrator
- Custom status
PBXware administrator can add statuses through PBXware GUI and those will appear as an option in the menu for all users. For example, an administrator could add Lunch Break status so users can easily inform others when they are using their lunch break and are not at their desk.
Also, you can set your own custom status, and write any message to describe your current availability. For example, if you have to attend a meeting, and you are not available to respond to calls or messages, you could choose Custom status… from the menu, select Busy from the dropdown, and type In a meeting as a message. This informs all other users that you are busy and the reason for that is you’re currently attending a meeting. This allows all users to have a better understanding of each others availability since each user can type a custom message to describe their current availability.
After you choose any of the statuses, you also have to specify status expiration. This allows you to let the application revert your status back to Available after a certain period of time. Using the example mentioned above, you could set your status to Lunch Break with the expiration of 1 hour, so when you come back to the office you don’t have to remember to change your status back to Available since the application will automatically do that for you.
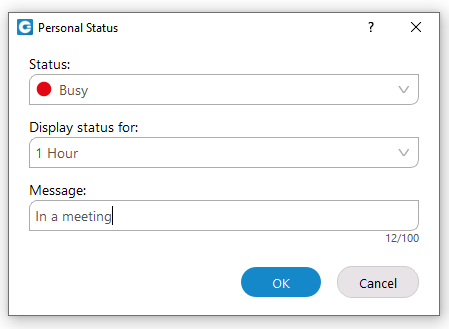
When setting status expiration you can choose between:
- Today
- 1 hour
- 4 hours
- 8 hours
- 12 hours
- 2 days
- 5 days
- This week
- Always
¶ Do not Disturb status
Setting your status to Do not Disturb (including custom Do not Disturb statuses) disables chat notifications, conference join notifications, and notifications informing you that someone has come online via Desktop. This allows you to easily remove distractions during an important period of the day when you need to fully concentrate on the task at hand. Note that this overrides the settings in the Alert section inside of the Preferences window.
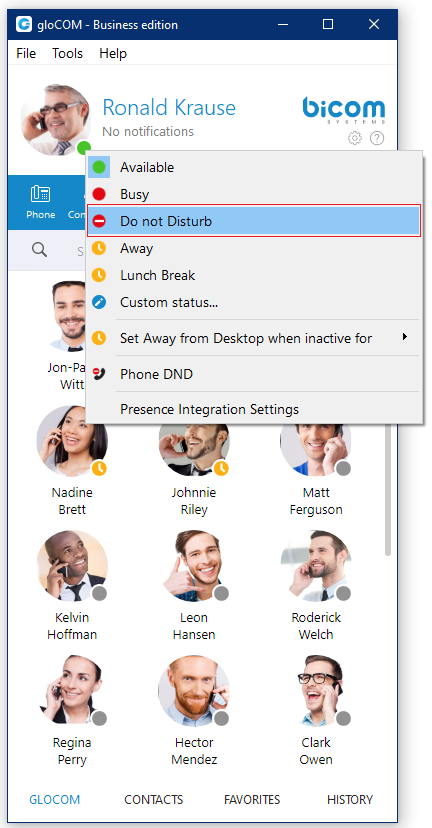
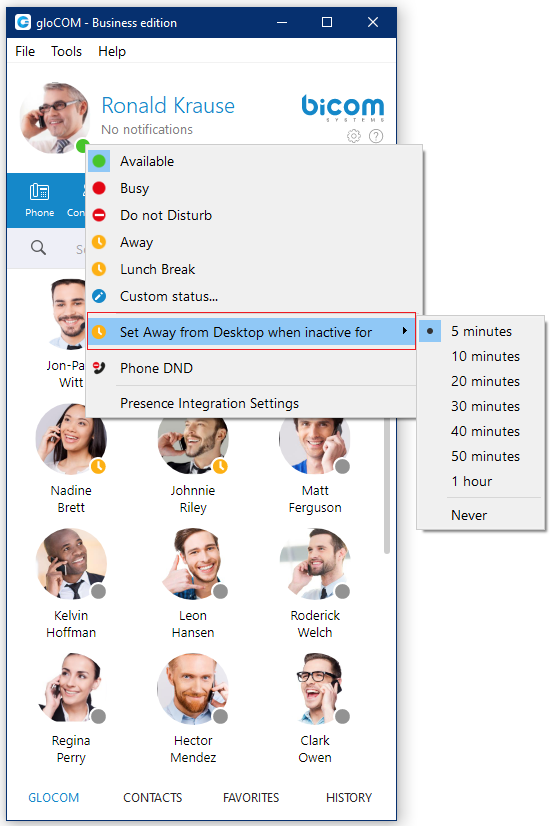
¶ Away from Desktop
When there is no user activity on your computer for a certain period of time gloCOM can inform other users that you are away from your desk. This can be configured by clicking on the status icon next to your avatar in the main window, hovering over the Set away from Desktop when inactive for item and choosing the desired option.
¶ Voicemail
- Select a Voicemail message and click
 to delete it. Please note, voicemail delete is permanent.
 - Click
 to move the selected voicemail message to the old messages directory.
 - Click
 to place a call to a contact who left a voicemail message.
 - Click
 to save a voicemail file to the disk.
 - Click
 to play the selected voicemail message.
 - Click
 tab to show new voicemail messages.
 - Click
 tab to show old voicemail messages.
While playing voicemail messages, the waveform shows up for the selected voicemail. It is possible to go back and forth through selected voicemail by clicking on the waveform.
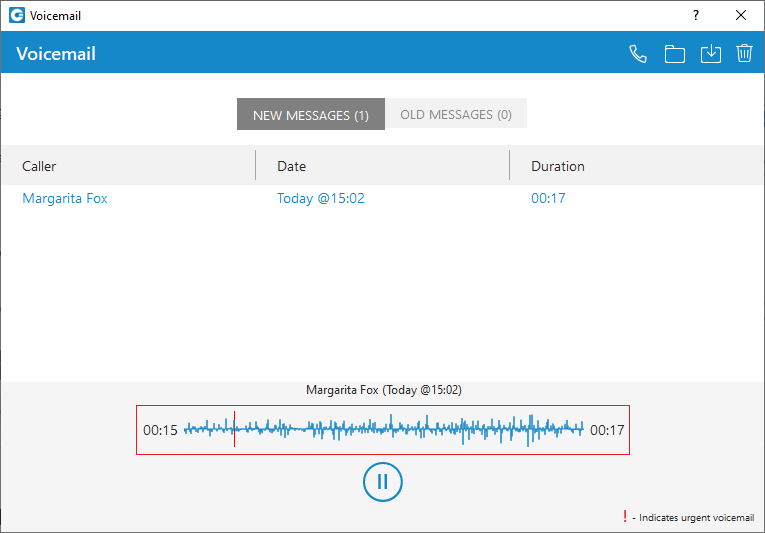
The Extension name and number will be shown within the voicemail window for the internal voicemails. Otherwise, only the number will be shown.
¶ Placing Video Calls
To place a video call, right click on a gloCOM contact and select Video Call from the drop-down menu.
Video call is not supported in the Office Edition.
¶ Sending Fax
¶ Outgoing faxes
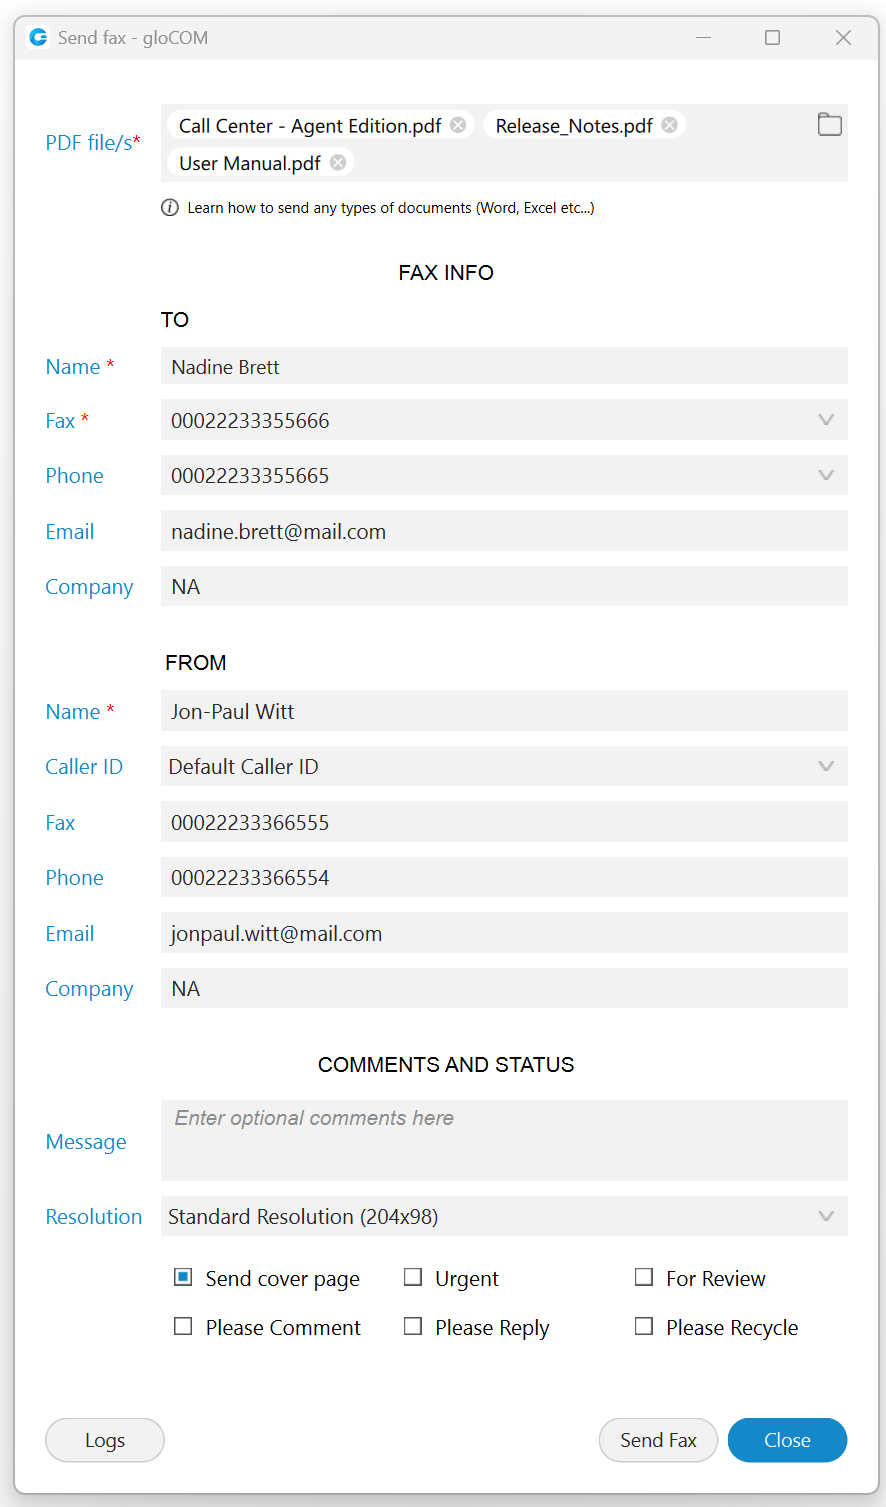
To send a fax, a user needs to navigate to the Send Fax module, fill out the required fields, and select the PDF file(s) they wish to send by clicking the file icon on the right side of the PDF file container. If they need to remove any selected files, they can do so by clicking the 'x' button next to the corresponding file.
- PDF file: Select a PDF file(s) that should be sent.
A user can select up to a maximum of twenty (20) files to send.
If users choose to include a cover page, the details entered in the Send Fax dialog will be displayed on the fax cover page.
Once everything is prepared, click the Send Fax button to transmit the selected files. A resizable progress dialog will appear, displaying all the selected files in the order they were selected. By default, a maximum of five (5) files will be shown at the same time. If there are more than five (5) files, users can scroll through the list to view them.
The files displayed in the dialog will be sent one at a time, starting from the top and proceeding to the bottom. The following file will only be sent after the previous one has finished transmitting. Users will be able to view the progress of each file being sent.
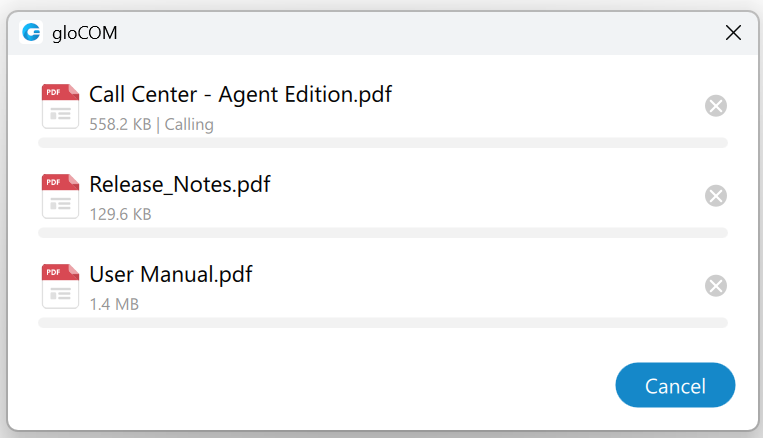
A notification will appear after a file is sent, informing the user of the transmission.
The sending file(s) can be canceled at any time, either individually by clicking the 'x' button next to each file or all at once by clicking the Cancel button.
Closing the progress dialog before sending is complete will prompt a confirmation dialog asking if the user wants to cancel sending all remaining files.
After canceling a file transfer, the 'x' button will change to a Retry button. This allows the user to attempt sending the file again. Clicking the Retry button will move the file to the end of the sending queue, making it the last file to be sent.
After a file has been sent, or if the attempt to send it has failed, a Fax report button will appear instead of the 'x' button. This allows the user to view the fax report for the selected file. If the file was not successfully sent, a Retry button will be available within the fax report dialog, enabling the user to attempt sending the file again.
Once all files have been sent or canceled, the Cancel button changes to a Close button, allowing the user to close the progress dialog. If the user decides to retry a file at this point, the button reverts back to a Cancel button.
TO Section
- Name: Enter the name of the recipient. For example, Tim Barr.
- Fax: Enter the phone number to which you want to send your fax, for example, 02033998800.
- Phone: Enter the phone number of the recipient.
- Email: Enter the recipient's email.
- Company: Enter the recipient's company name.
FROM Section
- Name: This field will be automatically populated with your gloCOM username.
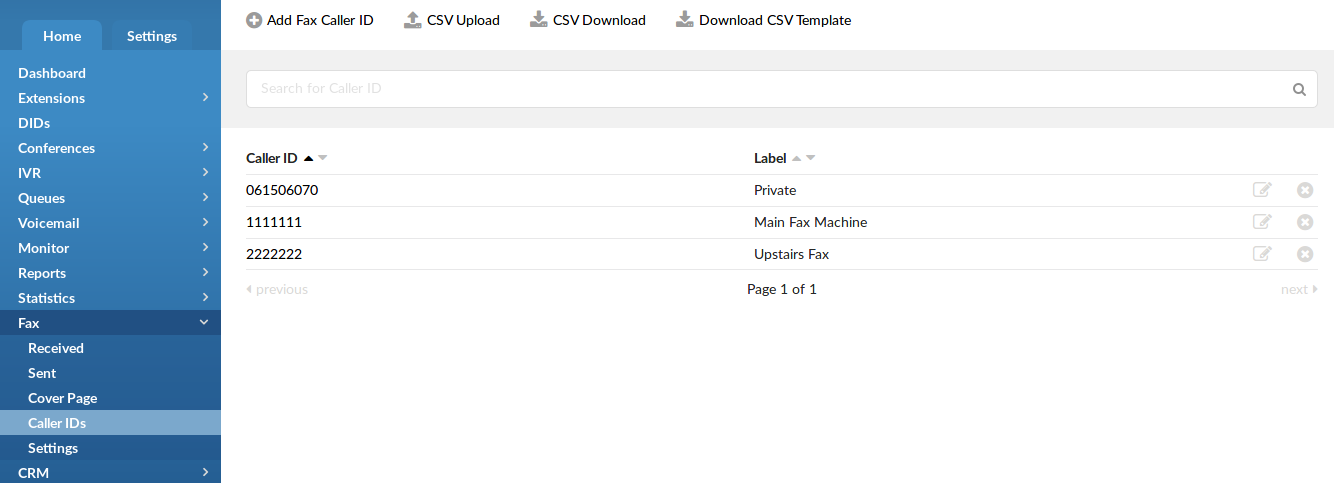
- Caller ID: Caller ID is a drop-down menu with the list of caller IDs allowed for an extension. Caller IDs are added from the PBXware GUI.
- Fax: Enter your fax number.
- Phone: Enter your phone number.
- Email: Enter your email.
- Company: Enter your company's name.
COMMENTS AND STATUS Section
Additional information like comments and status can be entered also.
¶ Incoming faxes
- Show list of all received and pending fax documents.

Send fax is not supported in the Office Edition.
¶ Camera
- Surveillance Camera: Opens up a Surveillance Camera preview. This option will work only if you have your surveillance camera set up in the IP address in gloCOM Preferences --> Video --> Surveillance Camera.
Surveillance Camera is not supported in the Office Edition.
¶ Online self care
In order to login to Online Self Care, point your browser to: http://$IPADDRESS/ (For Example: http://192.168.1.1/). When you click on the gloCOM OSC icon, you are automatically directed to your OSC page.
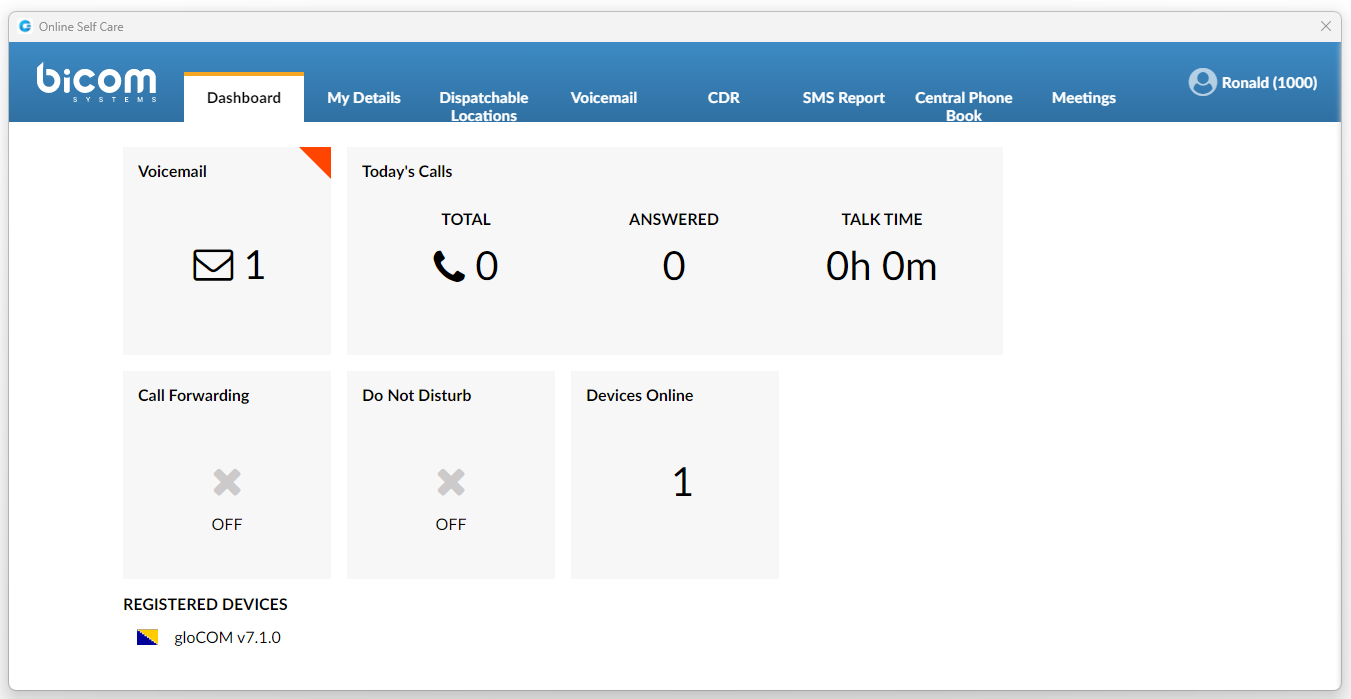
- Email: The email address assigned to the extension (ex. The provided email address is used as a username for logging into Online Self Care (e.g. email@example.com)), ([a-z] [0-9] [@_.-]).
- Password/PIN: The user password assigned to the extension (ex. This field accepts your gloCOM password (e.g.n9h*Caq1Icr)), ([0-9]).
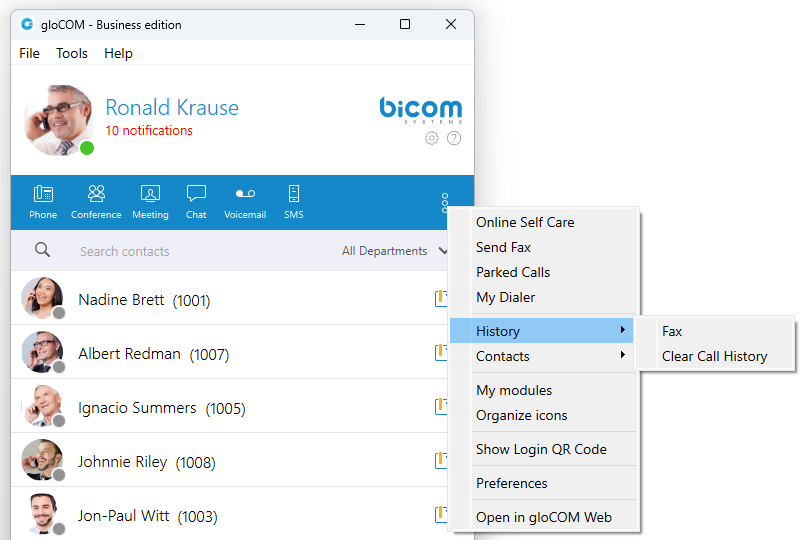
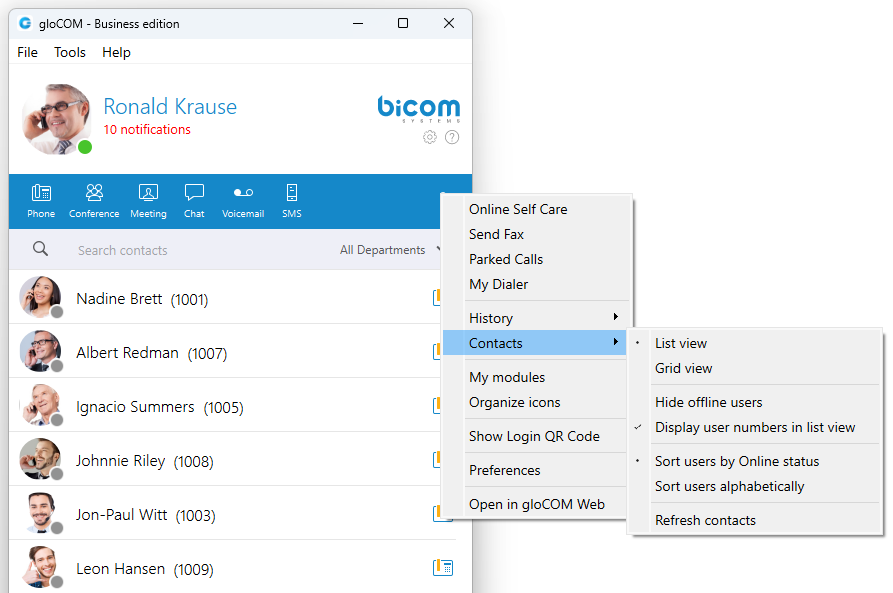
¶ Options (3 dots) menu
Options menu can be accessed by clicking on the 3 dots icon on the far right of the module icons. This menu shows all the remaining modules besides the 6 modules visible in the main window, as well as a few additional options explained below.

¶ History submenu
- Fax option is used for opening Fax History window which allows you to see all sent and received faxes.
- Clear Call History option is used to clear all your missed, received and dialled calls from the HISTORY tab.
¶ Contacts submenu
- List view option is used to layout gloCOM users in a list.
- Grid view option is used to layout gloCOM users in a grid.
- Hide offline users option is used to hide all users that were not active for 8 hours or more.
- Display user numbers in list view option is used to show a user’s extension number in the parenthesis in the list view.
- Sort users by Online status option is used to sort gloCOM users according to their most recent activity.
- Sort users alphabetically option is used to sort gloCOM users according to the alphabetical order of their names.
- Refresh contacts option is used to sync Outlook (for Microsoft Windows), Address Book (for macOS), Google, CRM, and Central Phone Book contacts.
¶ Other options
- My modules option is used to quickly navigate to Modules section in the Preferences so you could see which modules are available to you, and to set up those modules.
- Organize icons option is used to personalize the module icons available in the main window. Note that the first icon has to be the Phone module, but you can rearrange the 5 other icons as it suits your needs.
- Show Login QR Code as a part of the gloCOM Desktop allows users easier login to their mobile app by scanning QR Code generated by the gloCOM Desktop app.
- Preferences option is used to open the Preferences window.
- Open in gloCOM Web option allows users access to the Web app through the Desktop app by selecting the "Open in gloCOM Web" option from the drop-down menu.
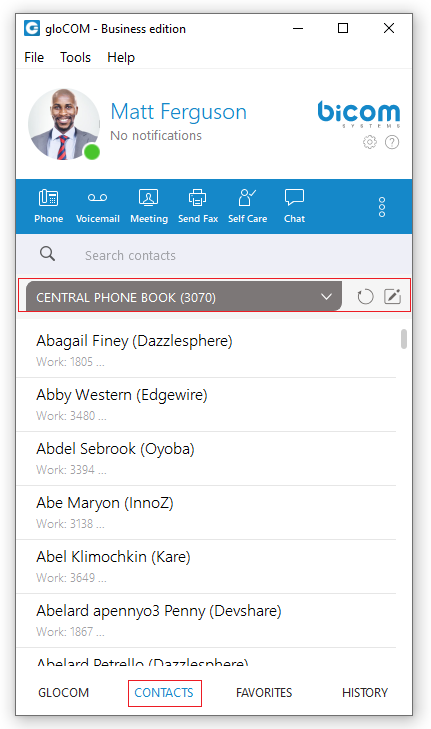
¶ Central Phone Book
Central Phone Book is a centralized list of contacts managed by the PBXware administrator. It is shared across all gloCOM users, and synced together with the rest of your contacts (Google, CRM, etc.). To access your Central Phone Book contacts navigate to the CONTACTS tab, and select CENTRAL PHONE BOOK from the dropdown.
You can use Search contact field to find a contact by their name. Double click on a contact to initiate a phone call. Right-click on a contact to open a context menu with additional options.
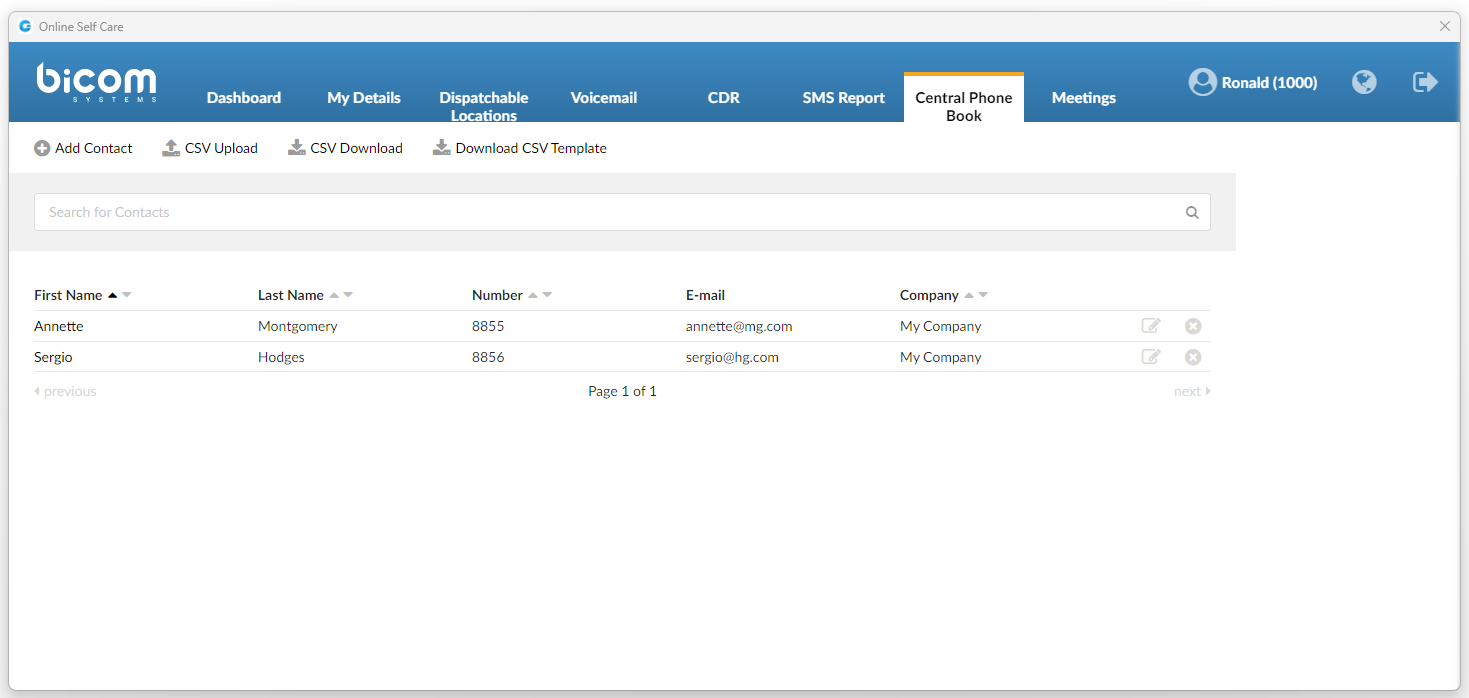
Besides contacts managed by the administrator, each user can manage his own personal list of contacts. This personal list is private and visible only to you. Clicking on the  button while in the CONTACTS tab opens up the Online Self Care window and switches to Phone Book tab. Here you can see all of your Personal Phone Book contacts, add new contacts, import/export contacts, or download a CSV template. To remove a contact click on the
  button on the right side of each contact.
After you close the Online Self Care window, the application will automatically refresh contacts if necessary, so the modifications you made in the Online Self Care are now synced inside of gloCOM.
¶ Quick List
Quick list buttons enable a quick overview of gloCOM, Contacts, Favorites, and Recent tabs.

- gloCOM: Displays a list of all gloCOM contacts.
- Contacts: Displays a list of all saved and imported contacts.
- Favorites: Displays all contacts that you marked as a favorite.
- History: Displays log of all recent missed, received, and dialed.
¶ Menu
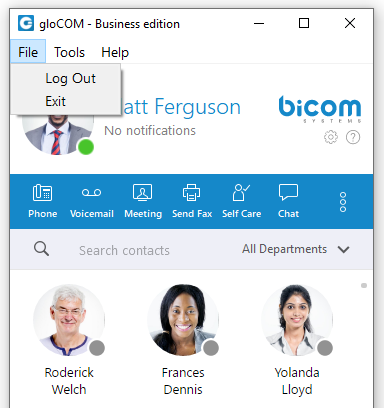
¶ File Menu
- Log Out: Click on Log Out to log out from active connection(s).
- Exit: Click on Exit button to log out from active connection(s) and close gloCOM application.
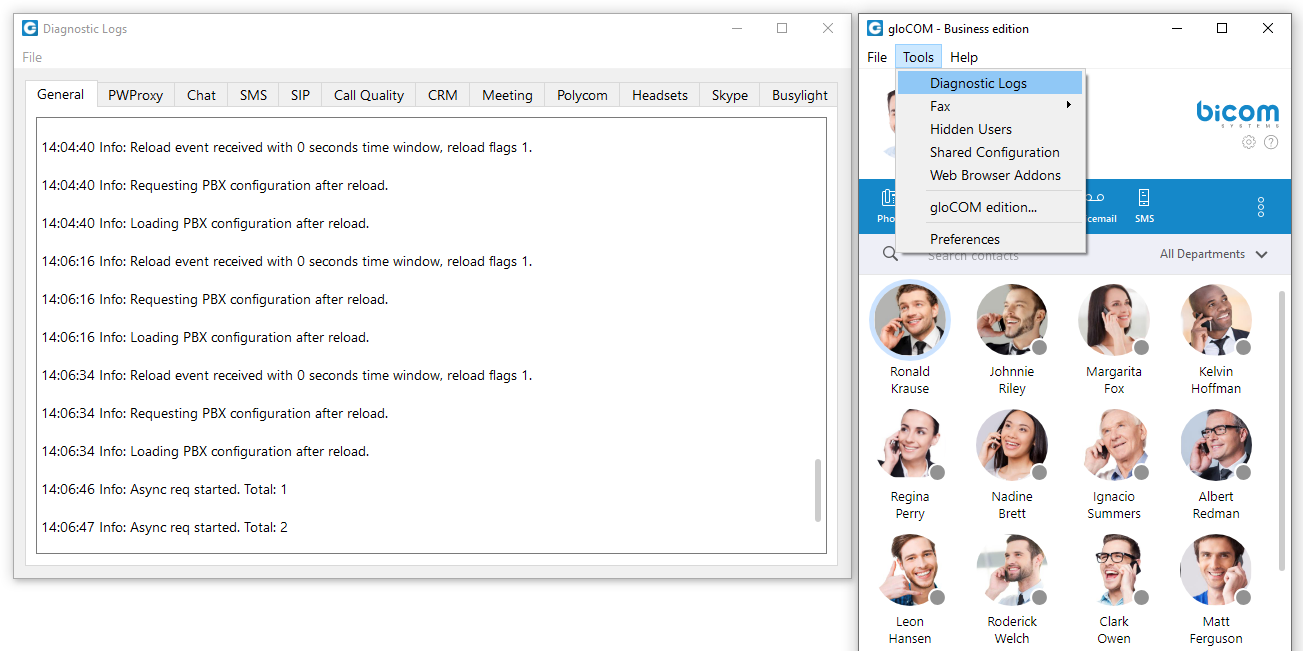
¶ Tools Menu
¶ Diagnostic Logs
Here you can see diagnostic logs with the level of verbosity that you have set in Preferences --> General --> Diagnostic Logs.
¶ Fax
- Add Fax Printer Automatically
- Add Fax Printer Manually
- Install Port Monitor
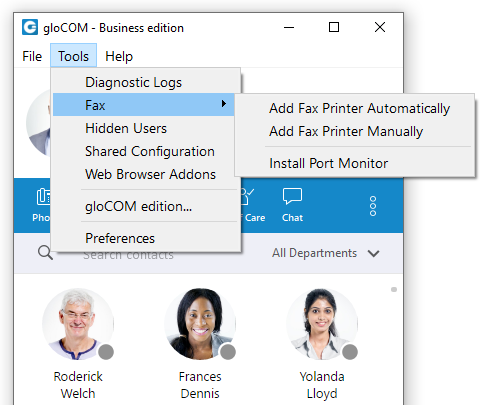
Fax is not supported in the Office Edition.
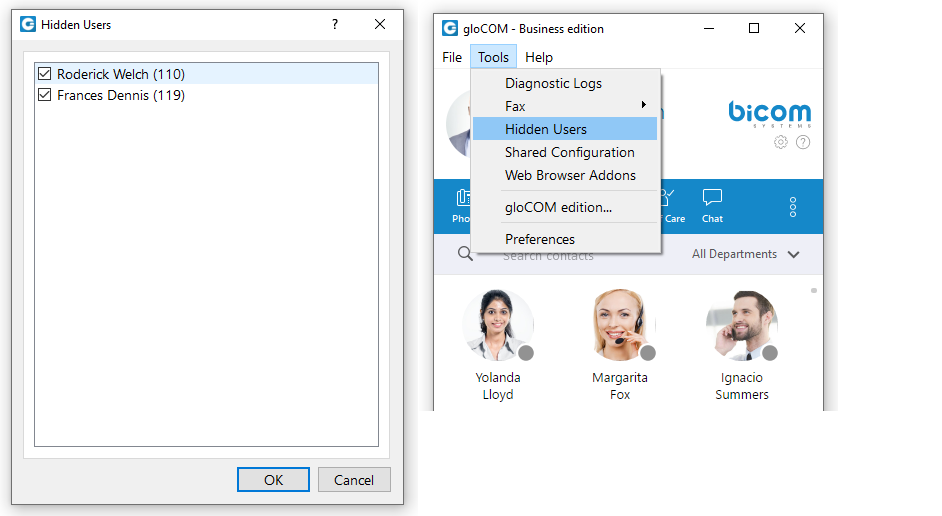
¶ Hidden Users
Opens a dialog showing all your hidden users. Uncheck the box next to a user's name if you want to unhide them.
¶ Shared configuration
Enable:
By enabling shared configuration, all users on this computer will share the same Login account, phone mode, and edition.
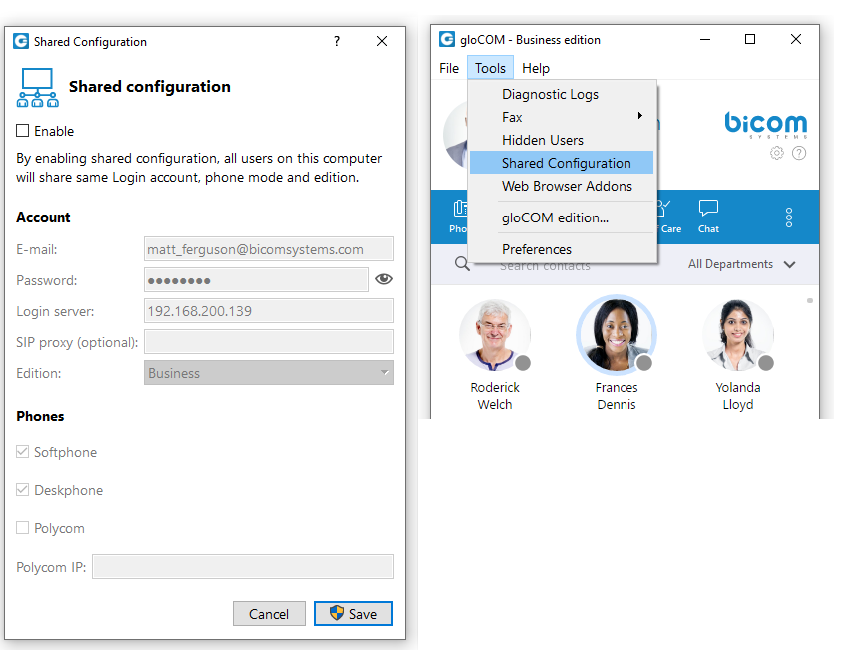
Account:
- E-mail: email address is displayed in this field.
- Password: in case the option Enable is unchecked, the password will be hidden. After you check the Enable option, the option Show Password will be functional.
- Login Server: Shows IP address of server.
- SIP proxy (optional): this field is optional.
- Edition: In this option select edition for your gloCOM. The current edition is displayed, but the possibility to choose between other editions is given.
Phones:
Choose which phones you want to use:
- Softphone: choose to use Softphone.
- Deskphone: choose to use Deskphone.
- Polycom: choose to use Polycom phone.
Polycom IP:
In case the user chose Polycom, in this option user needs to provide the IP address of the Polycom phone.
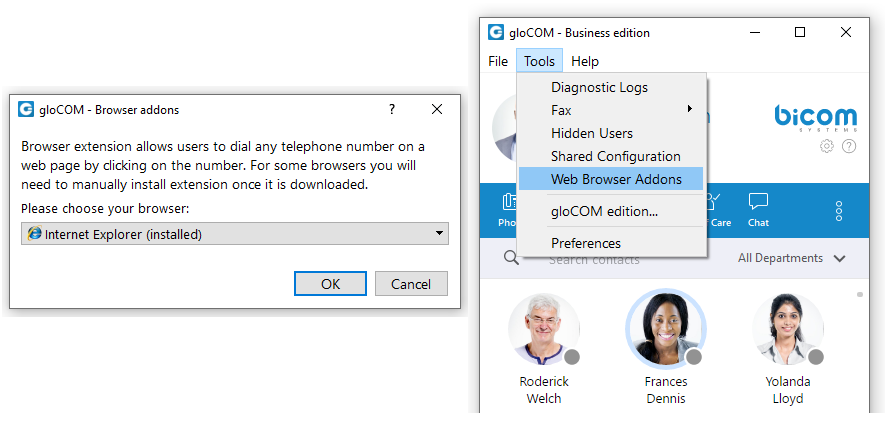
¶ Web browser add-ons...
Click on Download web browser add-ons to add the browser add-on which will allow the user to select and dial a phone number directly from a web page. Supported browsers: Internet Explorer, Firefox, Safari, Edge, and Chrome.
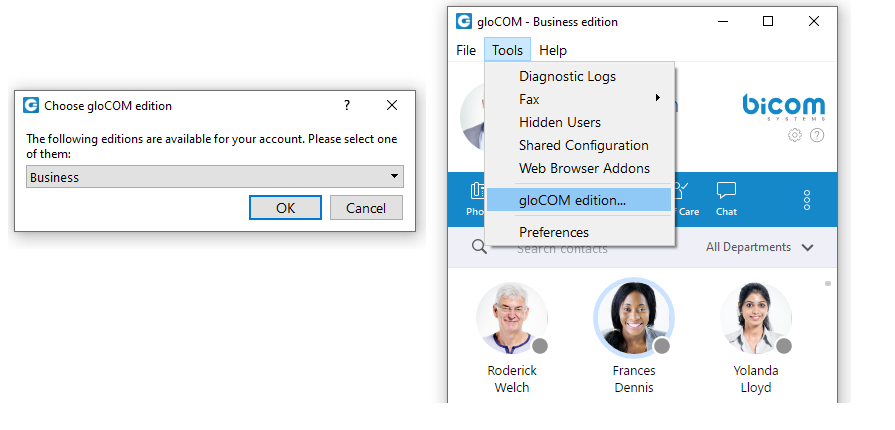
¶ gloCOM edition...
- Change the gloCOM edition.
- Changing gloCOM editions is not possible in case if Shared configuration is enabled.
¶ Preferences
Click on Preferences to open gloCOM settings. For more about preferences, please visit the Preferences chapter.

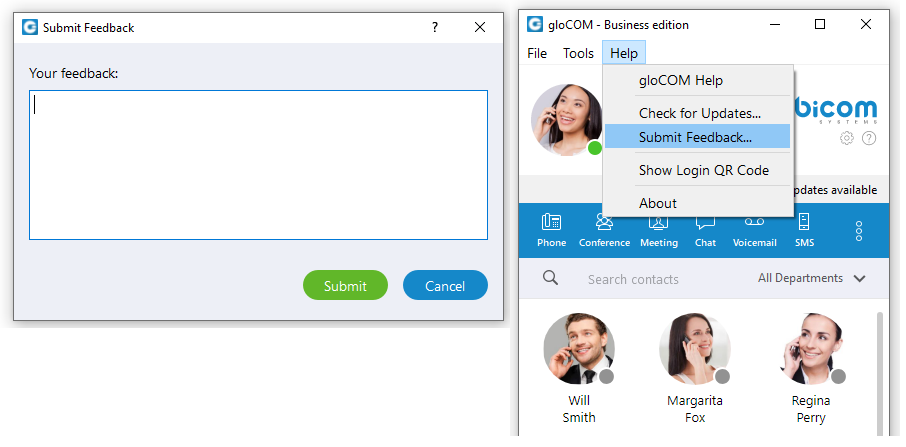
¶ Help
¶ gloCOM Help
- Redirect to our official website [http://www.bicomsystems.com/ www.bicomsystems.com].
- Additional documentation and guides are available on our official website: [http://www.bicomsystems.com/ www.bicomsystems.com]. If you still have any questions, please feel free to contact our support department.
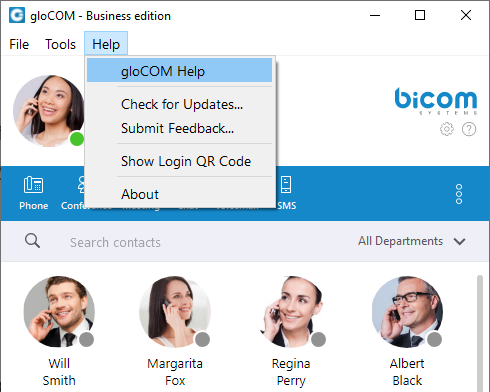
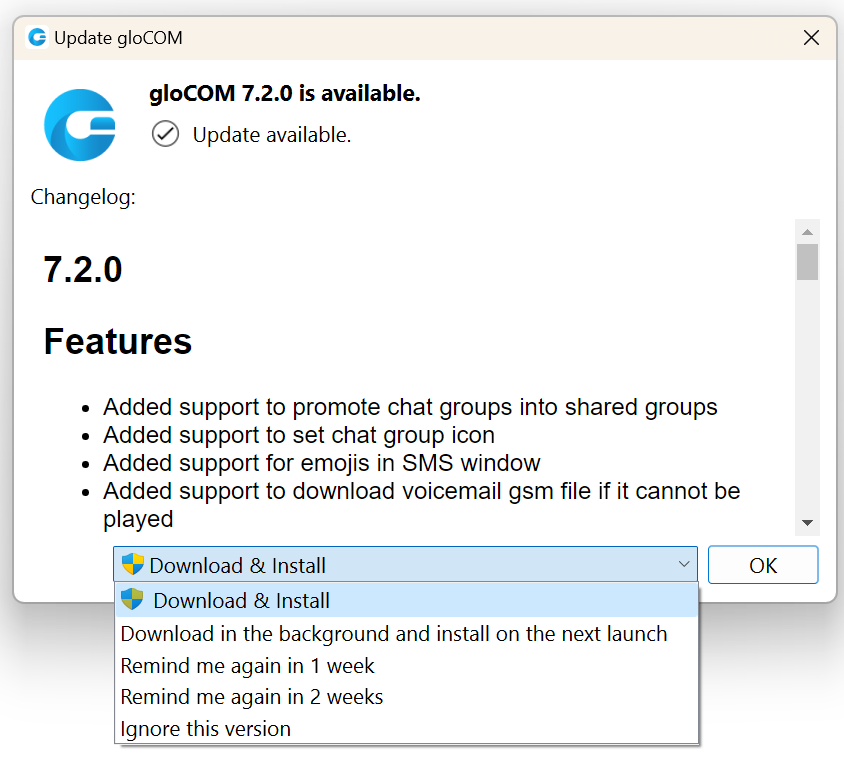
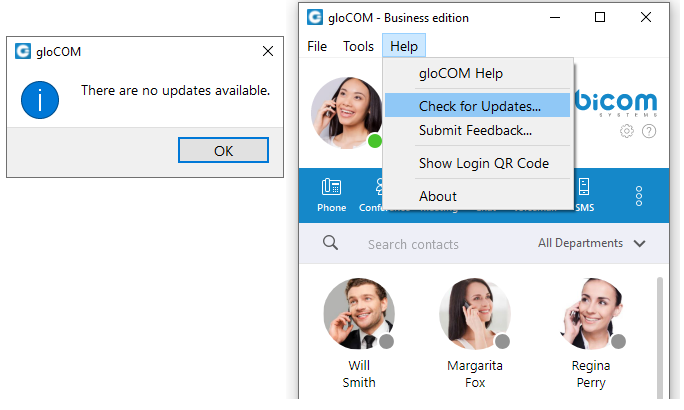
¶ Check for updates
Check online for the official product update.
If available, the gloCOM application will offer the user to select one of the following options:
- Download & Install: This will download and install it immediately.
- Download in the background and install on the next launch: This will download it in the background and force the installation on the next launch.
- Remind me again in 1 week: This will delay the update for one week.
- Remind me again in 2 weeks: This will delay the update for two weeks.
- Ignore this version: This will ignore the currently available update, and the gloCOM application will ask the user to update again when a new version is available.
If the gloCOM application is up to date, the message "There are no updates available" will be displayed, as shown in the picture below.
¶ Submit Feedback
- User can now easily send feedback from the Help --> Submit Feedback...
¶ Show Login QR Code
- Show Login QR Code as a part of the gloCOM Desktop allows users easier login to their mobile app by scanning QR Code generated by the gloCOM Desktop app.
- QR Code can be accessed from the Help menu or the three dots menu within the gloCOM Desktop main window.
- Selecting the Show Login QR Code option from one of these menus opens the QR Code window, which will stay open for 15 seconds.

¶ About
- gloCOM About dialog contain information regarding application version, revision, PBX information, libraries, and other important information. Users can easily access/copy and paste info for support if needed.

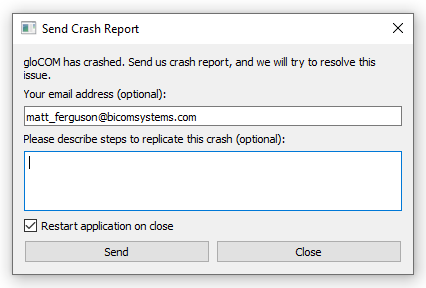
¶ Automatic crash report system.
- When gloCOM crashes, the user has the option to send a crash report for developers to analyze the issue and solve the problem.
Previous: Login
Next: Meeting