¶ Installation
- Visit the official Bicom Systems website at www.bicomsystems.com and download the gloCOM Next desktop app for your operating system.
- Run the downloaded installer and follow the on-screen prompts.
- Review and accept the End User License Agreement (EULA) when prompted to continue the installation.
- Launch gloCOM Next once the installation finishes and proceed to log in.
¶ MSIX installer for Windows
MSIX is a modern way to install desktop apps on Windows.
Windows MSIX installer provides clean installation and uninstallation, automatic updates, improved security through app containerization, and simplified enterprise deployment.
Note: Installation is only required for the gloCOM Next Desktop app. The Web app can be accessed by navigating to the appropriate IP address in your browser.
¶ Logging In
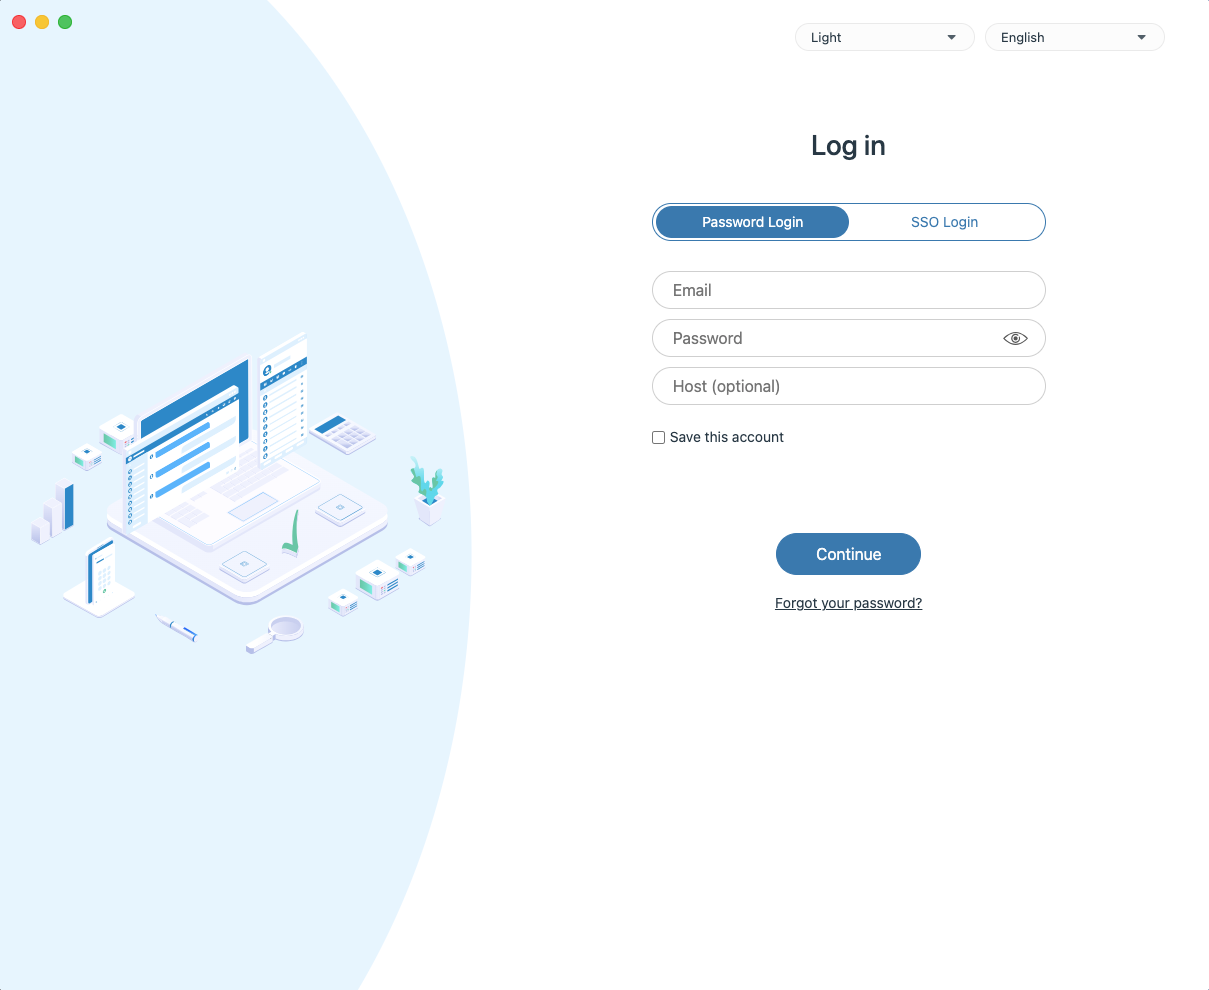
- Open the gloCOM Next application and navigate to the login page. You will see two login options at the top:
- Password Login – Enter your email and password credentials
- SSO Login – Use your organization's single sign-on authentication
Note: For SSO Login to function, it must first be properly configured on the server side.
- Enter your credentials:
- Type your Email address in the first field
- Enter your Password in the second field (click the eye icon to show/hide the password)
- Enter Host (This field does not exist in the web application)
Tip: If you've forgotten your password, click "Forgot your password?" to reset it.
- Click the Continue button to access your gloCOM Next main screen.
¶ Saving Accounts
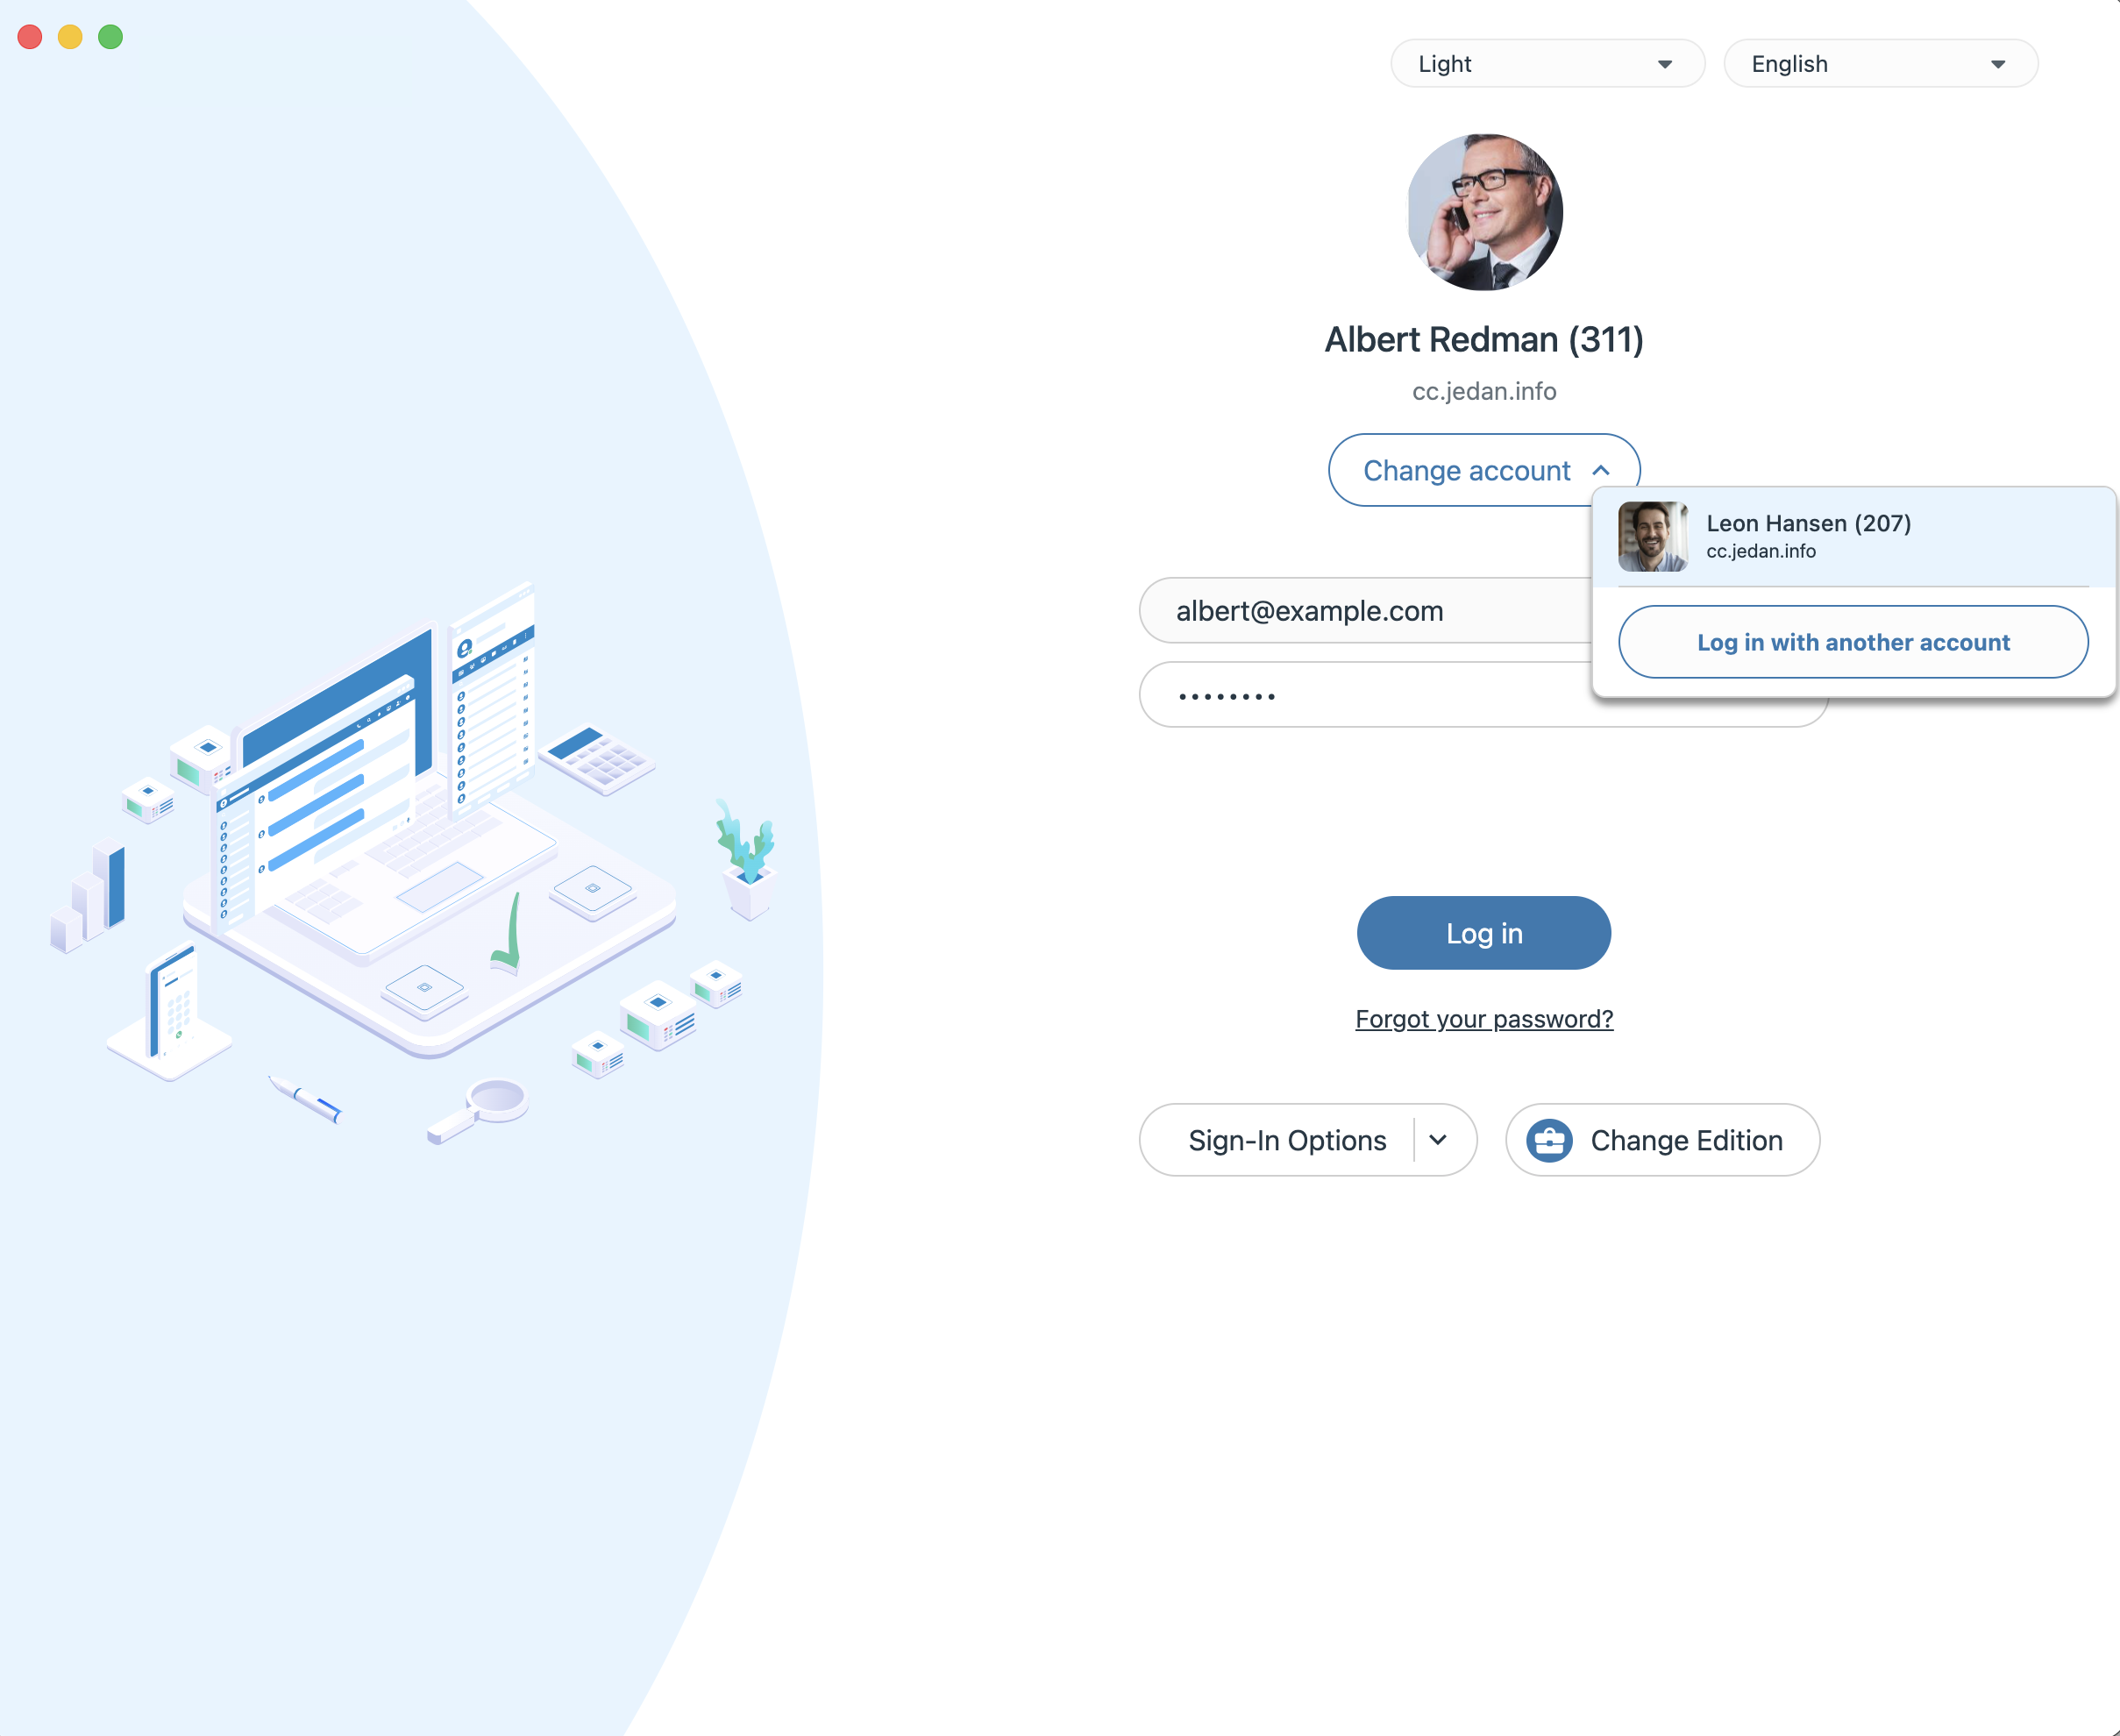
- Check the "Save this account" box on the login screen to remember your credentials for future sessions.
- Saved accounts will be accessible via the Change account dropdown menu.
¶ Two Factor Authentication (2FA)
To set 2FA up, log in to the app, navigate to Online Self Care, click the 2-Step Verification button, and follow the instructions.
Note: The 2FA feature cannot be combined with SSO.
¶ Profile Dropdown
¶ Changing your Profile Picture
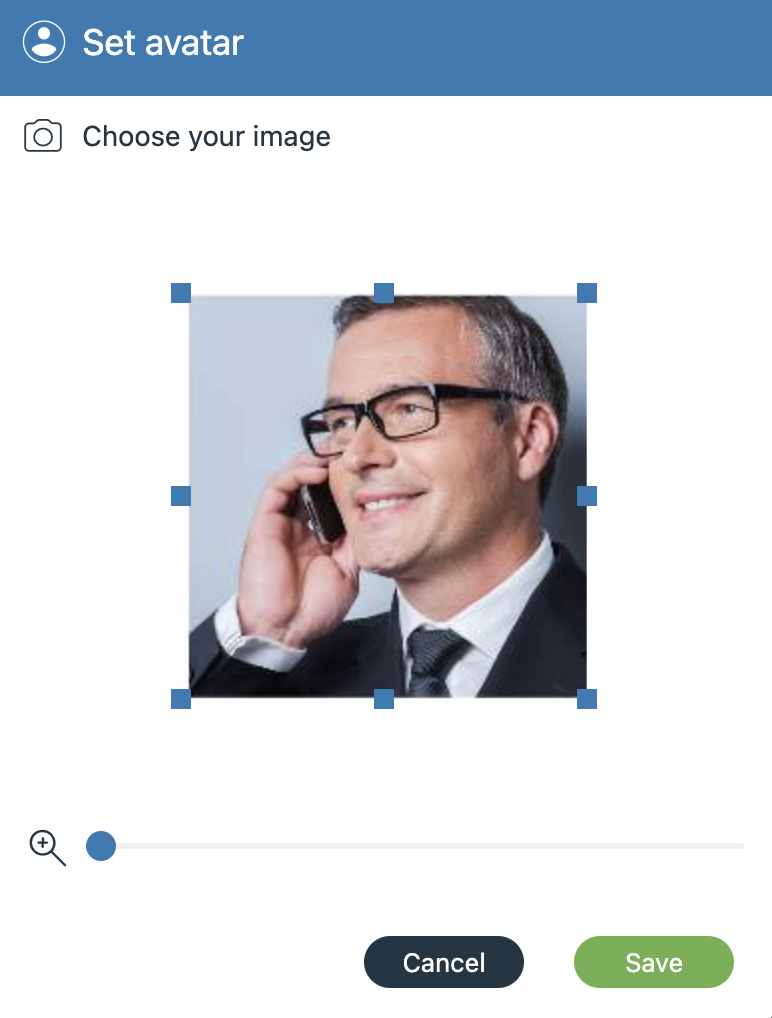
- Click on your profile picture and select “Personal information” from the dropdown.
- Click on your picture within the newly opened screen to open the “Change avatar” dialog prompt,
allowing you to upload a new avatar, reset to the default one, or cancel the action.
¶ Changing your Current Status
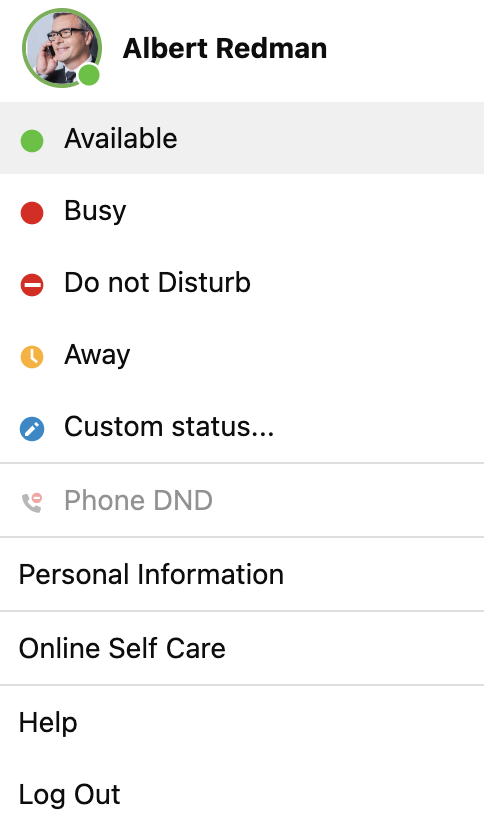
- Click on the "Status" indicator within the profile picture.
- Select a corresponding status from the options given in the newly opened status dropdown menu.
¶ Phone DND
- Select Phone DND from the profile dropdown to toggle "Do Not Disturb" for your telephony services. When enabled, a status indicator will appear in the top bar of the application.
- Click the Switch to available button within the indicator to change your status back to available.
¶ Accessing Online Self Care
- Selecting the Online Self Care option will automatically open a new tab in your web browser. To access the portal, you will be required to enter your credentials to log in securely.
¶ Navigation Menu Customization
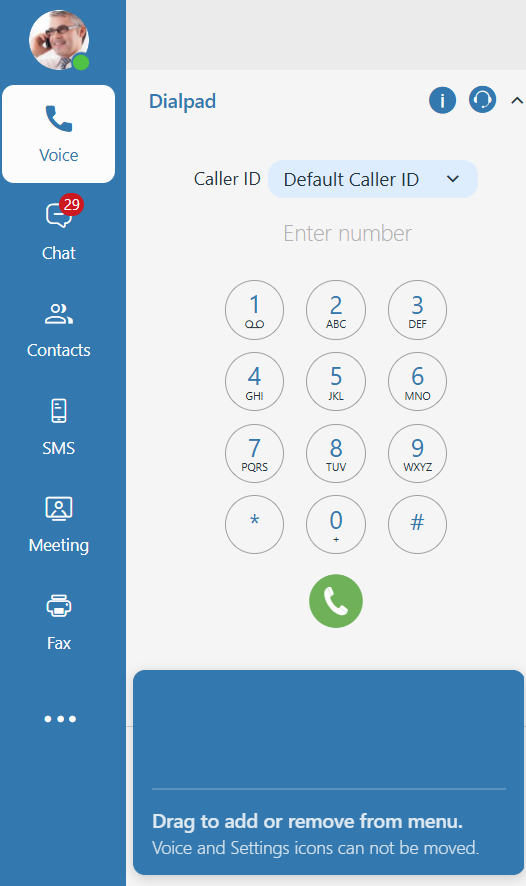
The “Navigation Menu Customization” feature lets users personalize the left sidebar by choosing which tabs appear and in what order, based on their preferences and the features enabled in their extension.
Users can drag tabs within the tray to reorder them, drag a tab into the navigation to add it, or drag it out to remove it. The Voice icon is always pinned as the first item, and the Settings icon is always pinned at the bottom of the navigation bar — neither can be moved or removed. Notification badges remain visible and continue to update live on tabs both inside the tray and after being repositioned in the navigation.
¶ Calls
¶ Establishing a Call
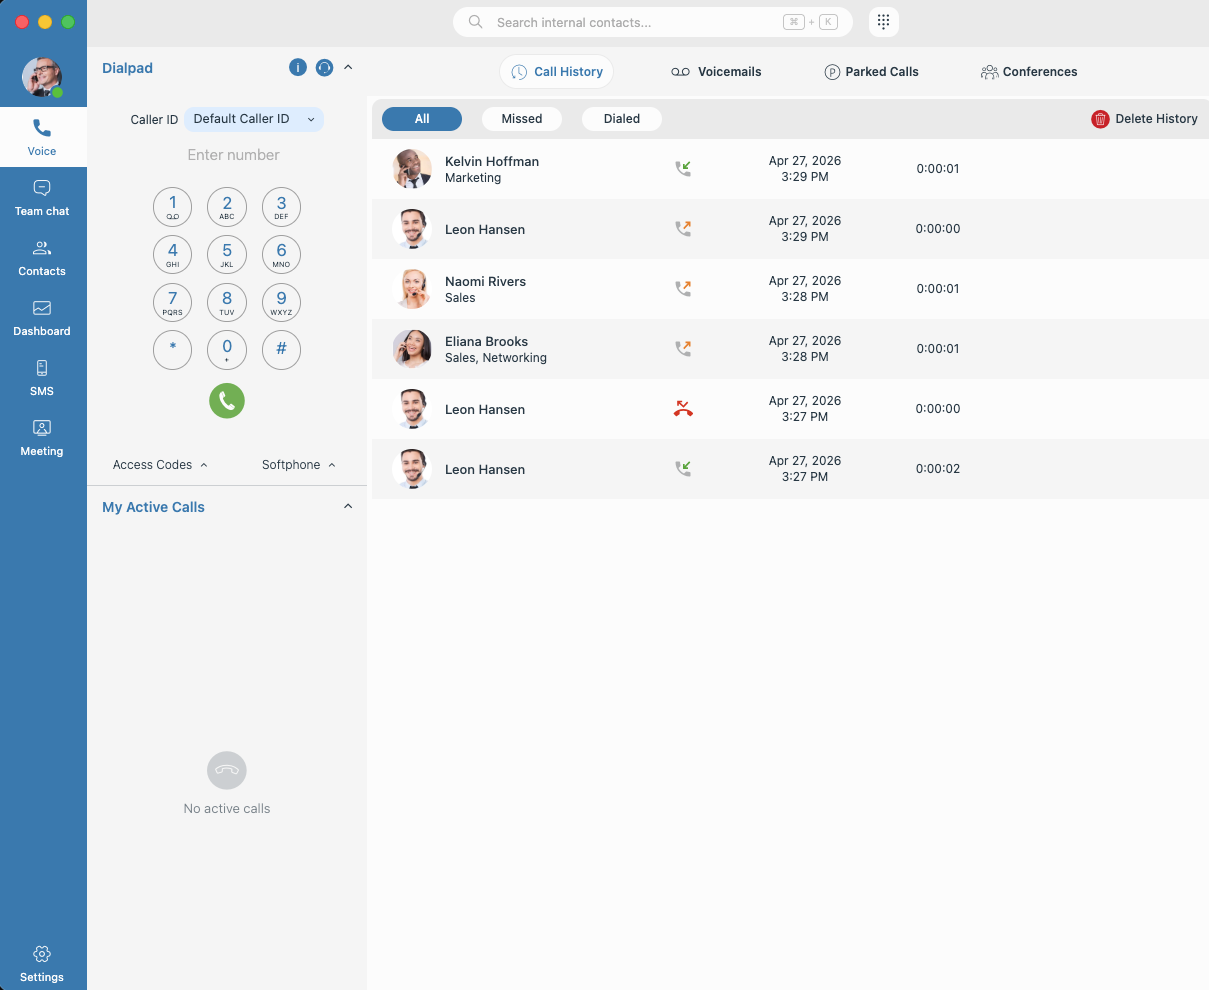
- Go to the Voice tab for full access to the dialpad and your call history.
- Tap the dialpad icon at the top for a quick-entry popup to dial a single number instantly.
¶ Quick Call
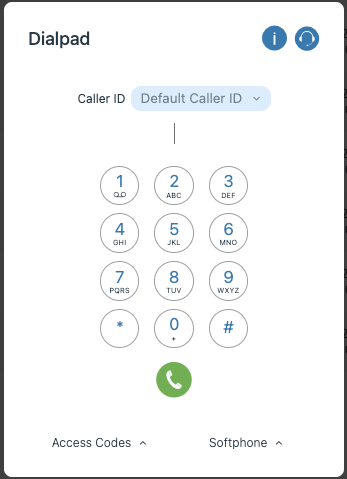
A dialpad popup is available on the top bar, allowing for quicker access to the dialpad from every tab in the application.
- Click on the dialpad popup from any tab in the application.
- Enter the desired number and initiate the call instantly.
¶ Change Caller ID
- Access via Dialpad: Open the dialpad from the Voice tab or via the Dialpad popup.
- Click on the Caller ID dropdown menu located directly above the number input field.
- Select the desired phone number or name from the list of available identities assigned to your account or hide the Caller ID.
Note: If this functionality is not enabled for your extension on the server, the option will be disabled.
¶ Adding People To An Existing Call
To bring more people into your existing call:
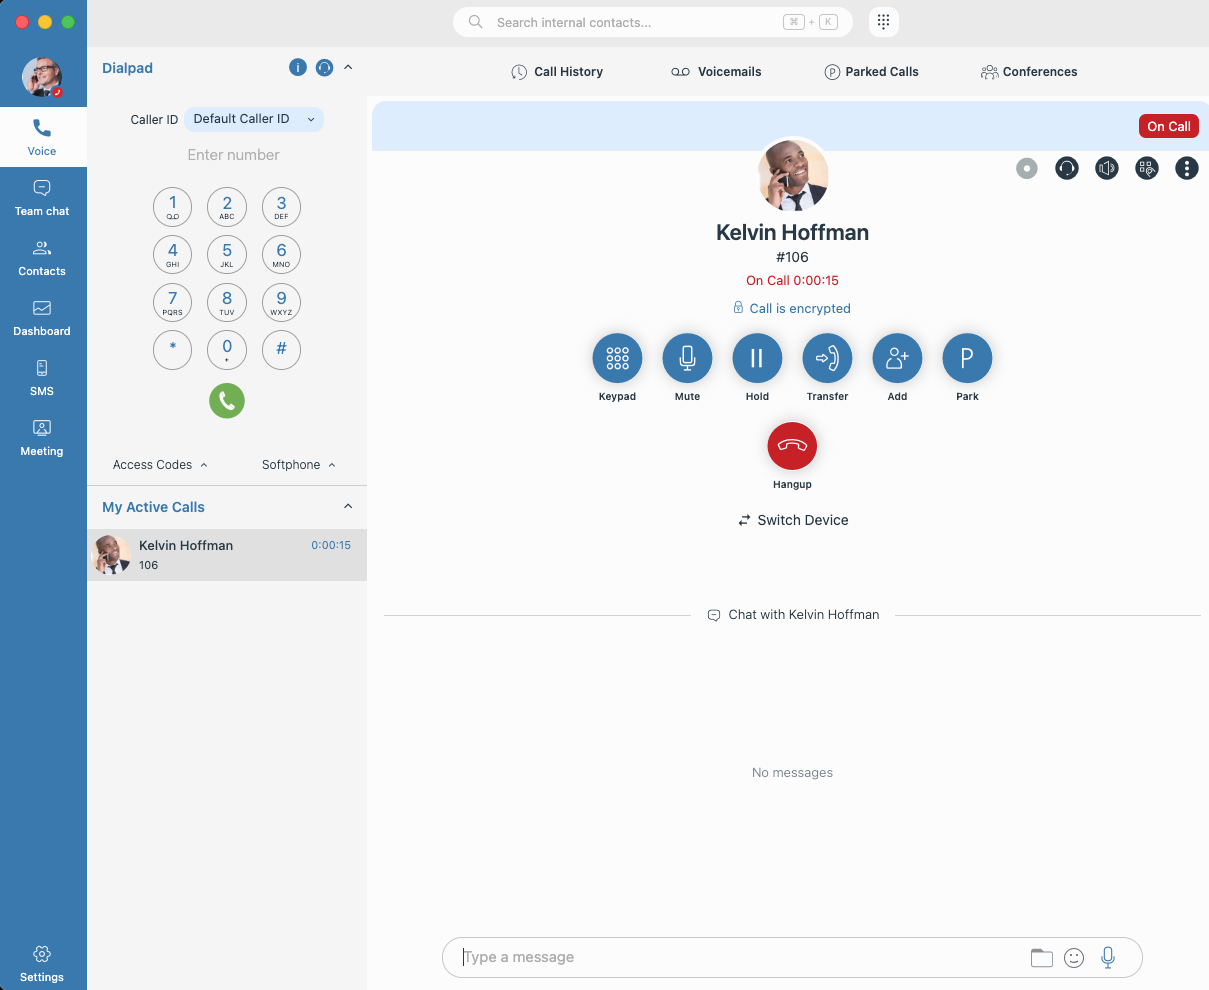
- Click the "Add" button.
- Use the input field to select the contacts you want to include.
¶ Transferring A Call
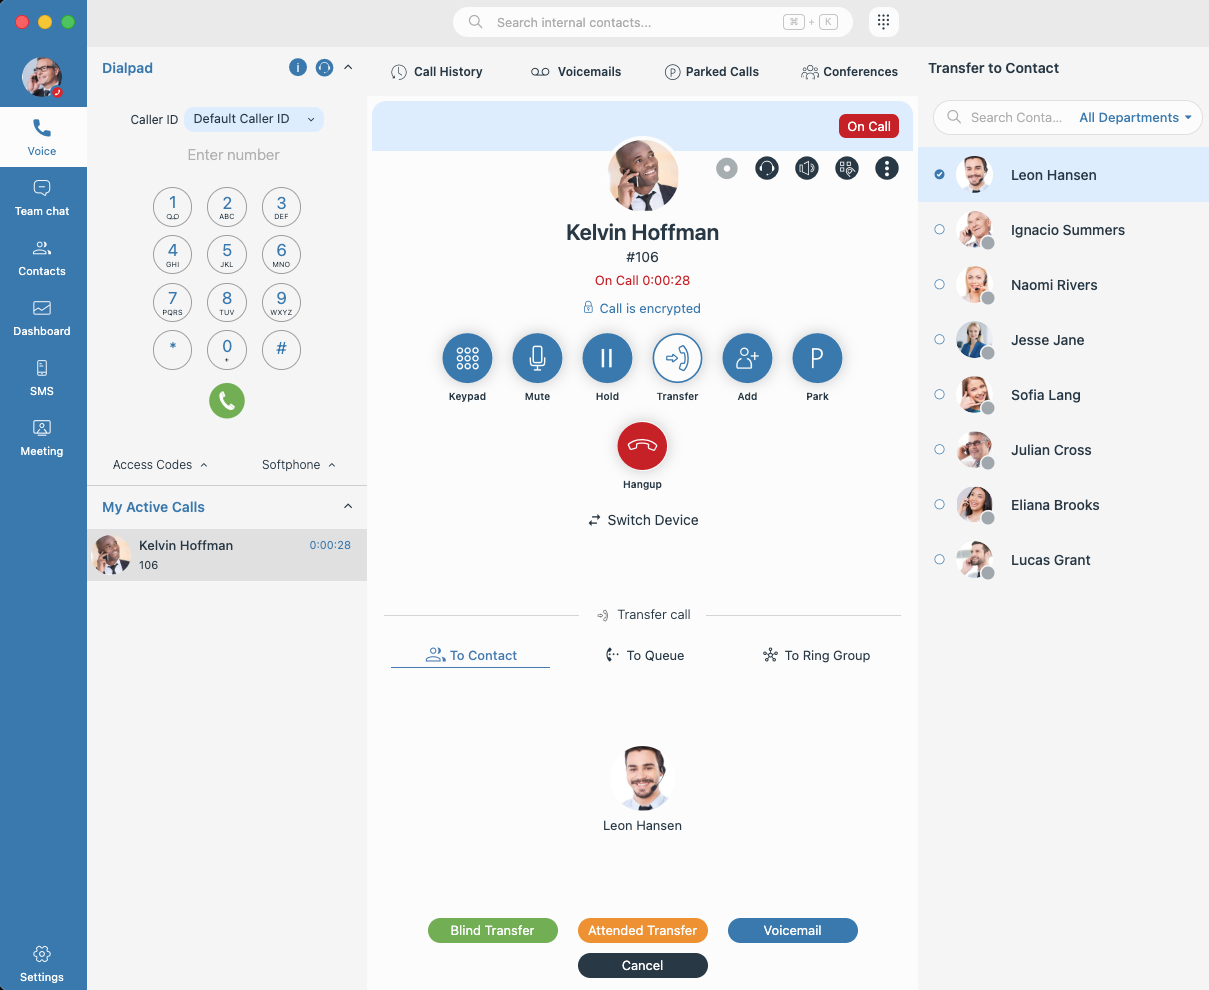
- To transfer a person in a call over to another, click on the “Transfer” button which will bring
the “Transfer” dialog box up. - Select the desired transfer option from the fields available from the dropdown menu, choosing between:
- A contact or phone number that you can manually input or search for
- An existing queue chosen from a list
- Existing ring groups
- After inputting everything, choose between a blind or attended transfer, or simply transfer the
person directly to voicemail.
¶ Call Pickup
Call Pickup lets you answer a call that is ringing on a colleague's extension, directly from your own gloCOM Next. When a contact is ringing, the Call Pickup option appears — one click redirects the call to you. It works for both internal and external inbound calls.
Note: Call Pickup is available only if the Call Pickup Enhanced Service is enabled for your extension on the PBX. If the service is enabled or disabled while you are logged in, the change takes effect after you log in again.
¶ Picking Up a Call
You can pick up a ringing colleague's call from two places:
- Internal contacts tab: when a contact shows the Ringing status, right-click the contact and select Call Pickup from the context menu.
- Main search bar: search for the ringing contact, click the ... (additional options) button on the result, and select Call Pickup.
The ringing stops on your colleague's extension and the call is connected to you immediately. For external calls, your call screen shows the original caller's number — you always see who you are talking to.
Note: The Call Pickup option appears only while the contact is actually ringing. It is not shown for contacts who are idle or already on a call.
¶ Call History
After a pickup, your call history shows the call as an outgoing entry to *88 followed by the extension number you picked up (for example, *88109). The colleague whose extension was ringing does not see the call in their history — it was never their call.
Tip: Call Pickup uses the
*88<extension>access code under the hood. Dialing it manually from the dialpad works too — the menu option is simply the convenient way.
¶ Good to Know
- Check your active device. Call Pickup places a call from your currently selected device. If your device is set to Deskphone but no deskphone is connected, clicking Call Pickup will appear to do nothing — switch to Softphone in the status menu and try again.
- If the ringing stops just before you click (the caller hung up or the call was diverted), nothing happens — no call is placed and nothing is misrouted.
- Each extension has at most one ringing call at a time, so Call Pickup always takes exactly the call you see ringing.
¶ Drag to Transfer
An alternate method of call transfer is to click on the icon of the user currently in the call
and drag them over to the person you want to transfer them to. There, an overlay will appear with the “Blind” and “Attended" options where you can drop them over your desired transfer method.
¶ Switching Device During a Call/Calling From a Different Device
-
During an Active Call: To switch the call to another device, click the Switch Device button, and select your desired endpoint. The call automatically transfers and rings your new device.
-
Before You Dial: Open the Dialpad popup, click the Switch Device button, and use the device dropdown to select which device you want the call to originate from.
¶ Call Quality Metrics
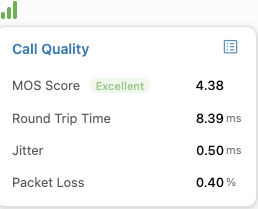
gloCOM Next displays live call quality information during every call, giving you instant insight into how your connection is performing. The metrics update continuously throughout the call, so you can spot network issues as they develop — without leaving the call screen.
¶ Viewing Call Quality
- During an active call, locate the Call Quality indicator on the call screen.
- Click the indicator to expand the Call Quality panel and view the detailed metrics.
- The panel refreshes automatically for as long as the call is active.
¶ Understanding the Quality Rating
The overall rating is based on a MOS (Mean Opinion Score) — the telecom industry's standard measure of voice quality, calculated using the industry-standard E-model. The rating and its color give you an at-a-glance summary:
| Rating | MOS | Color |
|---|---|---|
| Excellent | 4.3 and above | Green |
| Good | 4.0 – 4.29 | Green |
| Fair | 3.6 – 3.99 | Orange |
| Poor | 3.1 – 3.59 | Red |
| Bad | below 3.1 | Red |
Note: The terminology, thresholds, and colors are fully aligned with the gloCOM Desktop application, so you get a consistent quality-monitoring experience across both apps.
¶ Understanding the Metrics
Alongside the overall rating, the panel breaks down the network statistics that shape your call experience:
- MOS: The overall voice quality score, from 1 (worst) to 5 (best). Values above 4.0 indicate a call most users perceive as good or excellent.
- Latency: The time it takes for your audio to travel across the network, in milliseconds. High latency (above ~300 ms) makes conversations feel delayed and causes participants to talk over each other.
- Jitter: The variation in packet arrival time, in milliseconds. High jitter can cause audio to sound choppy or robotic.
- Packet Loss: The percentage of audio packets lost in transit. Packet loss is the most common cause of poor call quality — even a few percent causes audible dropouts and degraded audio.
Note: The quality rating reflects the stream you are sending — in other words, how the other party hears you. If the other person sounds bad to you but your indicator shows Excellent, the network issue is on their side of the connection, and their own indicator will reflect it.
¶ Troubleshooting with Call Quality Metrics
When a call doesn't sound right, the metrics help you identify the cause:
- High packet loss usually indicates network congestion or an unstable connection (e.g., poor Wi-Fi signal). Try moving closer to your access point or switching to a wired connection.
- High latency often points to a slow or overloaded network path (e.g., VPN routing, saturated uplink).
- High jitter typically appears on congested or wireless networks. A wired connection usually resolves it.
- If your metrics look clean but the call still sounds poor, ask the other party to check their Call Quality indicator — the issue is likely on their side.
Tip: When reporting a call quality issue to your administrator or support team, include the values shown in the Call Quality panel (MOS, latency, jitter, packet loss). This objective data significantly speeds up diagnosis.
¶ Remote DTMF (PCI Compliance)
Remote DTMF enables secure entry of sensitive information (e.g. payment card details) during a call. Instead of speaking the data, the caller enters digits using their phone keypad, which are then inserted directly into the active input field on the agent's device.
Note: DTMF tones are audible during the call but are not included in call recordings.
Note: Available only in the Desktop app (macOS and Windows). Not supported on Web or Linux.
¶ Enable and Use
- During an active call, click the Remote DTMF icon in the call controls.
- Place your cursor in the desired input field (e.g. payment form).
- Ask the caller to enter digits using their phone keypad.
Digits are inserted directly where the cursor is positioned. Only numeric digits (0-9) are supported.
¶ Session Indicator and Control
- When enabled, a red banner indicates that Remote DTMF is active
- You can stop it by:
- Clicking the Remote DTMF icon again
- Clicking the Stop button in the banner
- Ending the call
¶ Viewing Entered Digits
- Open the Dialpad during the call to view received digits
- Digits are shown for verification only and are not retransmitted
¶ Behavior and Limitations
- Only one active Remote DTMF session at a time
- Activating it on another call disables the previous session
- Automatically cleared when the call ends (including transfers)
- No digits are stored after the call
Note: This feature is intended for secure handling of sensitive data and helps prevent exposure through call recordings.
¶ macOS Accessibility Requirement
Remote DTMF requires Accessibility permission on macOS.
- On first use, you will be prompted to grant access
- If not granted, the feature remains disabled
- After granting permission, it can be enabled normally
If permission is revoked during an active call:
- Remote DTMF is automatically disabled
- A warning notification is shown
¶ Creating a Conference Call
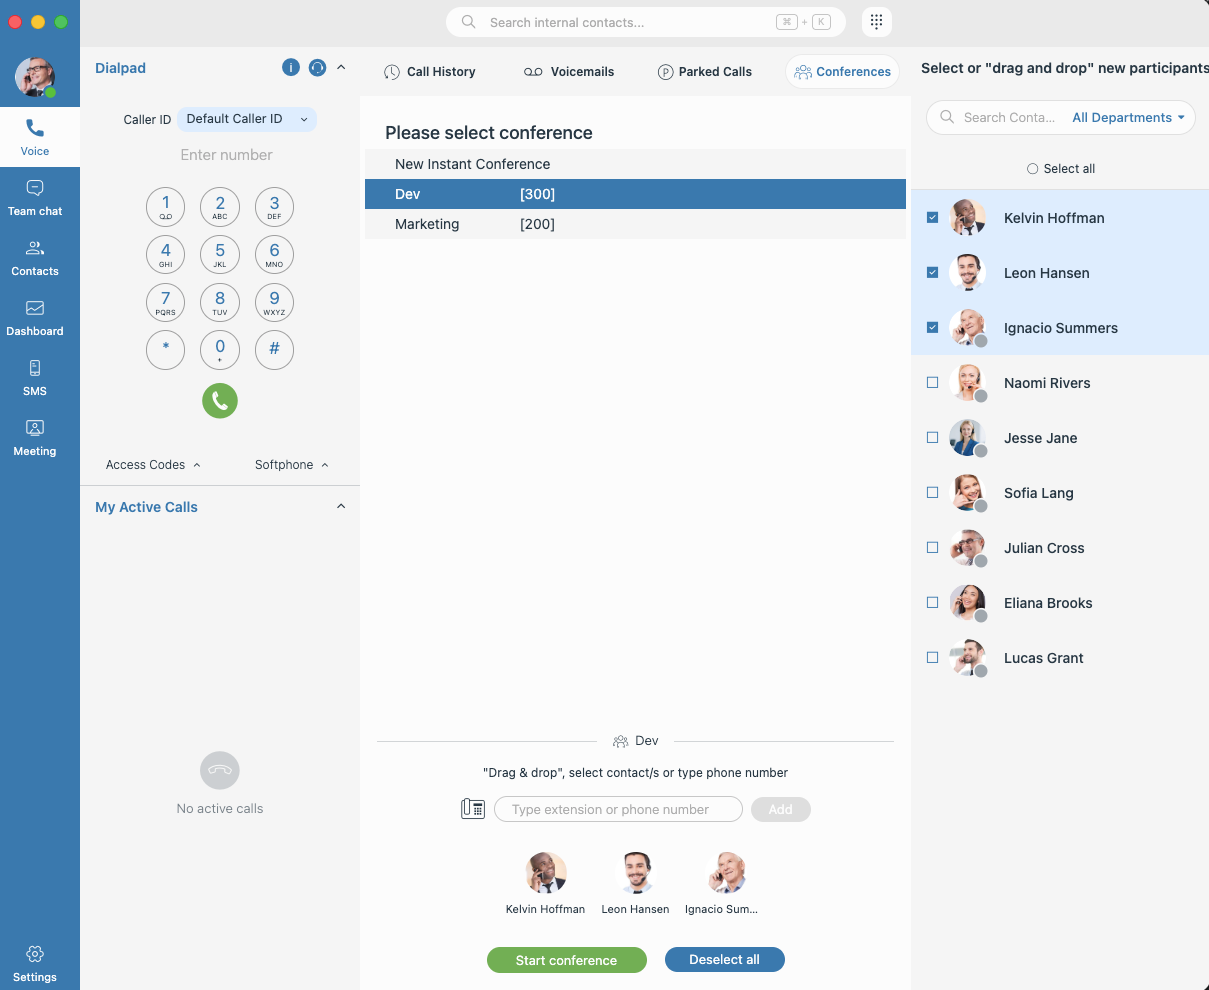
- Navigate to the Voice tab and click the Conferences button to open the Conferences screen.
- Choose either "New Instant Conference" or select a Static Conference room from the list provided.
- Add one or more participants either from your contact list (to Add External Contacts, select External Contacts from the dropdown menu to filter the list accordingly) or by typing the extension or phone number in the provided field.
- Click the Start Conference button.
¶ Parking a Call
- During an active call, click the Park button to open a dropdown menu and select a specific parking lot to place the call in.
- Once a call is parked, anyone can pick it up by pressing the Pick Call button next to the parked call or dialing the number of the parked extension.
¶ Checking Voicemail
- Navigate to the Voice tab and select Voicemails from the top menu to view your messages.
- Toggle between the New and Old sub-tabs to organize your received voicemails.
- Use the control bar at the bottom to interact with a selected voicemail.
Voicemails marked as urgent are shown with a red exclamation-mark icon and are always listed at the top of the New tab, so the most important messages stand out. If an urgent voicemail is moved to Old and then back to New, it is no longer marked urgent.
¶ Fax
gloCOM Next now supports fax functionality, allowing users to send, receive, and manage faxes directly from the application.
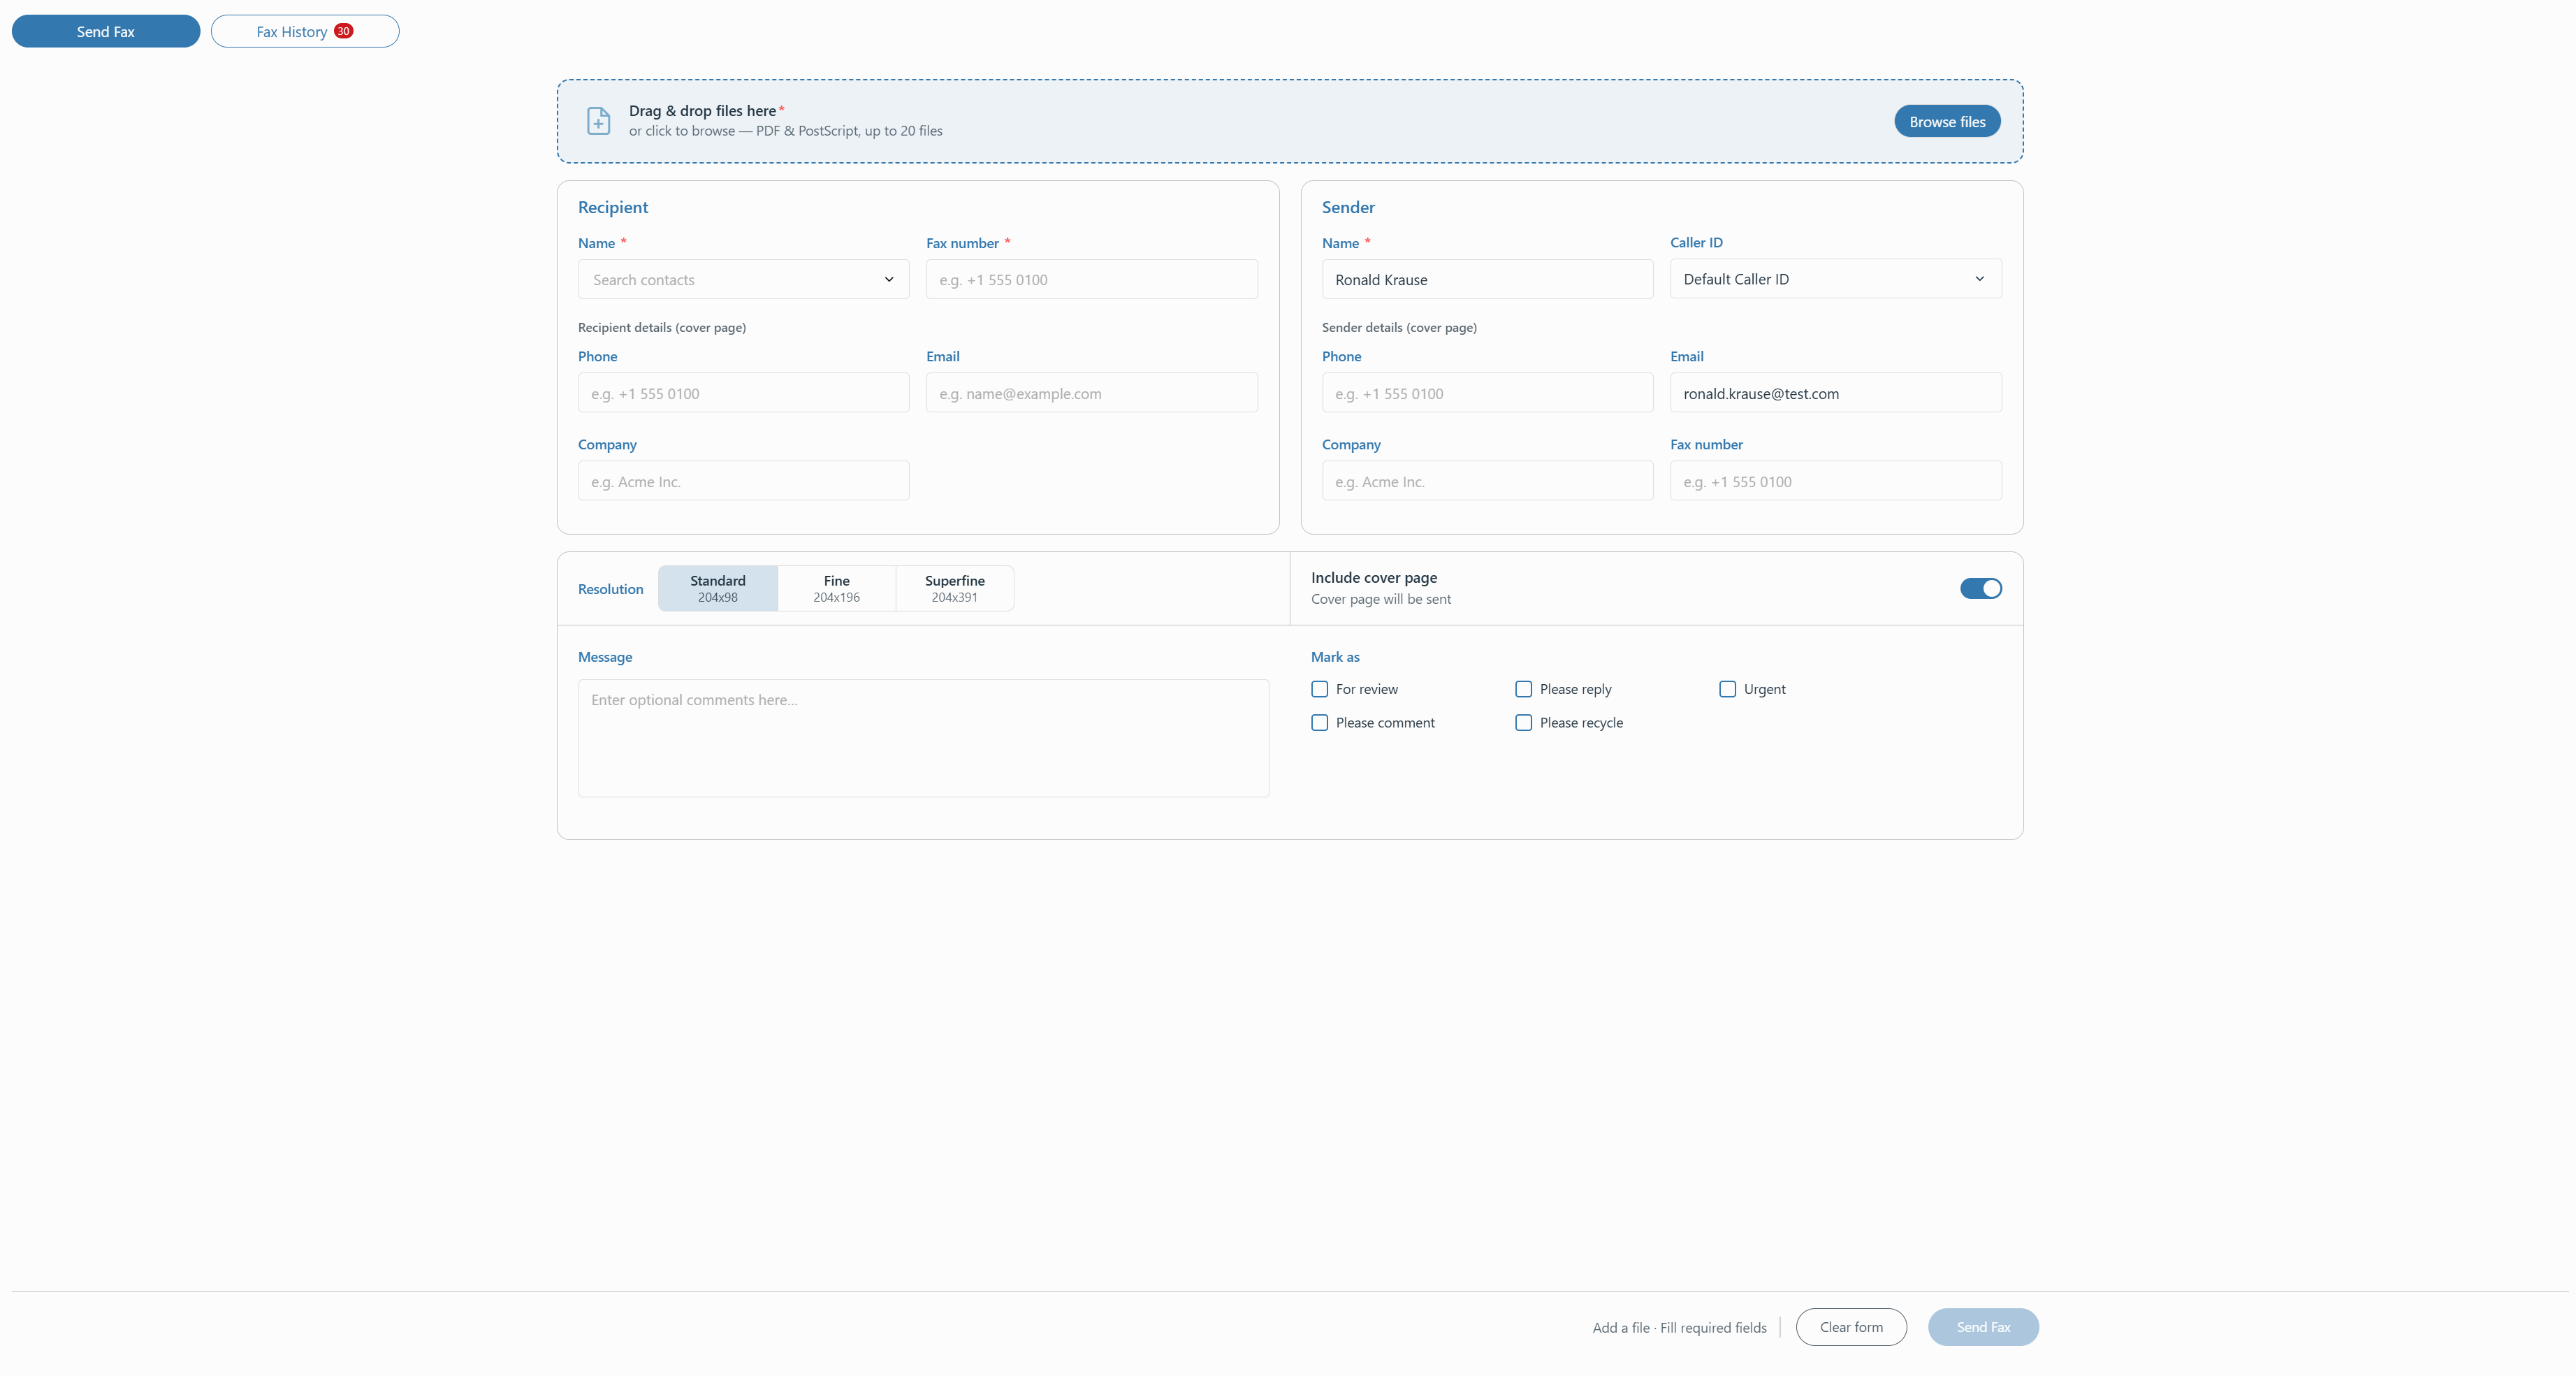
Users can send supported fax documents (.pdf, .ps, and .eps files) from the new Fax module, enter recipient and sender information, select the appropriate Caller ID and resolution, and optionally include a cover page with additional details and a custom message. The sending process provides real-time progress information and clearly indicates whether individual fax documents were successfully sent or failed.
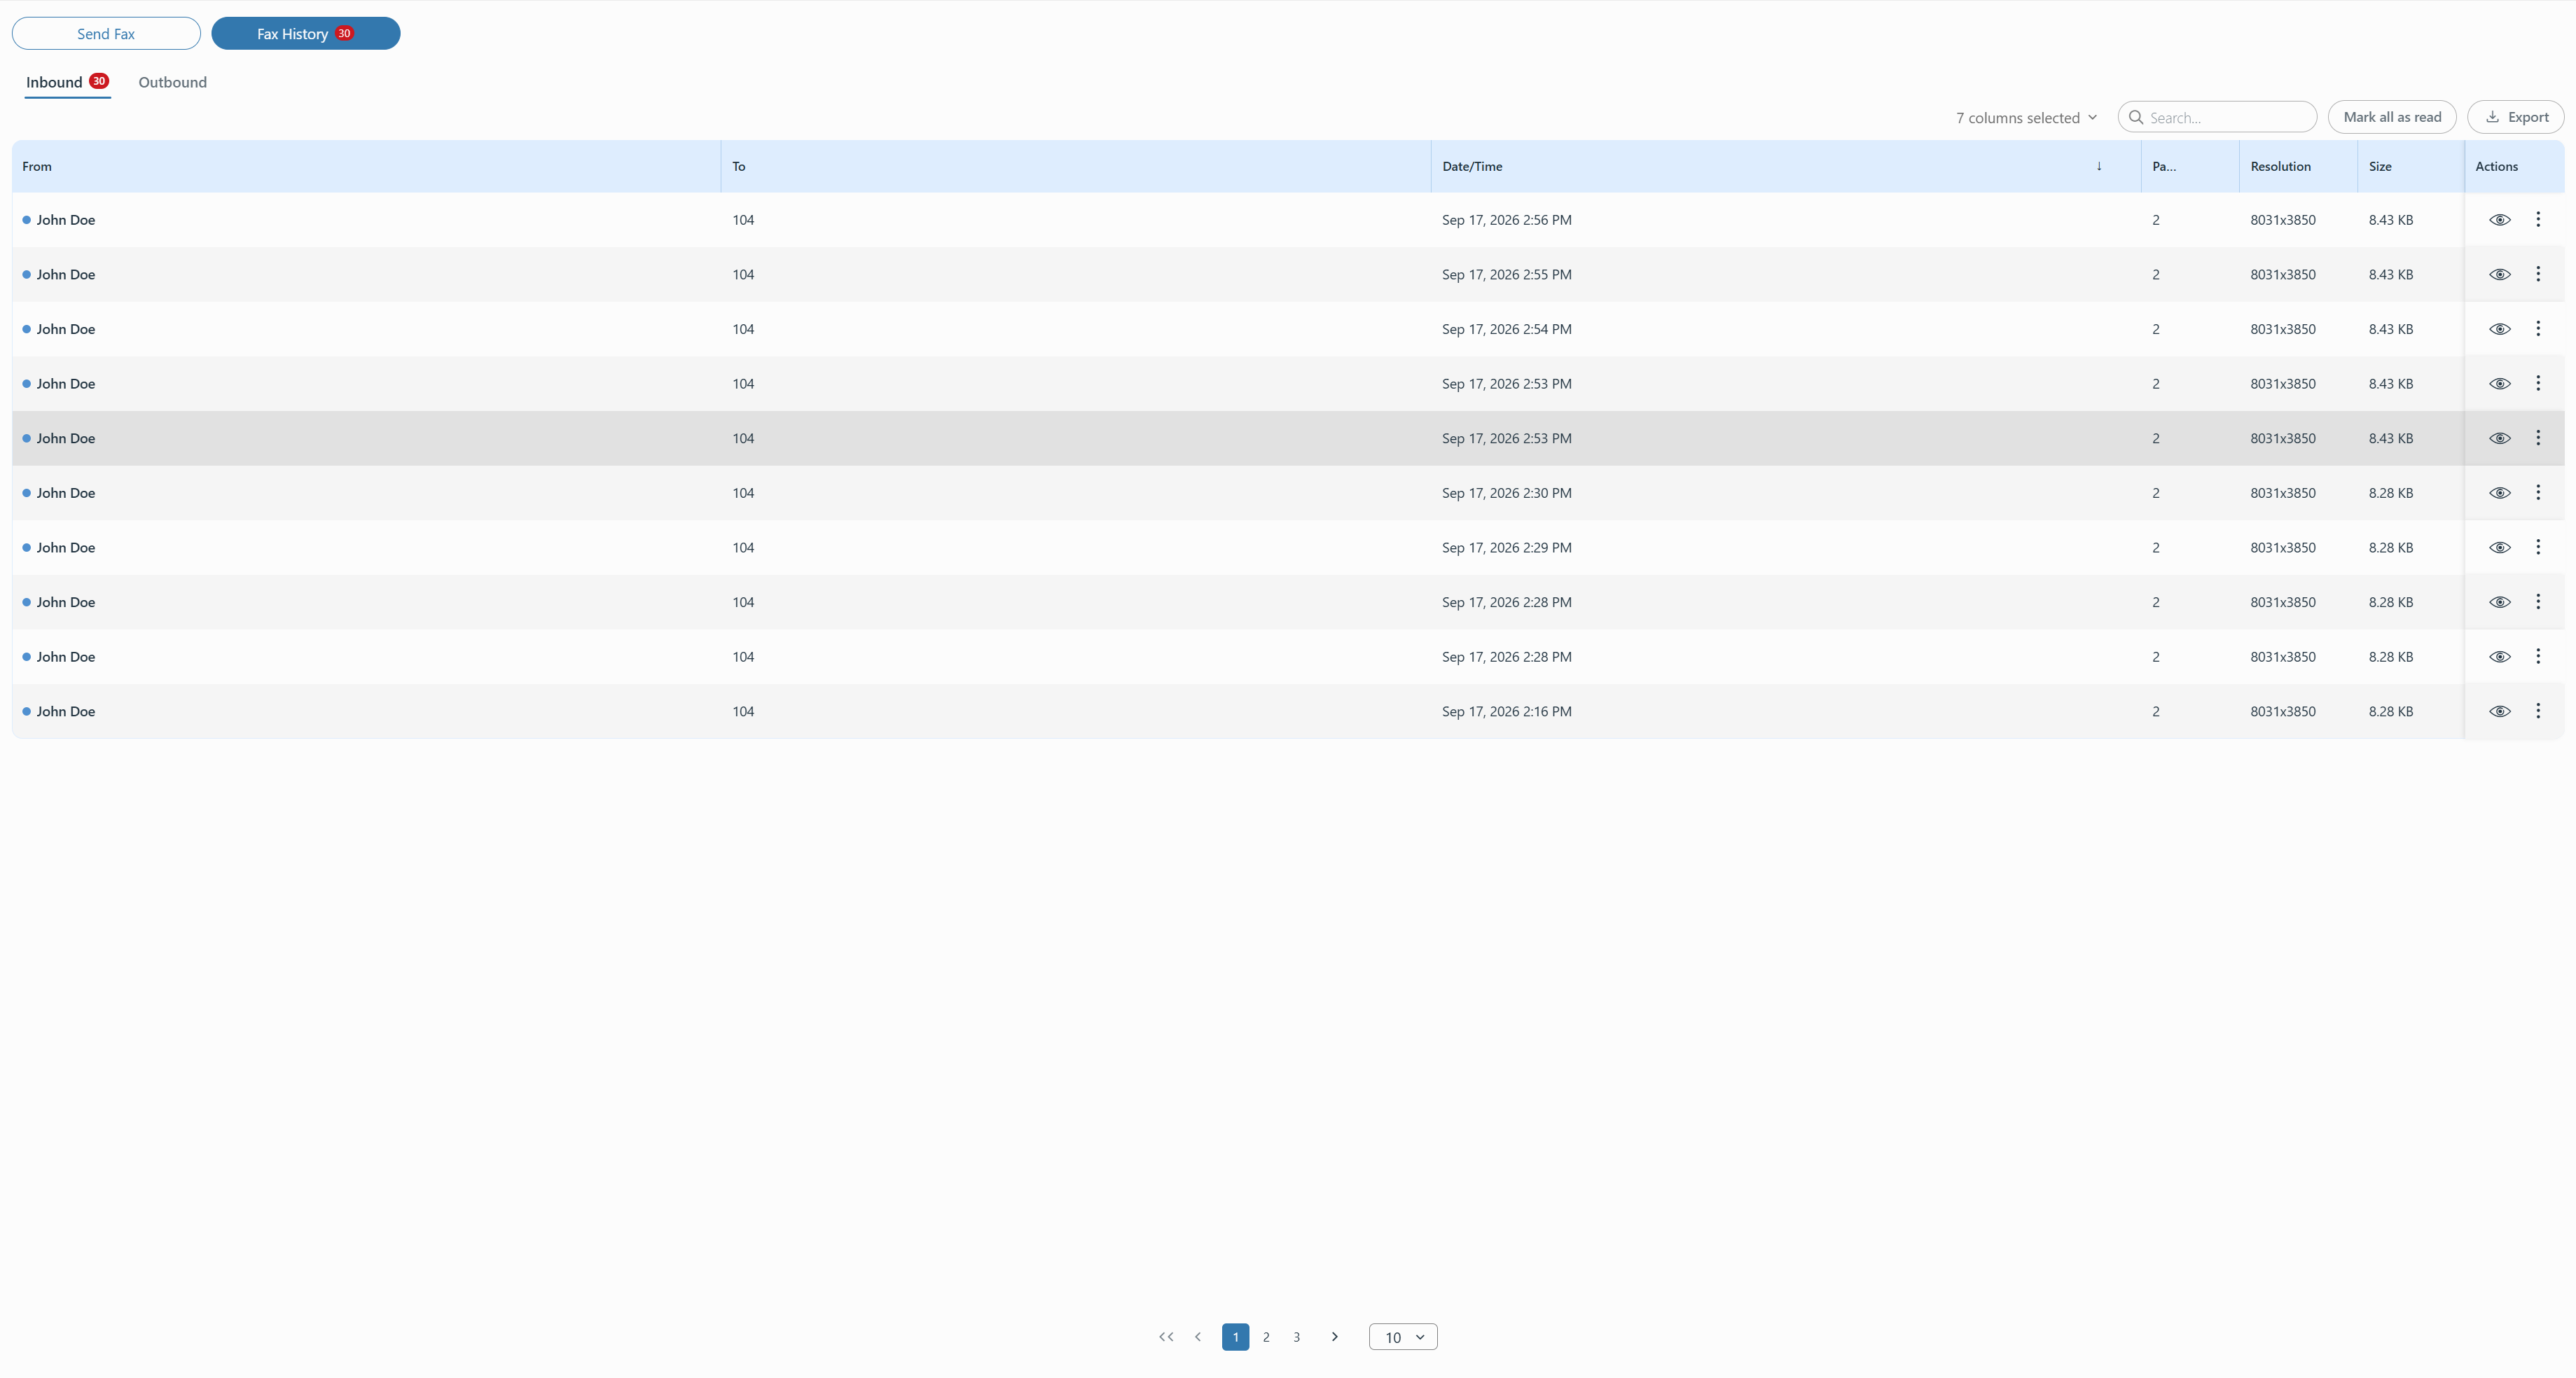
Received faxes are available in Fax History, with notifications that inform users when a new fax arrives. Fax History provides separate views for inbound and outbound faxes, along with search, filtering, sorting, and actions to view, download, print, or resend faxes when applicable.
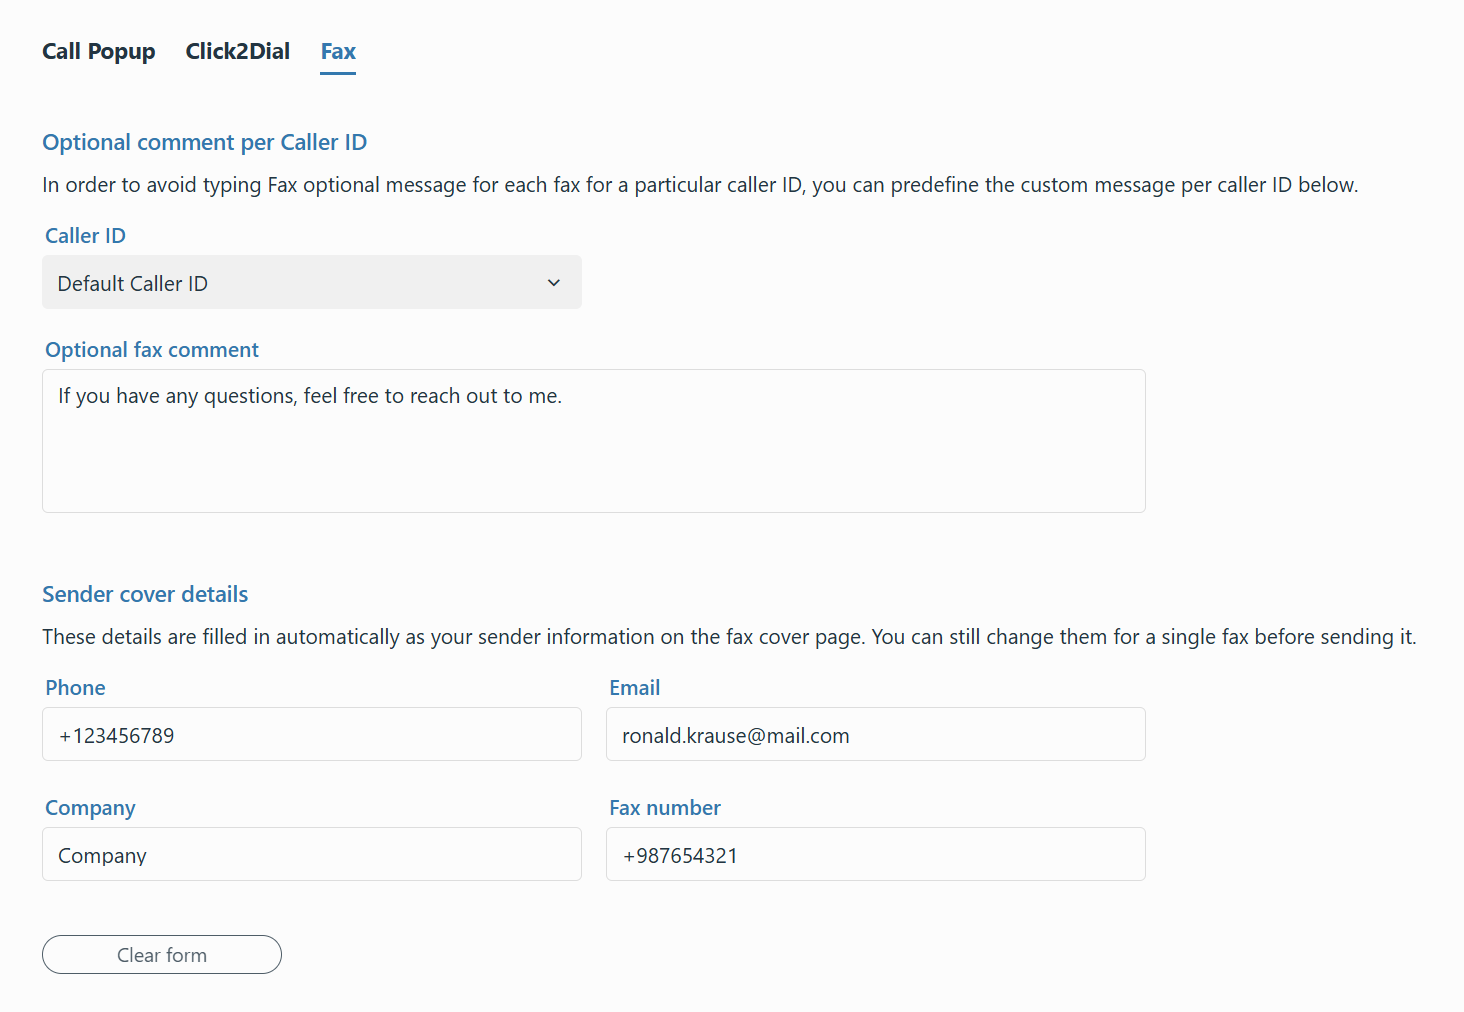
The fax settings page, accessible via Settings → Modules → Fax, allows users to predefine a custom comment per Caller ID that is automatically applied when sending a fax, and to set default sender cover page details — Phone, Email, Company, and Fax number — which can still be overridden before sending an individual fax.
¶ Team Chat
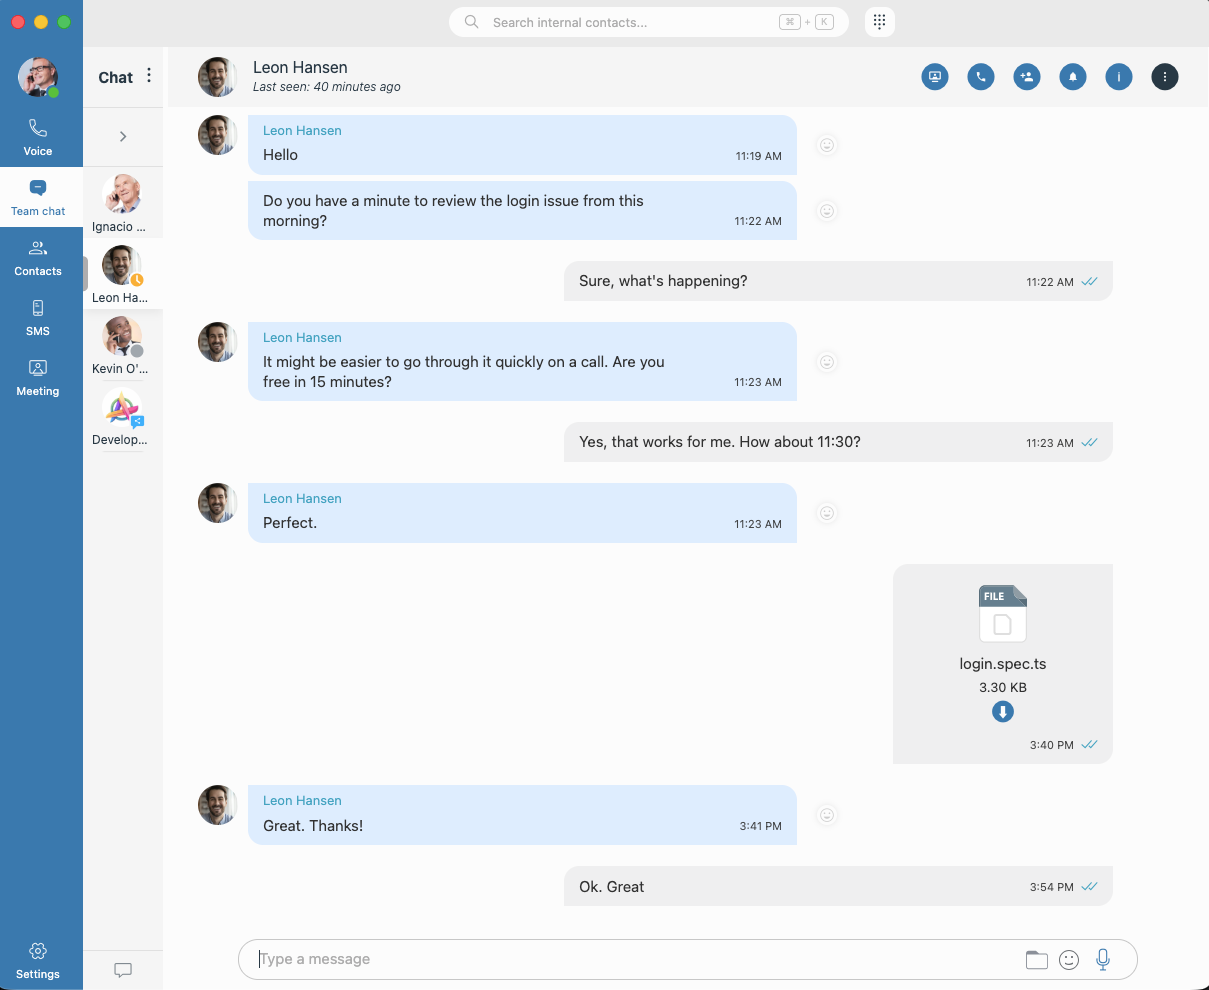
Click the Team Chat icon in the navigation bar to view your active conversations.
¶ Chat Search
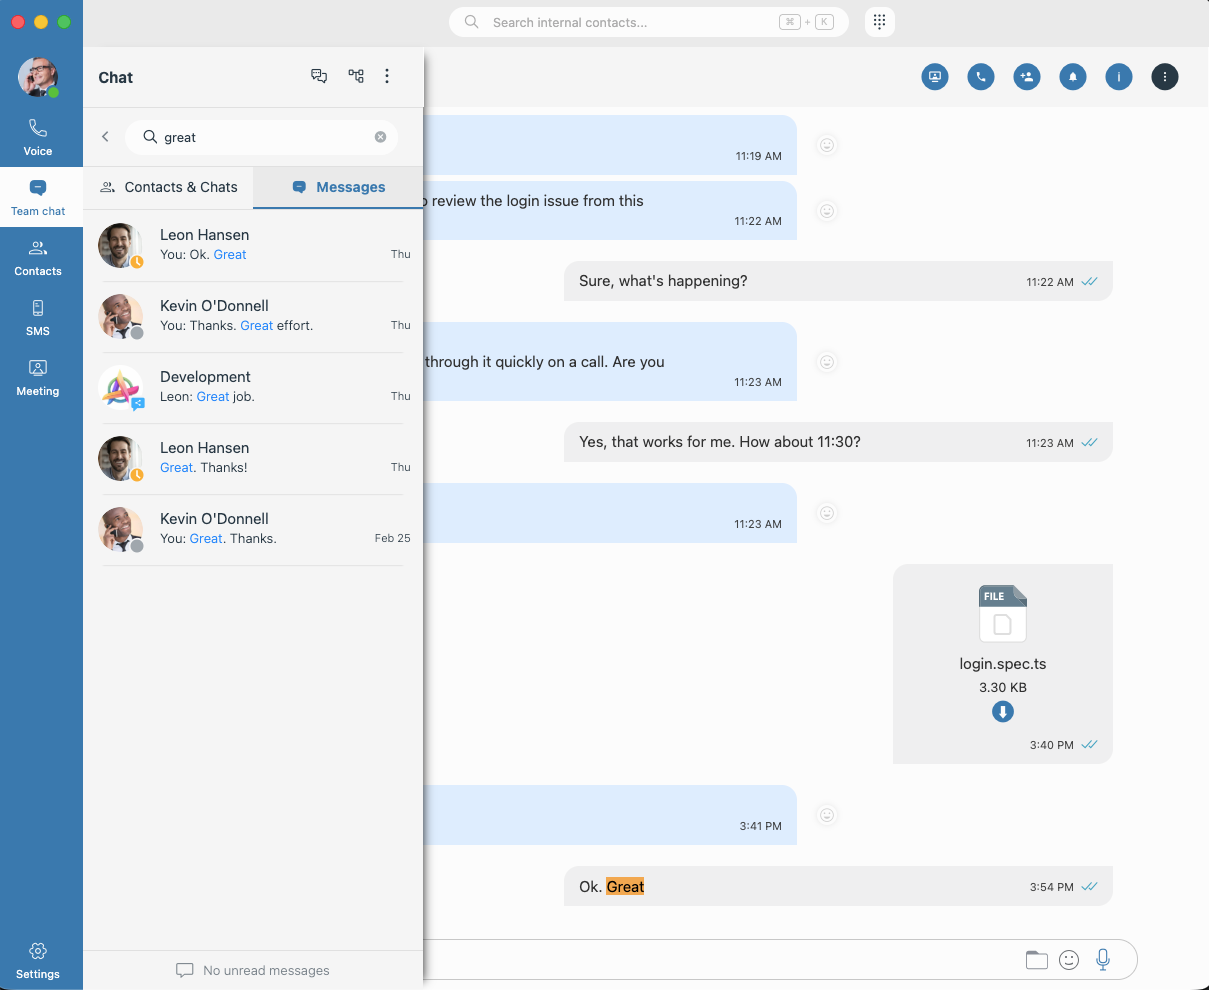
Use the search bar to find conversations by contact name or to search within message content. Results are separated into Contacts & Chats and Messages tabs.
Tip: Wrap your search term in double quotes (e.g., "error 500") to search for an exact phrase rather than individual words scattered throughout messages.
¶ Chat History Synchronization
To ensure a seamless experience across all your devices, the application automatically synchronizes your message history every time you log in.
-
Automatic Sync: Upon login, the application verifies and updates your chat history so that all messages are consistently available on your current device.
-
Sync Indicators: While synchronization is active, an indicator appears to let you know a sync is in progress.
In case of any issues regarding chat sync on any device, click on the “⋮” icon, navigate to
the “re-sync the entire chat history” option and click it to manually force a resync in order to
attempt to fix existing issues.
¶ Start Conversations
- Search for a contact using the search bar, or start a conversation by hovering over a contact in the Contacts list and clicking the Chat icon.
¶ Managing Group Chats
- Click on the “Create group” icon which will bring up the “Create group” dialog.
- Adjust your group preferences from the options available:
- Group name
- Shared group toggle
- Group participant list
- Once everything is set up, click on the “Create” button to create your group.
¶ Interacting Through Chat
- Organize a meeting with the participants of the currently selected chat/group by clicking on the
“Organize a meeting” icon and choosing whether you want to start the meeting right away, or
schedule it for a later date, similar to the process found under “Scheduling a Meeting”. - Drag the participant/s of the current chat into a (conference) call by clicking on the “call” icon.
- Add more users into a group or create a group with additional participants by clicking on the
“Add users into this chat” icon, prompting you to create a new group with the original chat
participant or expand your existing group. - For chats with a single participant, you can notify the participant that you require their
presence by clicking on the “Ask for attention” icon, which will send a push notification
to them. - Check who the chat admin of a group is as well as who the participants of a selected chat
conversation are by clicking on the “Chat info” icon. - Access additional chat actions by clicking the More options (three dots) icon in the chat header. The available options depend on the chat type (Group or One-on-one chat).
- Type a text message to the rest of the participants within the chat/group in the message field and press enter to send it.
- Share code snippets by wrapping them in triple backticks (```). Chat messages support
automatic syntax highlighting with theme-aware styling. - Share files and images with the participants of the chosen chat/group by clicking on the “Send
File” icon and navigating your storage for the chosen file in order to attach it to your message
before sending it. - Alternatively, you can drag the desired file over from the file explorer and place it directly into the chat. The third option can be done by simply copying the image to your clipboard and pasting it
into the gloCOM chat. - Add emoticons to your messages by clicking on the “Emoticon” icon and choosing from a wide
selection of different emoticons to enrich the content of your message before sending it. - If your hands are occupied or you’re too busy otherwise, record a voice message instead of
sending a text by clicking on the “Voice message” icon, speaking your response, stopping the
recording, and then sending it. - Right-click on a message to open the message context menu, which provides quick actions for managing and interacting with individual messages.
- Reply
- Create thread (group chats only)
- Copy
- Show plain text
- Forward
- Edit (my messages only)
- Pin
- Info (group chats only)
- Delete
- Use @name in group chats to notify specific participants.
¶ In-Conversation Search
Search for any message, file, or link within the current conversation without leaving it. Click the search button in the chat controls to open the Search sidebar alongside your messages.
Results are split into three tabs:
- Messages: Typing a couple of characters triggers an automatic search. Results display the sender, timestamp, and a message preview with the matching text highlighted. Your own messages appear as "You," and mentions show the contact's name.
- Files: Displays all files shared in the conversation immediately, filtering as you type.
- Links: Displays all links shared in the conversation immediately, filtering as you type.
All tabs load results in batches of 15 with a Load More button, and show a clear empty state when nothing is found.
- Click the search button in the chat controls to open the Search sidebar.
- Select the desired tab: Messages, Files, or Links.
- Type your search query to filter results (required for Messages; optional for Files and Links).
- Click any result to jump directly to that message in the conversation, where it will be highlighted.
Note: The sidebar opens fresh each time with an empty input and the Messages tab selected. Switching conversations closes the sidebar automatically.
Tip: The Search sidebar works in both 1:1 and group chats and updates in real time — new messages, files, and links appear as they are sent or received, and edits or deletions are reflected instantly.
¶ Unified Search
The main search has been redesigned as a unified search — one place to find
contacts and, as the feature grows, chats and SMS conversations. Open it by
clicking the search bar at the top of the app or pressing
Ctrl+K (Cmd+K on Mac).
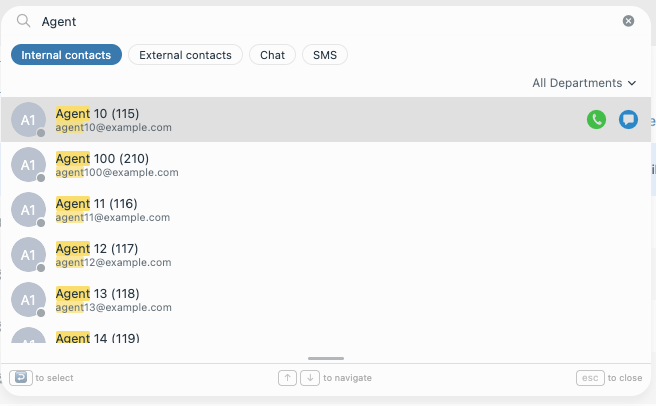
Results are organized into tabs: Internal contacts, External contacts,
Chat, and SMS. The Internal contacts tab is selected by default.
Note: In this release the Internal contacts tab is fully functional, while
the remaining tabs are being rolled out with upcoming releases.
¶ Searching Internal Contacts
Start typing to filter your colleagues by name, extension, or email
address — the matched text is highlighted in the results as you type. A
clear (x) button appears in the search field once you have typed something;
clicking it empties the field and puts the cursor back, ready for a new search.
Each result shows the contact's name and extension, their email
address, and their current status message, so you can see who they are
and whether they are available at a glance.
- Hover over a contact to reveal quick actions — call, chat, or video call.
- Right-click a contact to open the full options menu for that contact.
¶ Filtering by Department
The department filter sits at the top-right of the results, labeled with
the currently selected department (All Departments by default). Click it to
open the department list; the dropdown has its own search field so you can
find a department quickly even in large organizations.
Selecting a department narrows the results to that department. If the selected
department has few or no matches for what you typed, an OTHER section
appears below with matching contacts from the rest of the organization — so a
too-narrow filter never leaves you empty-handed.
You can drive the dropdown from the keyboard: Up/Down move through the
department list, Enter selects, and Escape clears the department search
text. Clicking anywhere outside the dropdown closes it without touching your
main search query.
¶ Resizing the Search Panel
Drag the handle at the bottom edge of the search panel to make it taller or
shorter. gloCOM Next remembers your preferred height and uses it the next time
you open the search — even after restarting the app.
¶ Contacts
- Click the Contacts icon in the main navigation bar to view your internal and external contact lists.
- Switch between the Internal and External tabs to view different directories.
- Customize View: Use the column selector to choose which information is displayed.
¶ Internal Contact Management
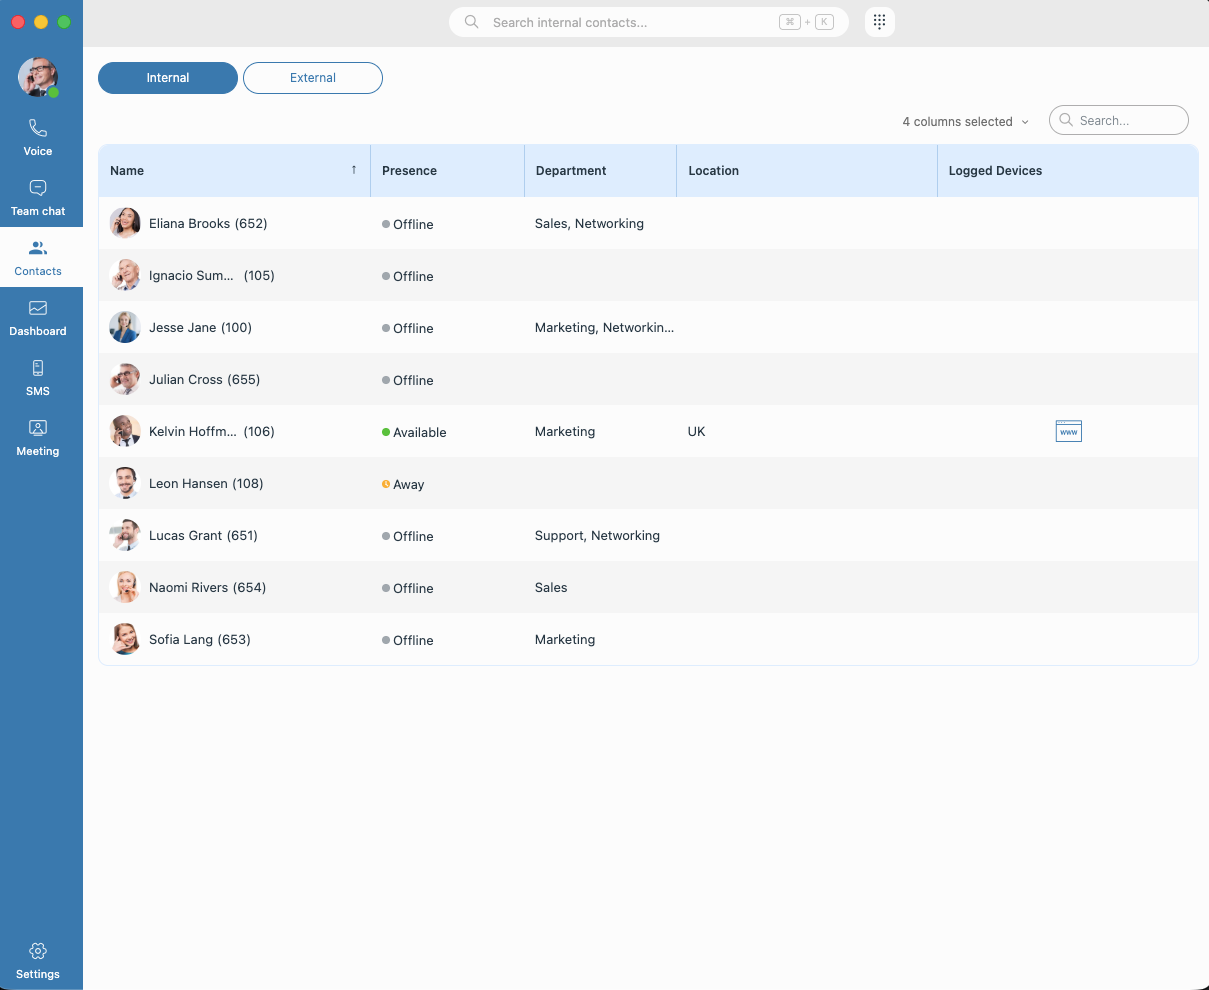
- Use the Search bar to find specific contacts by name, email, department, title or location.
- Check a contact's Presence status (e.g., Online, Offline, Busy) directly in the list to see their current availability.
- Hover over any internal contact to reveal quick-action icons:
- Call: Initiate an immediate voice call.
- Chat: Open a one-to-one conversation.
- Meeting: Start an instant meeting with the contact.
- More (⋮): Access additional options like viewing contact details or sending an email.
- Hover over the columns in the internal contacts list to reveal specific filtering or sorting possibilities.
- Use the filter menus to narrow down your list by Presence, Department, or Logged Devices.
- Sorting Options: Organize your view by sorting contacts based on Name or Presence to prioritize active users.
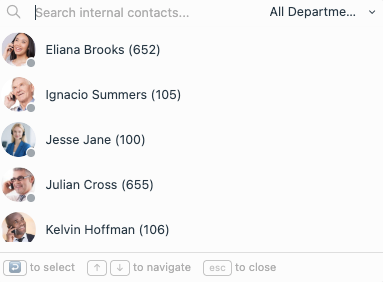
Tip: Internal contacts can also be searched quickly using the search bar located in the application's top bar where quick actions are available upon hovering over any contact in the list.
Note: Pressing ENTER or clicking directly on a contact in the search dropdown triggers a customizable default action (e.g., Call, Chat, SMS, Meeting). On first use, a setup dialog will prompt you to choose and save your preferred default action.
¶ External Contact Management
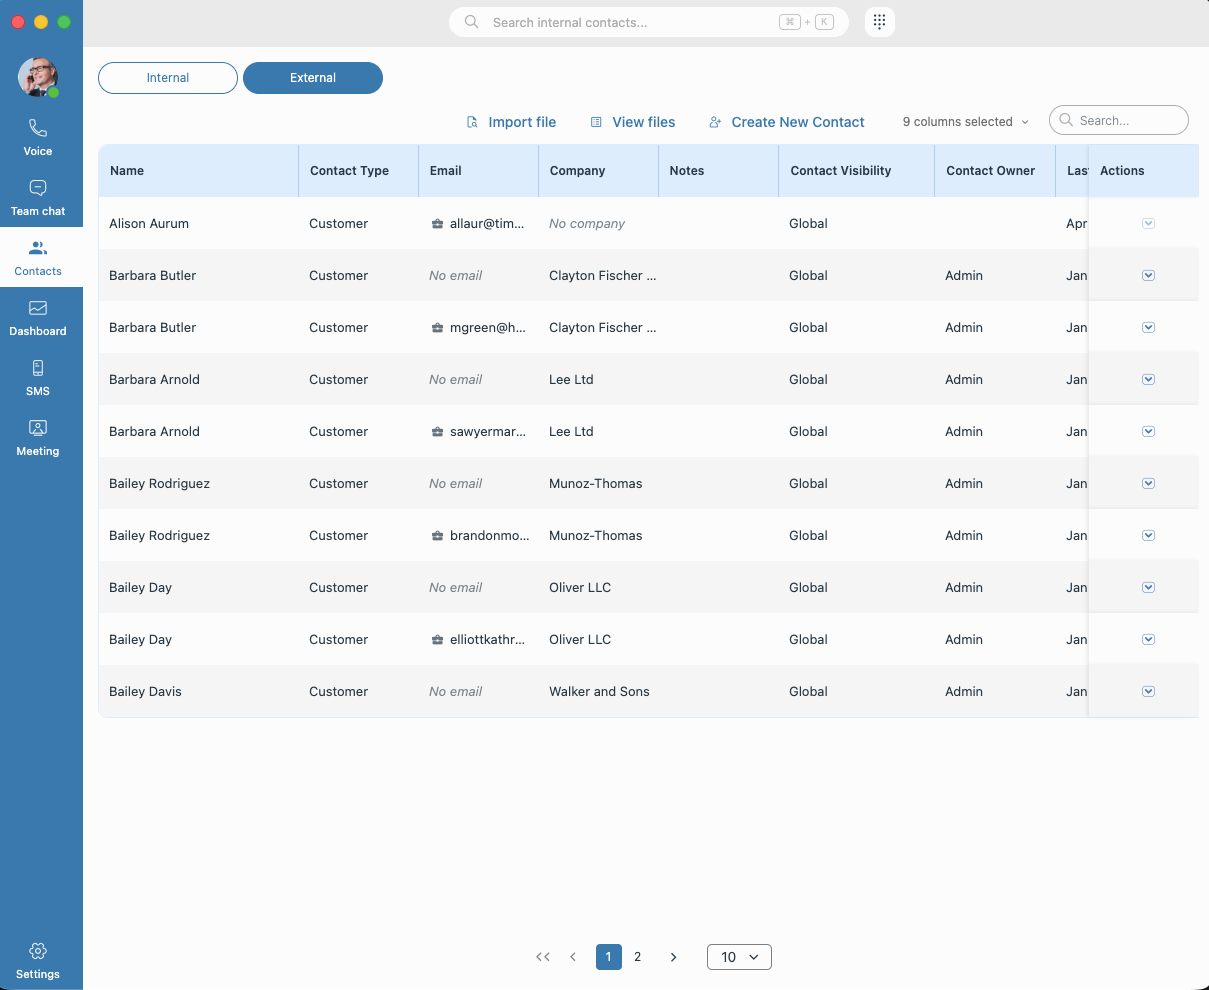
- Use the Search bar to find specific contacts by name, email, phone, company or location.
- Hover over Contact Visibility to enable filtering external contacts by contact visibility.
- When viewing the External tab, you can manage your contacts based on your assigned permissions:
- Import File: Bulk upload contacts using a CSV file.
- Create New Contact: Manually add a new external entry to your list.
- Manage Existing Entries: Click the action dropdown next to a contact to View/Edit their details, Merge contacts, or Delete them from your directory.
Merging combines two duplicate contact entries into a single record, consolidating their details and conversation history.
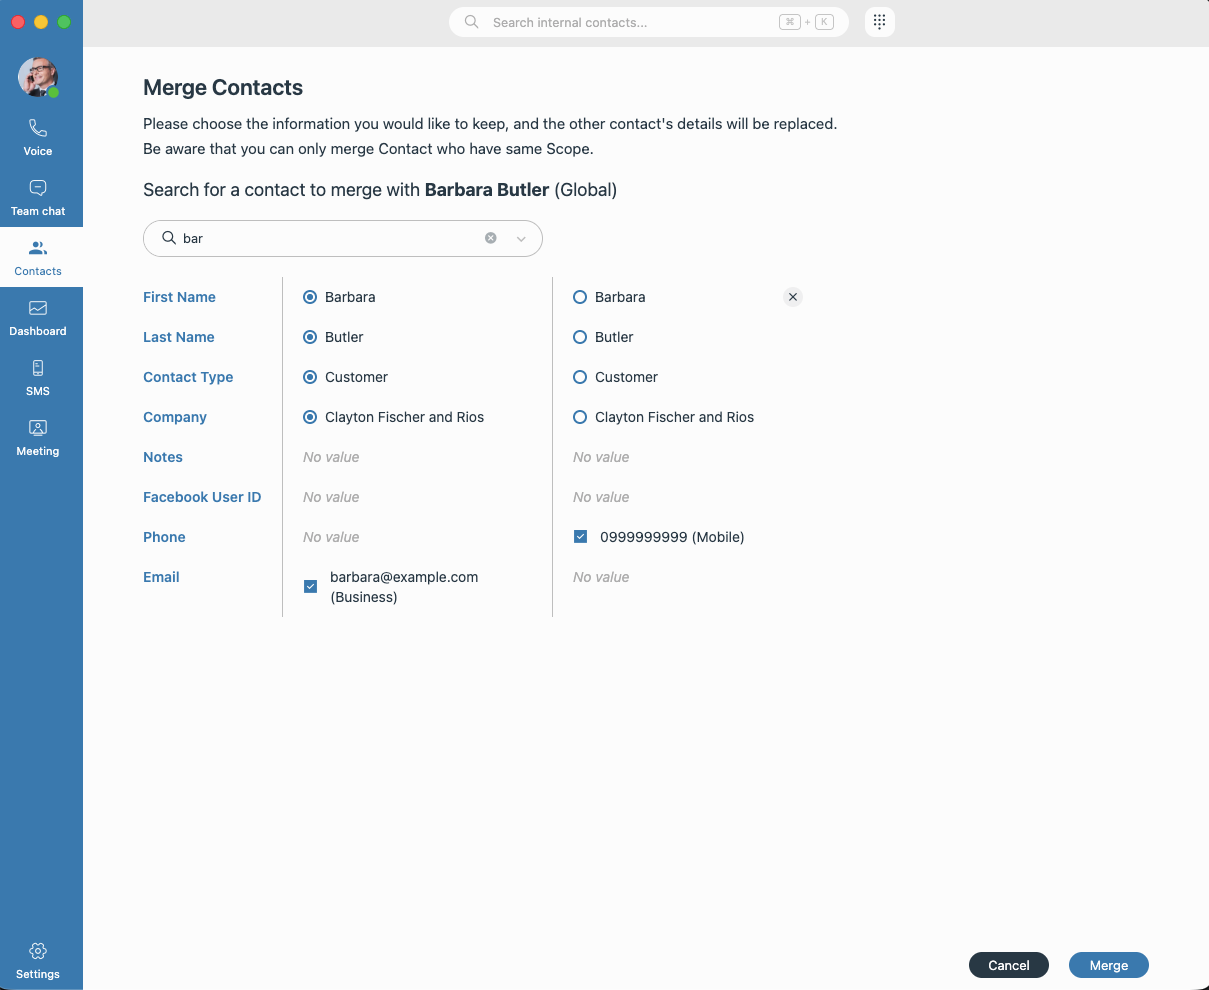
Note: Only contacts with the same contact visibility can be merged.
Across all contact categories, Department Admins have full management capabilities (view, add/edit, delete/merge, CSV upload/download, view uploaded files, and change visibility), while Department Users are generally limited to viewing, adding, and editing — with delete, merge, and administrative actions restricted unless they are the contact owner.
The scope of these permissions narrows from Global Contacts (broadest access for both roles) to Department Contacts (limited to the user's assigned departments) to Private Contacts (accessible only to the contact owner).
¶ Quick Actions for External Contacts
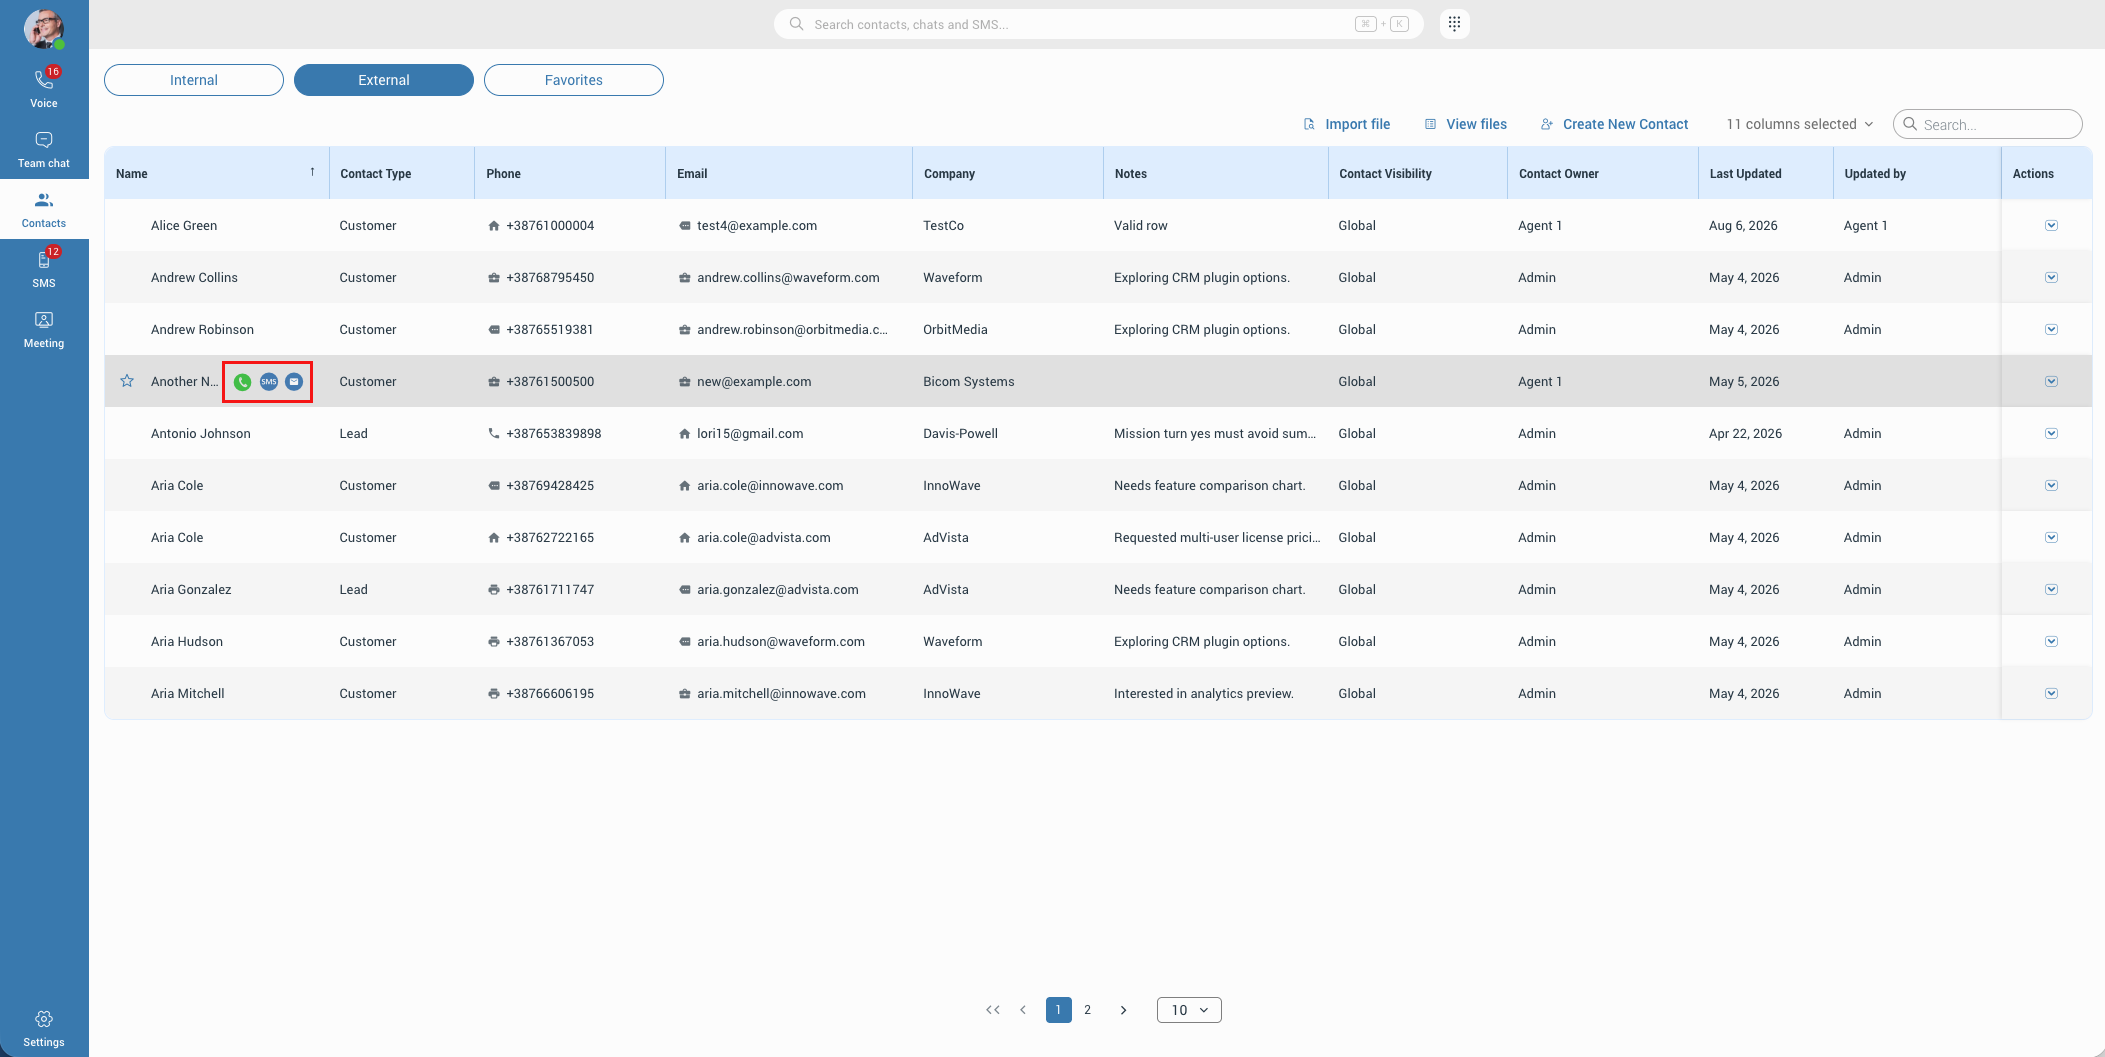
The External Contacts tab shows a quick-actions toolbar when you hover over a
contact, letting you Call, send an SMS, or send an Email directly from the
list — no need to open the contact first. The same actions are available on
external-contact entries in your Call History.
¶ Using the Quick Actions
- Open the Contacts tab and switch to External.
- Hover over a contact's row (in the Name column) — the quick-actions toolbar
appears: Call, SMS, Email, and More (⋮). - Click an action:
- Call — starts a call to the contact's first phone number.
- SMS — opens the SMS flow for the contact's first phone number.
- Email — opens your default email client with the contact's first
email address.
- Click More (⋮), or right-click the row, for the full context menu of
options.
Note: When a contact has more than one phone number or email address, the
quick actions always use the first one on record.
¶ When an Action Isn't Available
If a contact has no data for an action, that button is shown greyed out and
cannot be clicked. Hovering it shows a tooltip explaining why:
- No phone number → Call and SMS are disabled ("Call unavailable" /
"SMS unavailable"). - No email address → Email is disabled ("Email unavailable").
¶ Quick Actions in Call History
Call History entries carry quick actions too, matched to the type of contact:
- External contacts show Call, SMS, and Email.
- Internal contacts show Call, Chat, and Meeting instead.
For an external contact, the Email button becomes available a moment after
the entry loads, once the contact's details are retrieved. If the caller's
number was withheld (an Anonymous call), all actions are disabled — there's
no number or address to act on.
Note: SMS and Email require the relevant service to be configured for your
account; the Meeting action requires the meeting service to be enabled on your
system.
¶ Importing External Contacts from a CSV File
External contacts can be added in bulk by importing a CSV file. Open
Contacts → External and use Import file to upload your file, then
View files to follow the progress and results of your imports.
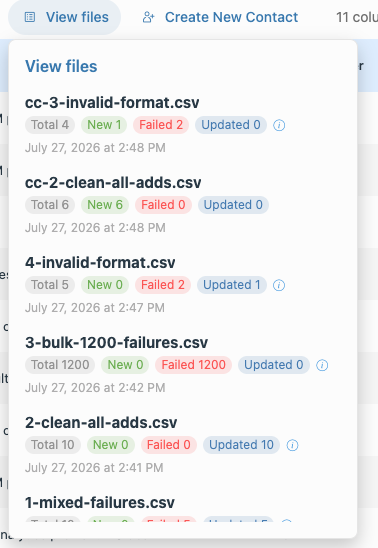
Each import in the list shows how many contacts were processed:
- Total — rows in the file
- New — contacts added
- Failed — rows that could not be imported
- Updated — existing contacts that were changed
While an import is still running you will see its progress (for example
Syncing 2500/10000), and you can stop it using the remove button next to
the file name.
Note: Importing contacts requires Department Admin rights on your
extension. If you do not see the Import file option, ask your administrator
to enable it.
¶ Checking Why Contacts Were Not Imported
If an import finished with failed or updated contacts, an info button
appears next to the result. Click it to open Import Details.
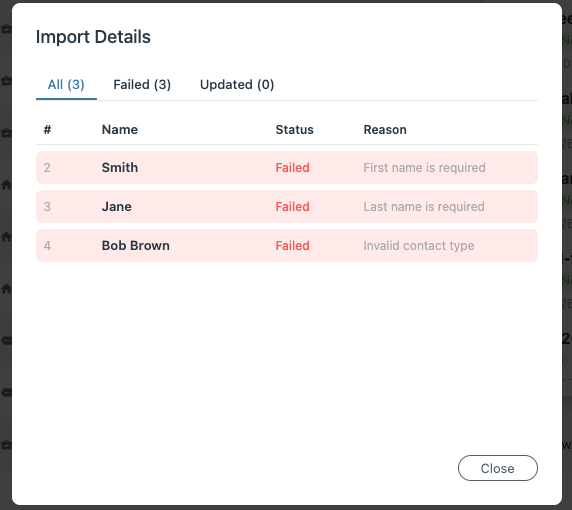
The details are grouped into three tabs — All, Failed and Updated —
each showing how many contacts it contains. For every contact you see:
- # — the row number in your original CSV file
- Name — the contact from that row
- Status — whether the row failed or updated an existing contact
- Reason — why the row failed
Failed rows are highlighted in red and updated rows in blue, so problems are
easy to spot. The Reason column is only shown where it applies — updated
contacts do not have one.
¶ What the Reasons Mean
| Reason | What to do |
|---|---|
| First name is required | The name column is empty for that row — fill it in. |
| Last name is required | The last_name column is empty for that row — fill it in. |
| Invalid contact type | The contact_type column must be either customer or lead. |
| Invalid CSV format | The row does not match the expected format — usually a missing column, an extra column, or an unclosed quotation mark. |
Note the row numbers include the header line, so row 2 is the first contact in
your file. Correct those rows in your CSV and import the file again — existing
contacts will be updated rather than duplicated.
Note: Your CSV must use these columns: name, last_name, company,
contact_type, phone, phone_label, email, email_label, fbUserId, notes.
name,last_nameandcontact_typeare required.
¶ Large Imports
Imports of any size are supported. When a file produces more than 1000 listed
results, the first 1000 are shown and a Load more button appears at the
bottom to fetch the next batch. Your most recent imports are kept in the list;
scroll to the bottom to load older ones.
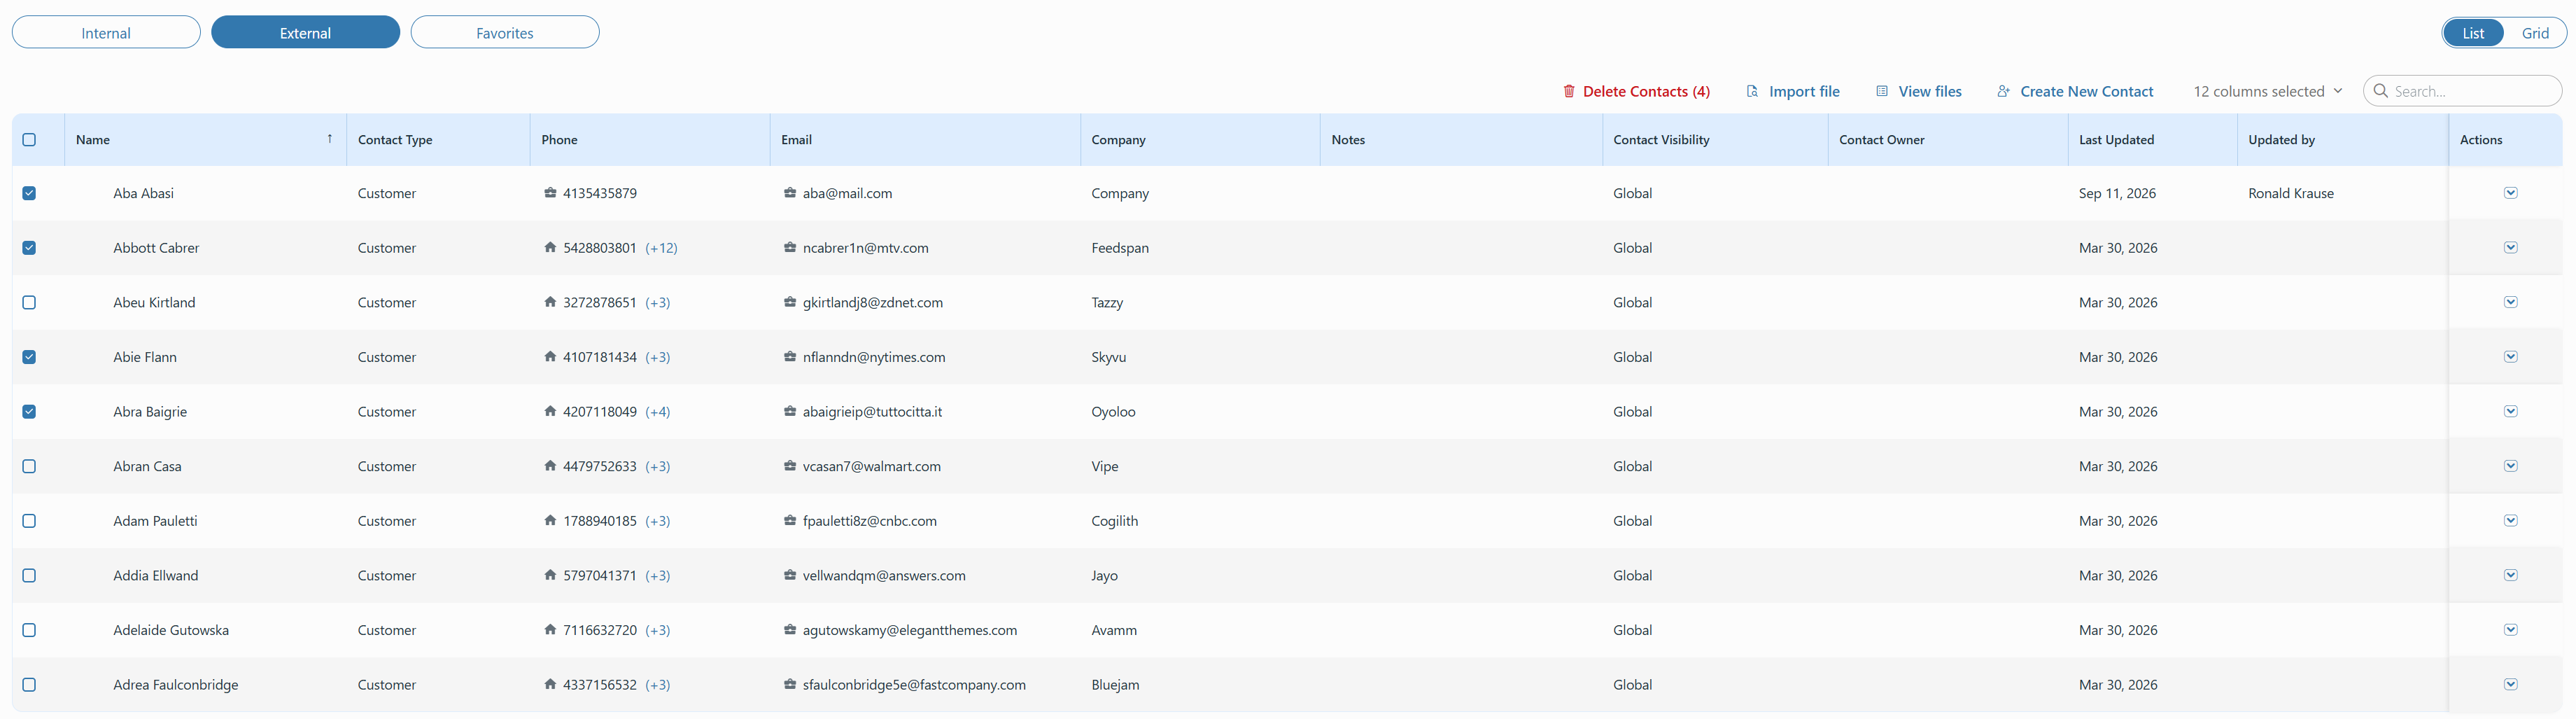
¶ Delete Multiple External Contacts
Allows users to select and delete multiple external contacts at once. Only users with delete permission can select and delete contacts.
¶ Favorites
Mark contacts as favorites for quick access across all your devices. Favorites sync to the server — a contact starred on one device appears starred on every other device signed into the same account.
Note: Requires PBXware 8.2.0 or newer. The Favorites feature is not available on older PBXware versions.
¶ Adding a contact to Favorites
There are four ways to mark a contact as a favorite.
Star icon in the contact list
- Open the Contacts panel and select the Internal or External tab.
- Hover over a contact row — a star icon appears in the Favorites column.
- Click the star. It turns gold to indicate the contact is now a favorite.
Right-click context menu
- Right-click any contact in the Internal or External list.
- Select Add to Favorites from the context menu.
Contact Information dialog
- Click a contact to open the Contact Information dialog.
- Click the star icon in the top-right corner of the dialog.
Star icon in the contacts widget
When a contact is matched and displayed in the Contacts widget during a Call, SMS, Messaging, or Email conversation, users can add that contact to Favorites directly from the widget, including internal contacts visible in the call history.
¶ Removing a contact from Favorites
Use any of the same methods:
- Click the gold star icon in the contact list (it becomes unfilled).
- Right-click the contact and select Remove from Favorites.
- Click the filled star in the Contact Information dialog.
- On the Favorites tab, single-click the star next to any contact to remove it.
¶ Favorites tab
A dedicated Favorites tab appears alongside Internal and External under Contacts. It shows all contacts you have marked as favorites, in either of two views that you switch with the toggle in the tab header.
List view shows contacts as rows with presence status, phone numbers, and department.
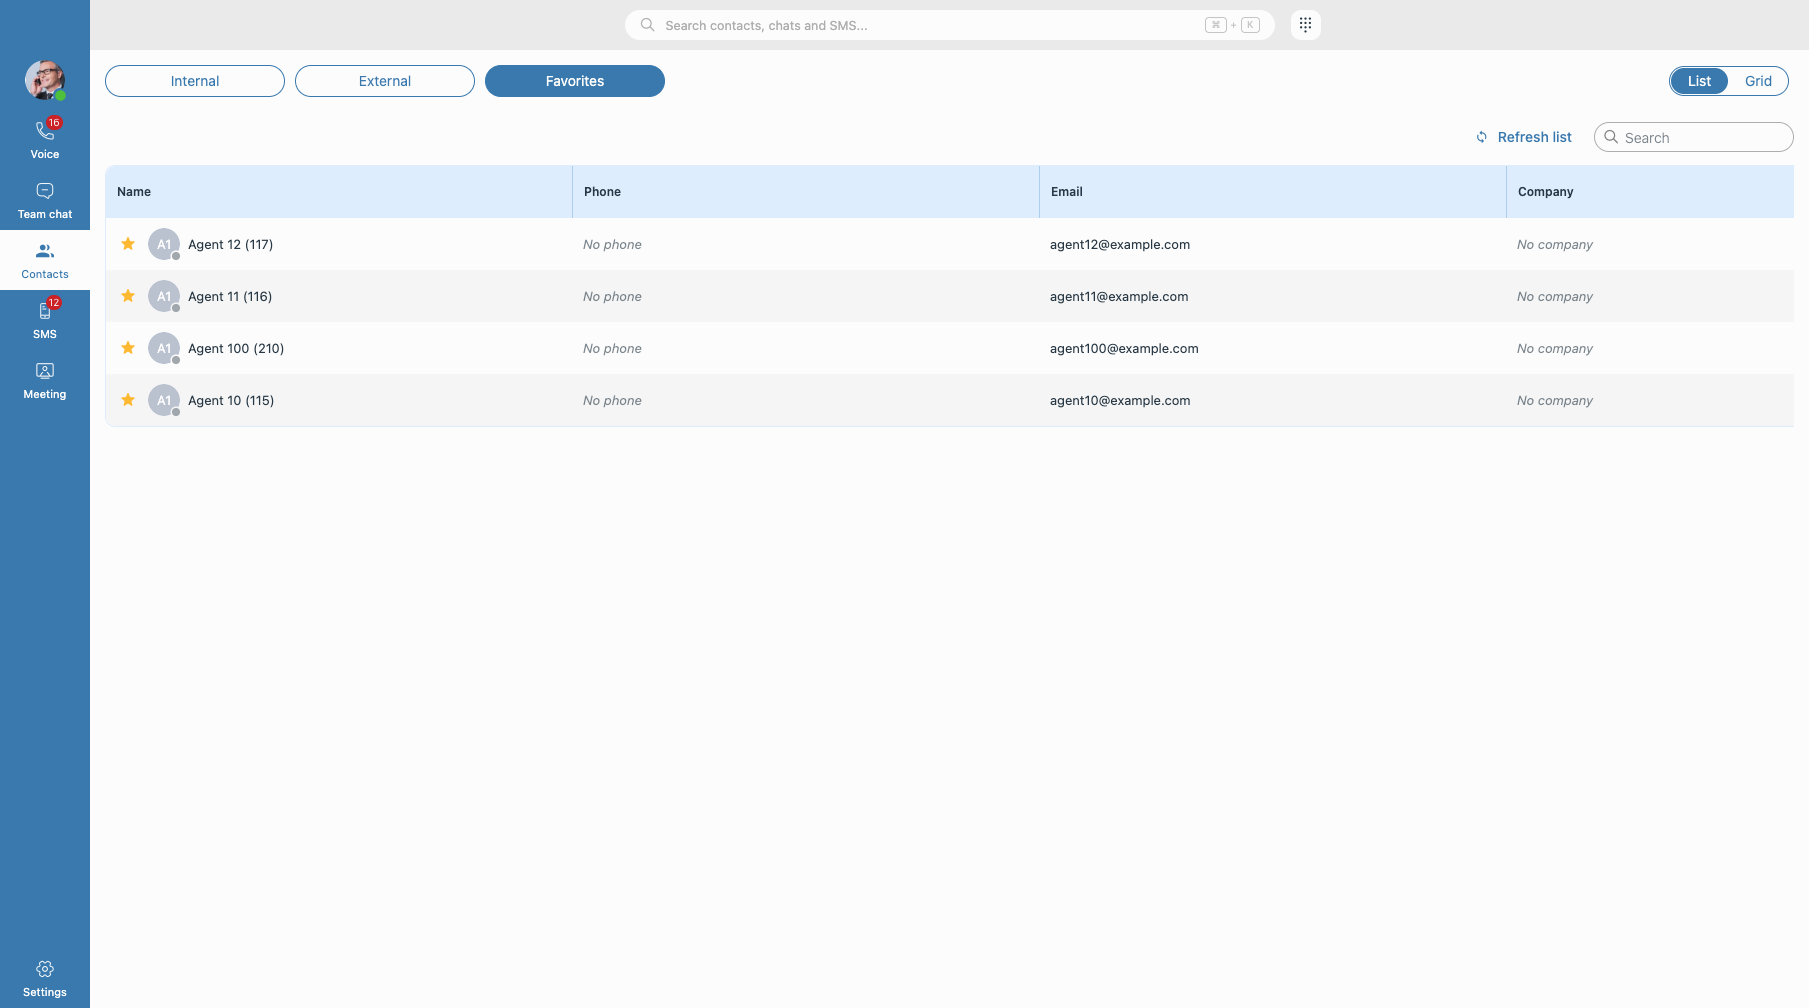
Grid view shows contacts as cards with avatar and presence indicator.
Click Refresh on the Favorites tab to reload your favorites from the server — this picks up changes made on your other devices. If no contacts are marked as favorites, the tab shows "No favorite contacts" and remains accessible.
¶ Favorites column visibility
The Favorites column (star icons) is shown by default in the contact list. To hide or show it, click the Column Selection button (grid icon) above the contact list and check or uncheck Favorites. When the column is hidden you can still add or remove favorites via right-click or the Contact Information dialog.
¶ Syncing across devices
Favorites are stored on the server and sync automatically across all clients (Electron and Web) signed into the same account — adding or removing a favorite on one device is reflected everywhere after a refresh.
Note: A maximum of 50 contacts can be marked as favorites. If you try to add a 51st, a notification tells you the limit has been reached — remove an existing favorite first.
Both internal contacts (extensions on your PBXware system) and external contacts (from the company phonebook) can be favorited, and both appear together on the Favorites tab. The feature works identically on gloCOM Next (Electron) and gloCOM Web, on both CC and MT (on MT, favorites are scoped to your tenant).
¶ Contact Card
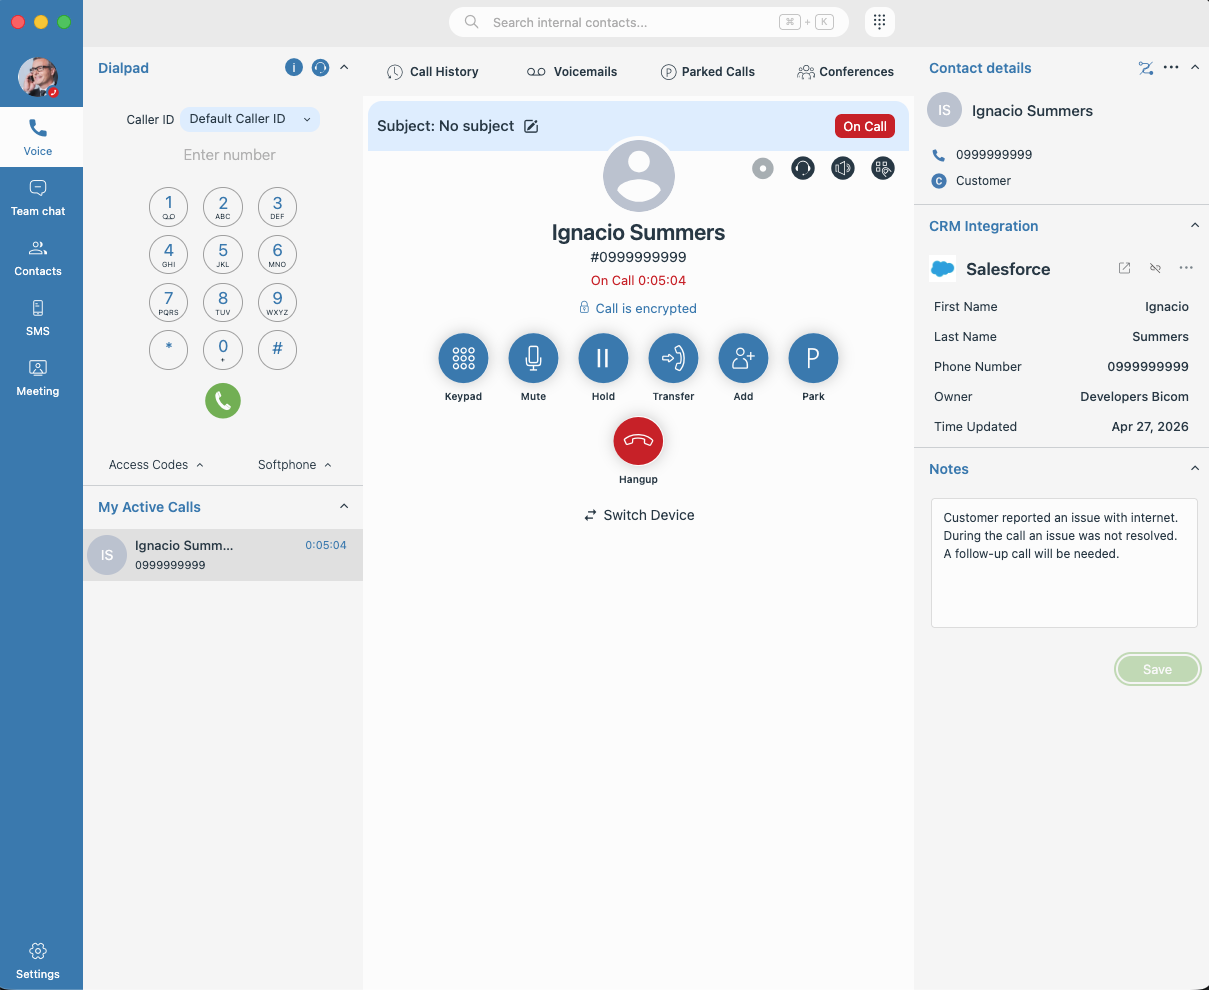
The Contact Card is a comprehensive side panel that appears during active interactions (sms conversations, calls with external contacts), providing a unified view of customer identity and integrated CRM data.
¶ Contact details
- Identity: View the contact's name, initials, phone number, and account type (e.g., Customer) at the top of the card.
- Contact Actions:
- Add/Edit Contact: Use the icons in the header to manually create a completely new contact or update the details of an existing record. When adding a contact during an active call, the new contact is automatically linked to that call. Contact visibility (Global, Department, or Private) can be set at creation or edit time.
- Link/Unlink: Use the link icon to associate a call with an existing contact — either from suggested matches or by searching for a contact directly. During the link operation, you can also update the contact's information. Use the unlink icon to remove an incorrect connection.
¶ CRM Widget for external calls
The CRM Widget provides a centralized view of contact data retrieved from your active CRM integrations during external calls. The widget pulls and displays relevant contact information from any currently connected CRM systems.
Quick Setup:
- If no CRM is integrated, the CRM widget will display a "Connect to a CRM" link.
- Clicking the "Connect to a CRM" link will instantly redirect you to Settings → CRM to manage your integrations.
CRM Widget actions
Within the CRM widget, you can manage how conversations are associated with your CRM data through the following actions:
-
Linking a Record: This "connects" an active call to a specific CRM record (e.g., a Contact or Lead). Once linked, the widget will automatically display that contact's comprehensive information whenever you engage with them.
-
Suggested Matches: The widget automatically displays suggested records. If only one match is found, the system will perform an Automatic Link.
-
Manual Search: You can search for records by name, phone, or email using the input field. A global CRM search triggers once you enter at least 2 characters.
-
Unlinking a Record: If a record is linked incorrectly or you wish to remove the connection, click the Unlink button. You will be prompted with a confirmation dialog to prevent accidental unlinking.
-
Rematching a Record: This serves as a shortcut to switch the current link to a different record. Access this by clicking the three-dot menu and selecting Rematch. The current record remains linked until you successfully select and confirm a new one.
-
Creating a New Record: If no existing records match your needs, click Link/Create new record followed by the Create new object button.
-
Select the record type (e.g., Contact, Lead) from the dropdown.
-
Fill in the required fields; the system will alert you via a toast notification if mandatory information is missing.
-
Upon successful creation, the new record is automatically linked to the conversation.
-
Editing a Record: To update information on a linked record, select Edit from the three-dot menu. Modify the necessary fields and click Apply to save your changes.
Note: The specific fields displayed within the widget and the actions available to you (such as editing or creating records) depend on your PBXware configuration and assigned user permissions.
Note: For all actions (linking, unlinking, creating, or editing), the system provides real-time feedback via toast notifications to confirm success or alert you to errors, such as network issues or API problems.
¶ Dashboards
Note: The Dashboard tab for Business Edition is available only on multitenant systems if the Show ERG Dashboards setting is enabled on the extension.
-
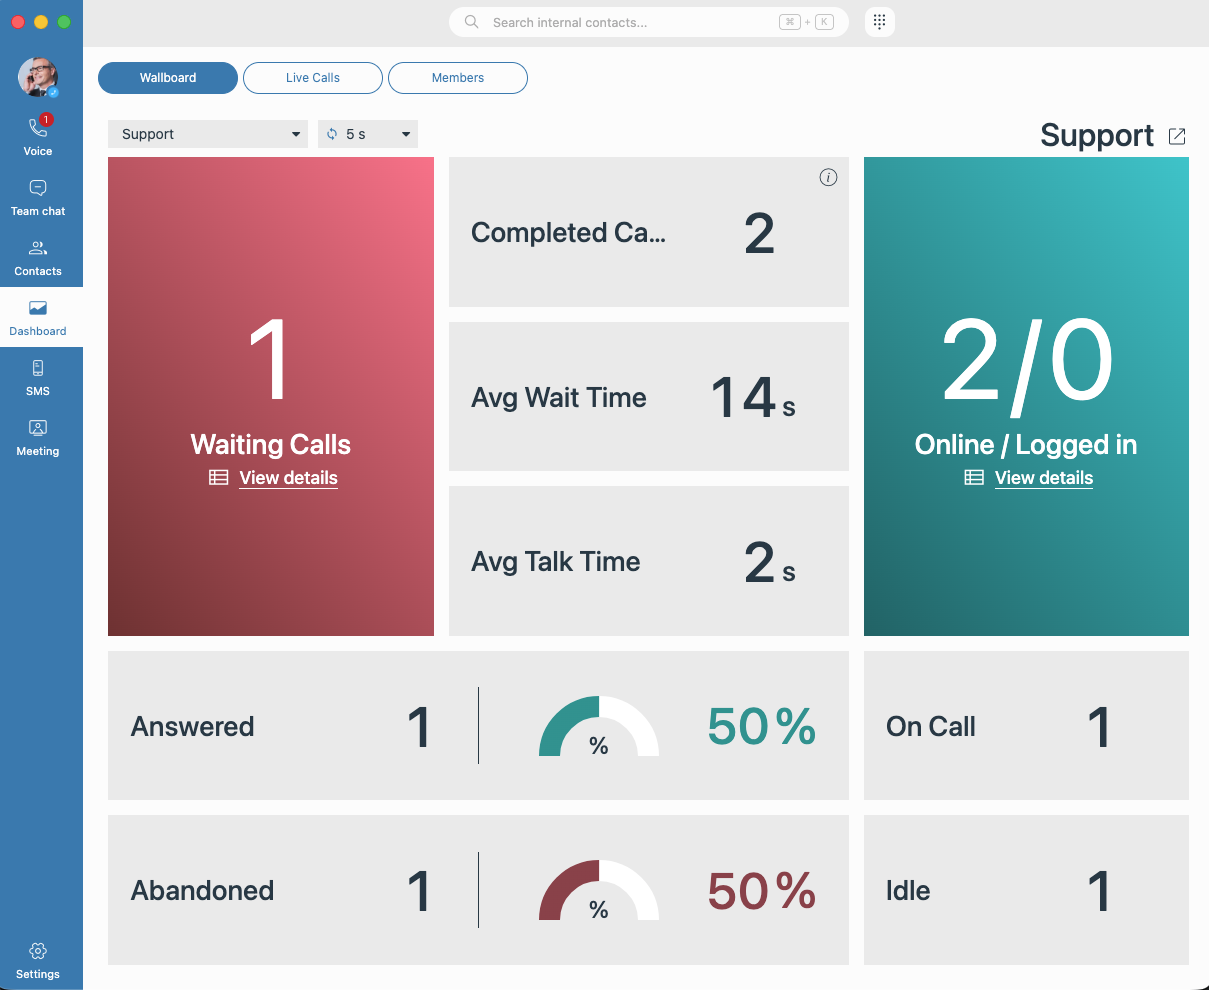
Click the Dashboard icon in the main navigation bar to monitor call activity, key metrics and member engagement for your ERGs.
-
Navigation Tabs: Use the following tabs to manage your view:
- Wallboard: View a high-level overview of call metrics such as:
- Online and logged-in members
- On-call members, idle members
- Calls waiting to be answered
- Answered calls
- Abandoned calls
- Completed calls
- Average waiting time
- Average talk time
- Live Calls: Displays a list of active calls and calls waiting in the queue, including details such as the caller’s name and number, ERG, and talk or waiting time.
- Members: Displays information about each member’s phone status and state (for example: online, offline, logged in, logged out, on a call), as well as the number of answered and unanswered (missed) calls per member. If members belong to ERGs with the Static members option enabled, both phone status and state are shown. When this option is not enabled, only the phone status is displayed.
- Wallboard: View a high-level overview of call metrics such as:
-
Detach Windows: Click the Detach icon (pop-out) on any tab to open it in a standalone window.
You may have a maximum of three detached windows open simultaneously (one for each tab). Detached windows will automatically refresh if new filters are applied in the main application and the detach button is clicked again. Clicking View Details within a detached window will bring the main application into focus and navigate to the relevant tab.
Tip: Detached windows can be displayed on a large screen or TV for easier monitoring.
- Filtering: Use the dropdown menus to filter data by specific ERGs and set the Refresh rate (e.g., 10s) to ensure the data remains current.
¶ SMS
¶ Engaging with the SMS messages
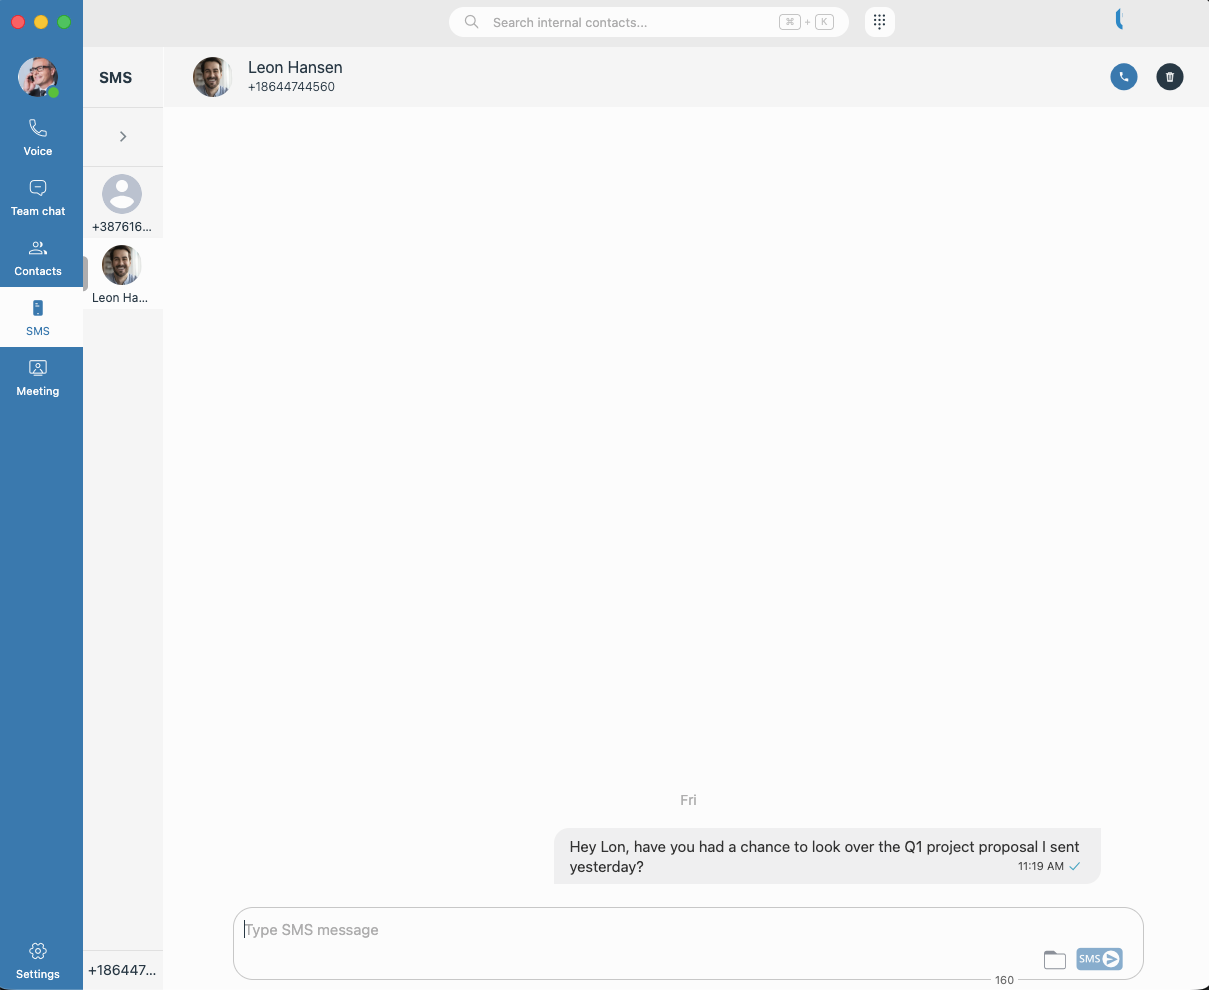
- If you have an SMS number assigned to your login credentials, click the “SMS” icon, which
will open an SMS dialog box showing your SMS history across all participants, synced across
all devices. - The SMS interface includes a Contact Card, consistent with the Voice, Email,
and Messaging experiences. The widget automatically matches contacts, allows manual resolution
when multiple matches are found, and supports linking existing records or creating new ones
directly from the widget. Any updated contact information reflects immediately across the SMS
interface.
Note: Contact Actions (Add/Edit Contact and Link/Unlink) are only available for external contacts.
¶ Using multiple SMS numbers (DIDs)
If more than one SMS number (DID) is assigned to your extension, gloCOM shows which number each conversation belongs to and lets you choose which number you send from.
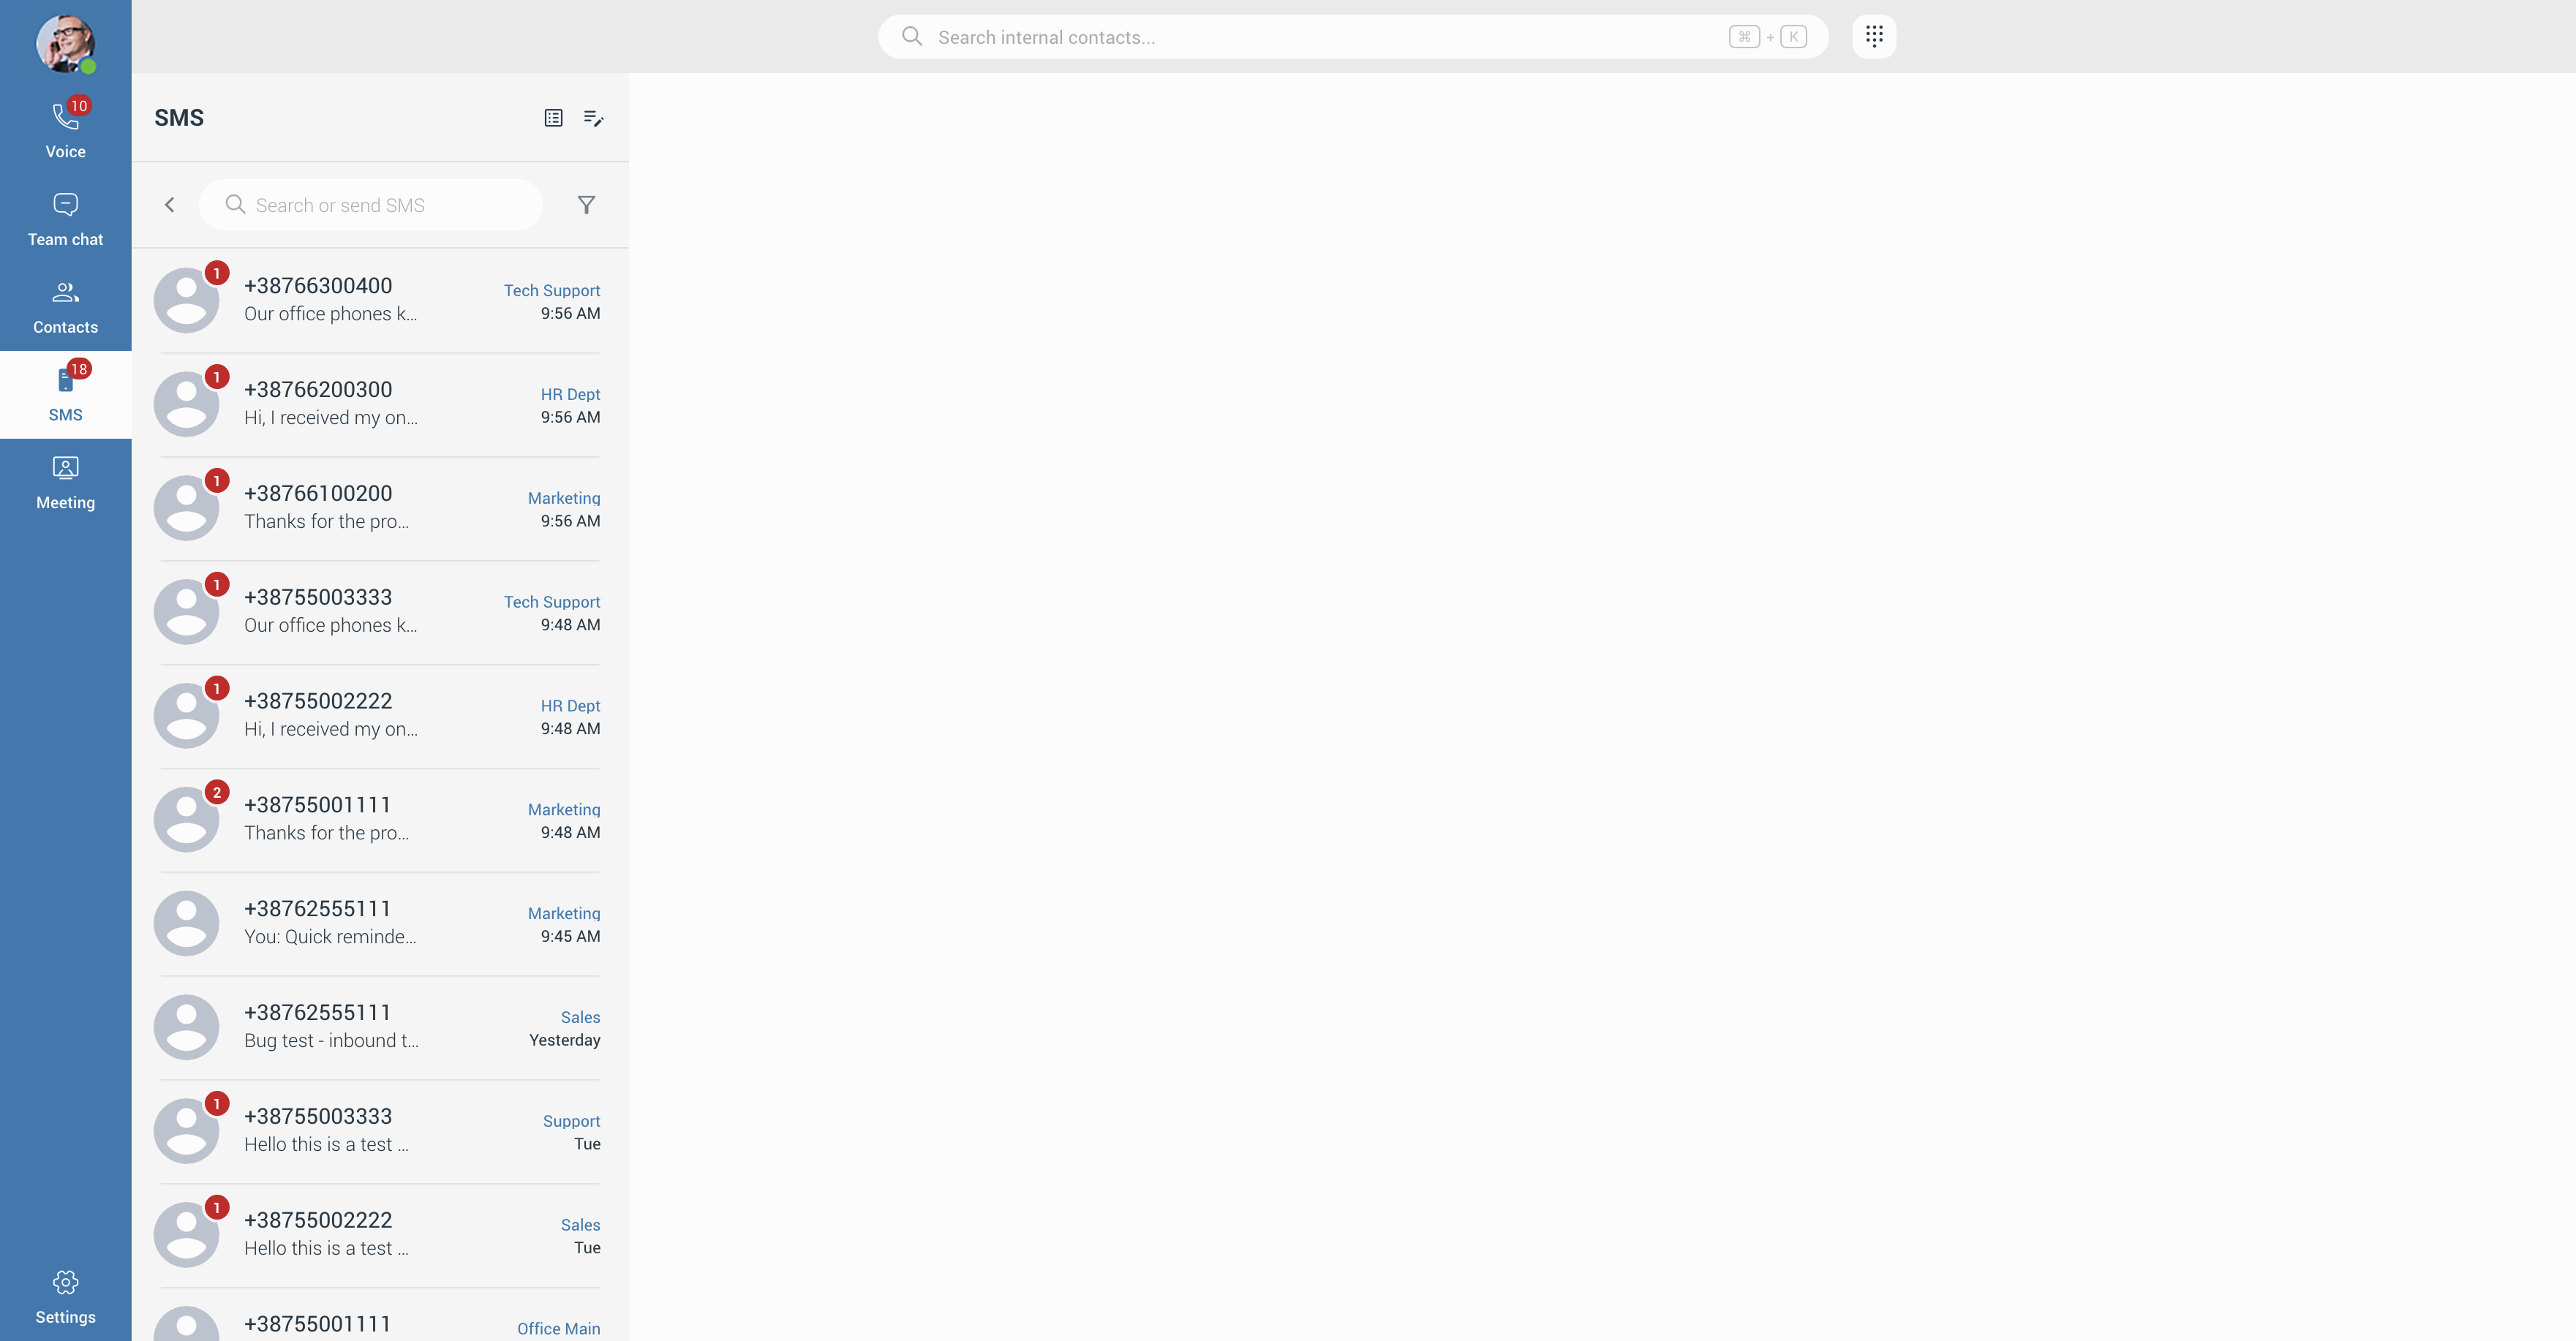
- Each conversation shows a label (or the number, if no label is set) indicating which of your numbers the message was received on. Use the filter icon next to the search bar to show only conversations on selected numbers.
- Open a conversation to see the “Sending from” bar beneath the header, showing the number that conversation uses. Click the copy icon to copy that number.
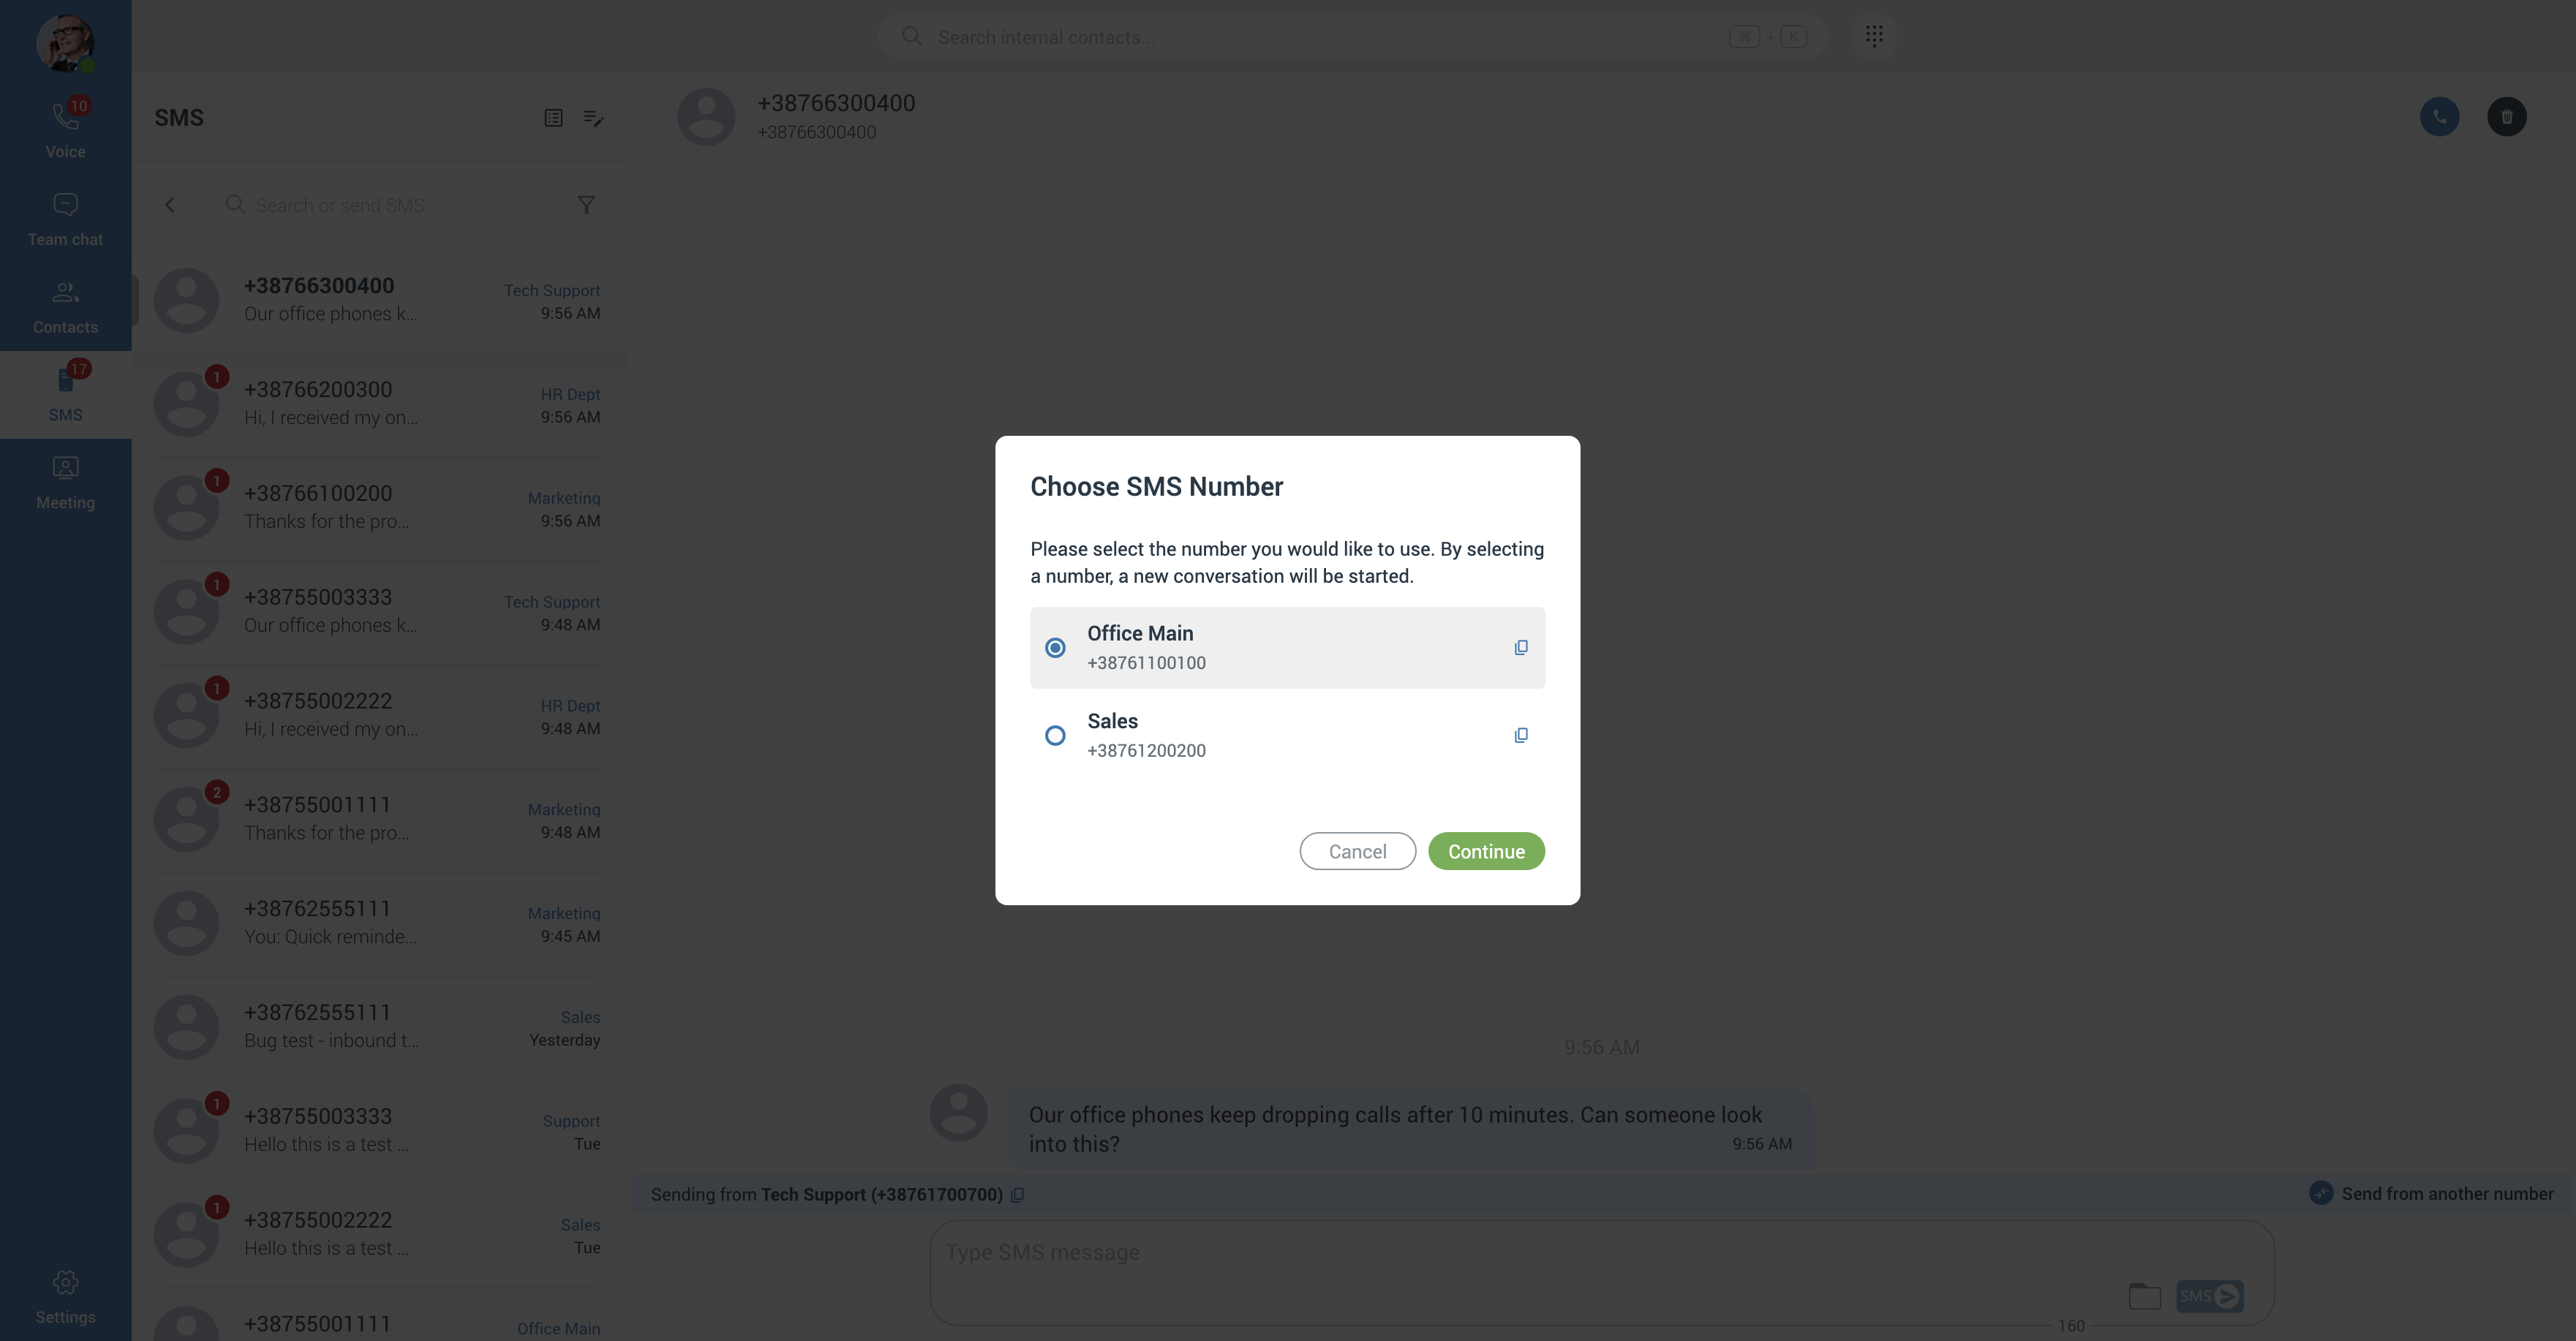
- To set the number used for new conversations, click the “Manage SMS Numbers” icon in the header, select a number, and click Continue. An administrator can also set this default; if none is set, your first assigned number is used.
- To send from a different number, click “Send from another number” when replying, or choose a number when starting a new message. Each conversation is tied to one sending number, so picking a different number starts a new conversation with that contact.
- If a number is no longer assigned to you, its conversations remain visible (greyed out) so you can still read the history, and a banner lets you start a new conversation from one of your current numbers.
Your assigned SMS numbers also appear on a contact’s information panel, and an optional SMS Number column can be enabled on the Internal Contacts tab.
¶ Meeting
¶ Creating an Instant Meeting
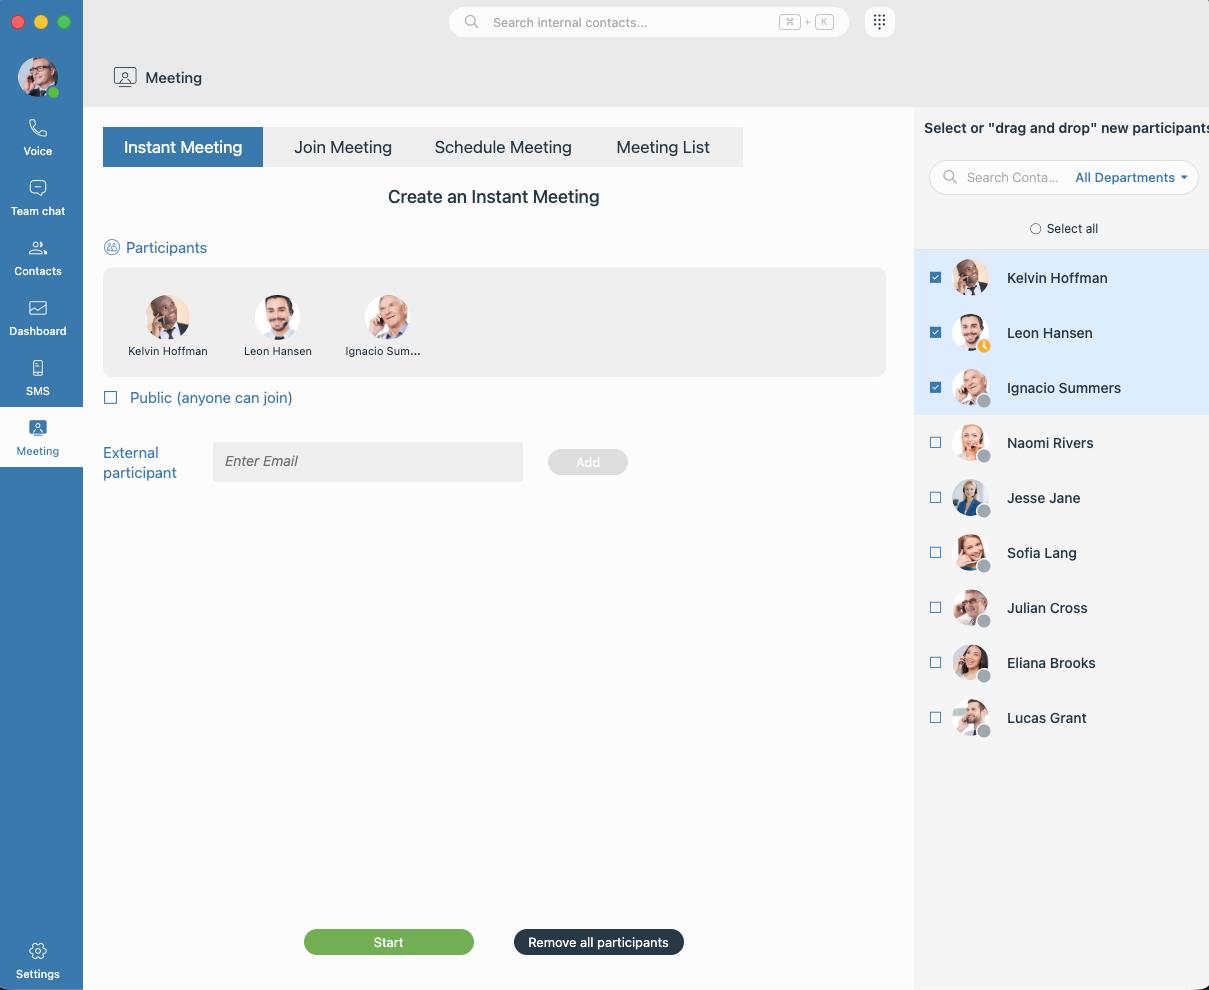
- Click on the Meeting icon and select the Instant Meeting tab.
- Drag and drop or select contacts from your list, or manually enter an external participant's email in the field and click Add.
- Select the Public (anyone can join) radio button to allow open access, or leave it unchecked for a private session.
- Click Start.
¶ Joining an Existing Meeting
- Click the Meeting icon.
- Choose your method: Join Meeting (using a meeting number) or Meeting List (to select from scheduled meetings).
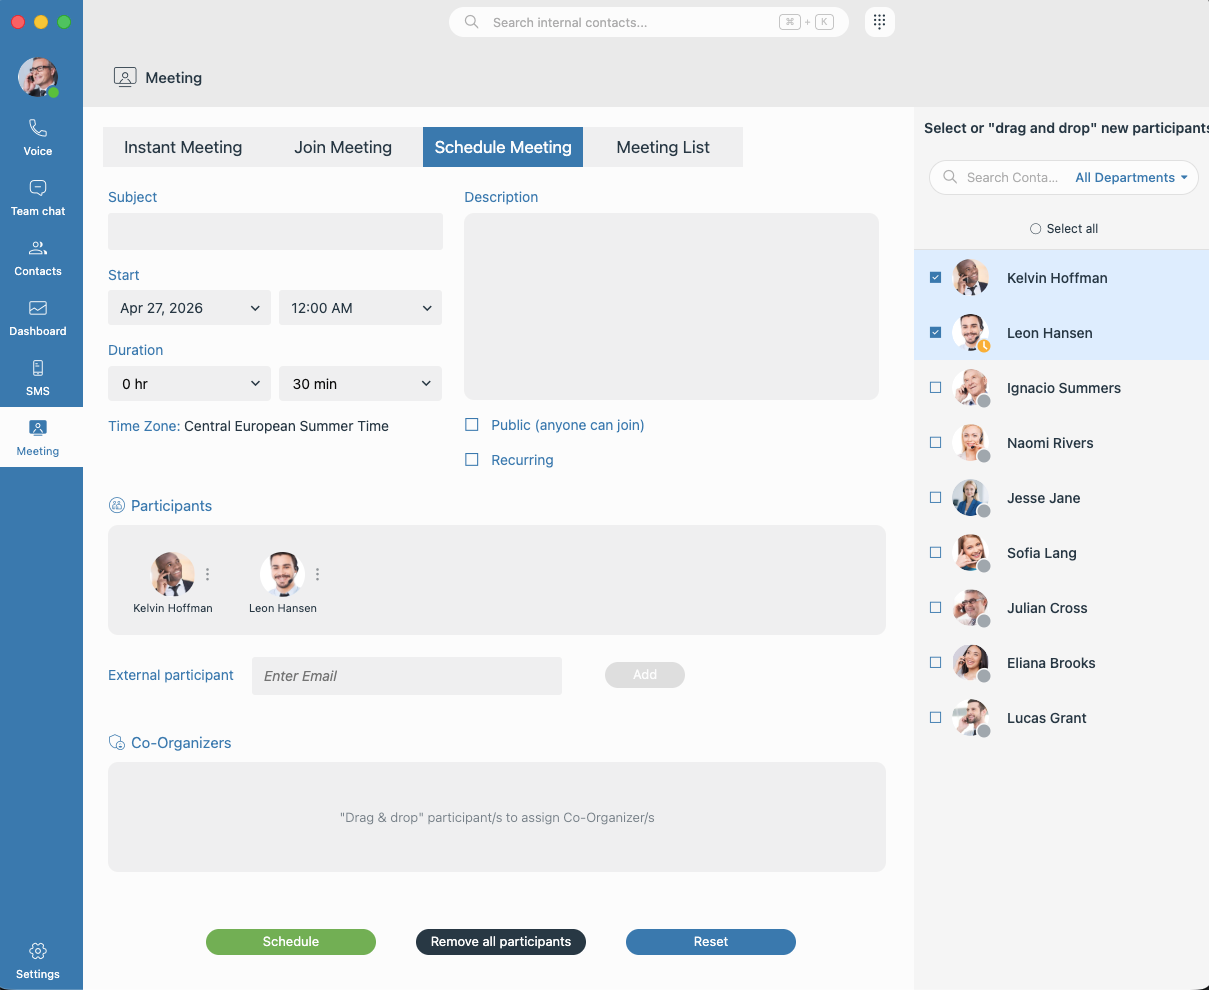
¶ Scheduling a Meeting
- Select the Schedule Meeting tab.
- Adjust your meeting preferences from the options available:
- Meeting subject
- Meeting start time
- Meeting duration
- Time zone adjustment
- Meeting description
- Public or private meeting
- One-time or recurring meeting
- Meeting participants
- Meeting co-organizers
- Drag and drop or select contacts from your list into the Participants field, or manually enter an external participant's email in the field and click Add.
- To assign Meeting Co-Organizers, drag and drop contacts from your list into the Co-Organizers field or click on the 3 dots button next to a participant and select the "Assign co-organizer" option.
- Once everything is set up, click on the “Schedule” option to send a notification out to every
participant involved in the meeting, leaving the meeting details in their “Meeting list” as a
reminder, as well as sending out an email notification.
¶ Meeting List
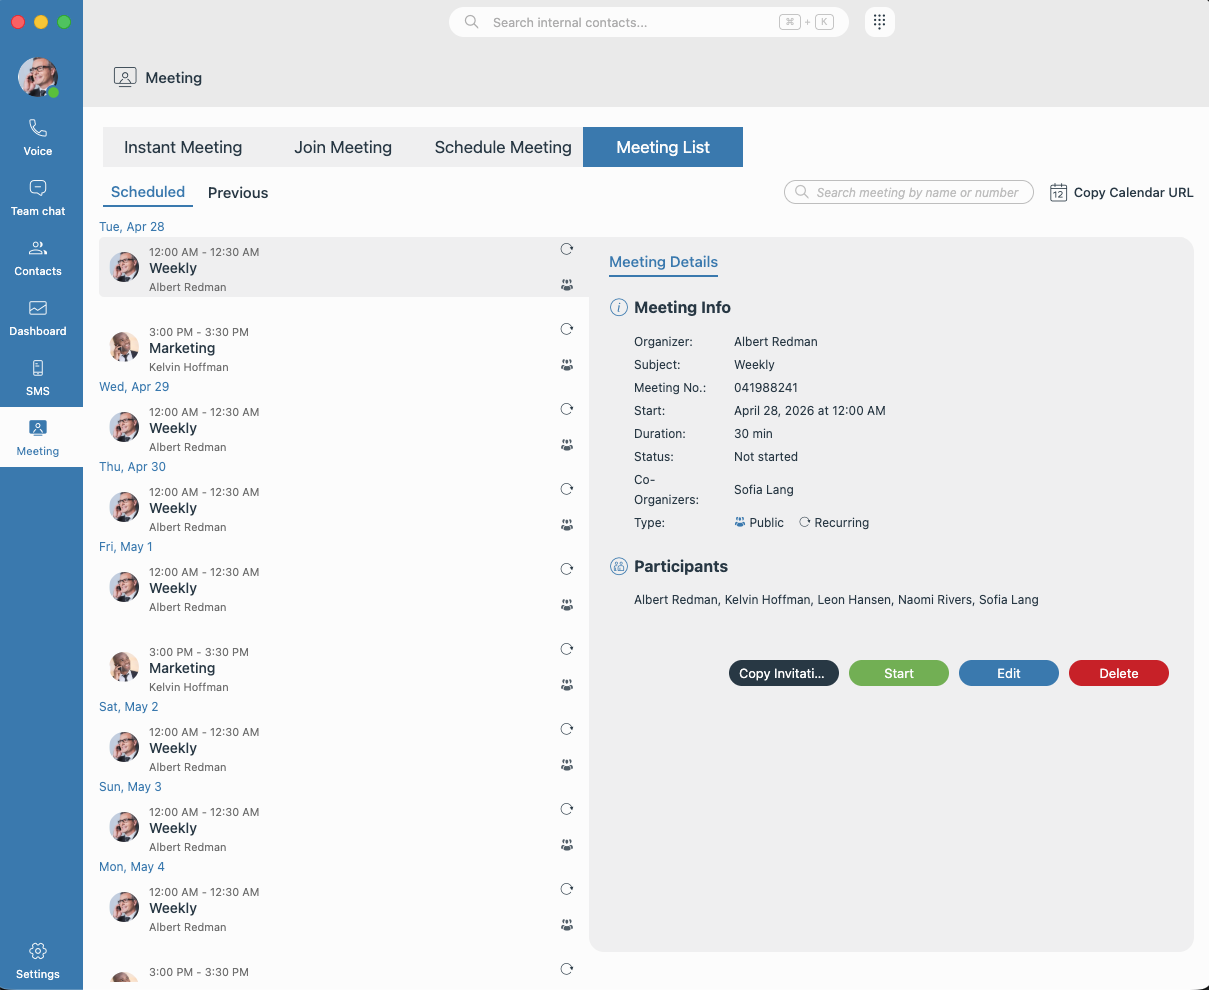
- Click the Meeting icon and select the Meeting List tab.
- View Scheduled Meetings: Under the Scheduled sub-tab, you can see all upcoming meetings where you are a participant or organizer.
- Review Past Meetings: Switch to the Previous sub-tab to access details and participant lists from your history. Click the Chat Records tab to view the full chat history from that session.
- Manage Meetings: Select a meeting from the list to view its info. Depending on your permissions, you can use the buttons in the side panel to Start, Edit, or Delete the meeting.
¶ Using Meeting
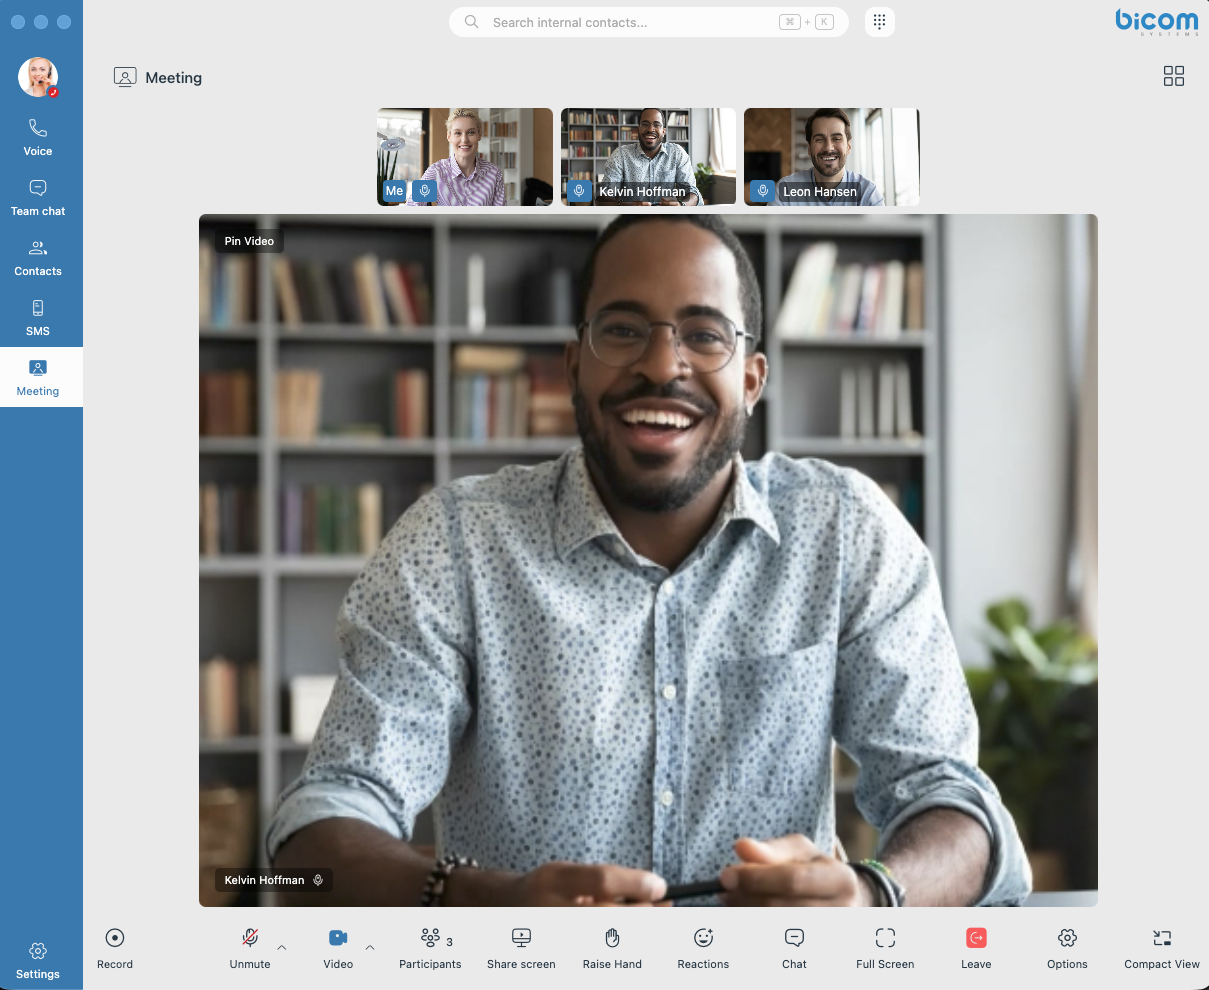
While in an active meeting, use the control bar at the bottom to manage your session:
- Audio & Video: Toggle your microphone with Unmute/Mute or control your camera with the Video icon.
- Click the arrow icon next to the Mute/Video buttons to switch devices (e.g., change your microphone, speaker, or camera) mid-call.
- Collaboration Tools:
- Share Screen: Broadcast your desktop or a specific window to participants.
- Chat: Open the in-meeting chat panel to send messages and files.
- Record: Click the Record icon in the bottom-left corner to start or stop capturing the session.
- Raise Hand: Click the Raise Hand icon to signal to the organizer that you have a question or comment.
- Reactions: Click the Reactions icon to send immediate visual feedback, such as emojis, to the group.
- Participant Management:
- Click Participants to view the attendee list and manage invitees.
- Depending on your role, right-click a participant to Assign Co-Organizer, Reinvite, or Remove from meeting.
- View & Layout:
- Use Full Screen to expand the window.
- Switch Layout: Toggle between Grid View and Speaker View using the layout icon in the top-right corner to change how participants are displayed.
- Pin Participant: If you want to keep a specific participant in focus, double-click on their window to pin it; a Pin icon will appear to indicate they are locked in view.
- PIP window: Switch to a PIP (Picture-in-Picture) window using the Compact View icon in the bottom-right corner to keep the meeting visible in a small overlay while multitasking.
- Meeting Settings: Access advanced configurations by clicking the Options (gear) icon. Available options include:
- Video Controls: Toggle incoming video to manage bandwidth.
- Meeting Access: Switch to a Public meeting mid-call.
- General Actions: Copy meeting info/links, enable keyboard shortcuts, or show/hide reactions and statistics.
- Leave: Click the red Leave button to exit/end the meeting session.
¶ Call Into Meeting
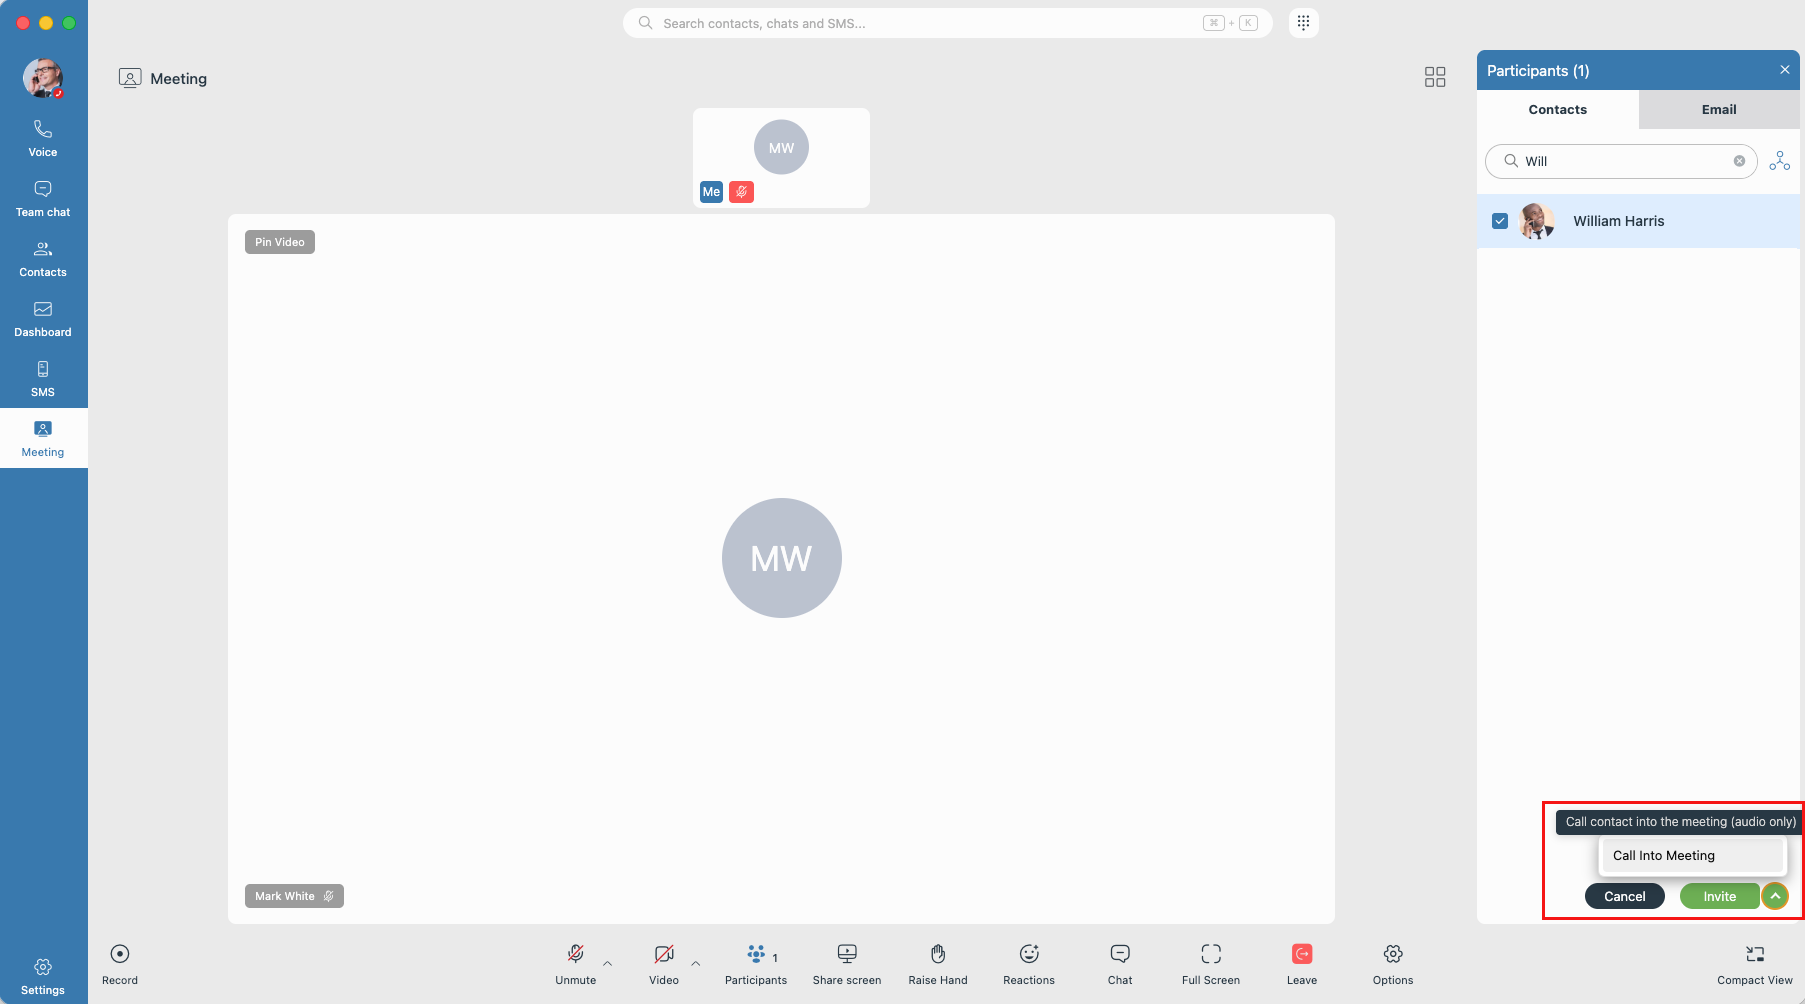
Call Into Meeting lets you bring a contact into an ongoing meeting with a direct phone call. Pick a contact from the invite menu and the system dials their extension — the moment they answer, they join the meeting as an audio-only participant. No app, no join link, and no meeting number needed on their side, which makes it the fastest way to include a colleague who is away from their computer.
¶ Calling a Contact Into a Meeting
- In an ongoing meeting, locate the Invite split button.
- Click the arrow (chevron) to open the dropdown and select Call into meeting.
- Pick the contact — the call is placed immediately and the dropdown closes.
- The contact appears in the participants list with a ringing indicator. When they answer, they join the meeting audio.
Note: The called participant joins with audio only — no camera or screen sharing. The tooltip on the option says exactly that: "Call contact into the meeting (audio only)".
¶ Managing a Called-In Participant
Called-in participants appear in the participants list like everyone else. Right-click one for the available actions:
- Mute — mutes the participant's audio for the whole meeting.
- Remove from audio — ends the phone call; the participant leaves the meeting audio.
- Remove from meeting — removes the participant from the meeting entirely.
If the participant hangs up on their side, they leave the meeting audio automatically and are shown as Not present in the participants list — you can call them back in from there at any time.
Note: For privacy reasons, no participant can be unmuted by the organizer — this applies to all participants, not just called-in ones. Keep in mind that a called-in (phone) participant has no unmute control of their own, so mute them only when you don't expect them to speak again.
¶ Ending the Meeting
When the meeting ends, all called-in participants are disconnected automatically — their phone calls end together with the meeting.
¶ Good to Know
- If the contact does not answer, is busy on another call, or is offline, no participant joins — the entry remains in the participants list so you can simply try calling them again later, or remove it manually.
- The called contact sees the meeting's number as the caller — answering the call is all they need to do to join.
- Calling into a meeting requires the contact's extension to be reachable (registered) on the PBX.
¶ Remote Control
Remote Control lets you hand control of your shared screen to another participant in a meeting. They can move your mouse and use your keyboard, and you can optionally share your clipboard with them.
You stay in charge — control is only given when you allow it, and you can take it back at any time.
Note: Remote Control requires the desktop app and sharing your entire screen. It is not available when you share a single application window, or when the presenter is using gloCOM Web.
¶ Giving control to a participant
While you are sharing your entire screen, a Remote Control button appears in the meeting control bar.

- Click Remote Control to open the menu.
- Under Allow remote control to, click the participant you want to give control to.
- A tick appears next to their name once they have control.
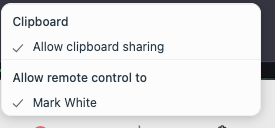
To also share your clipboard, tick Allow clipboard sharing in the same menu.
¶ Requesting control from the presenter
If someone else is sharing their screen, you can ask them for control.
- Click Options in the meeting control bar.
- Click Request remote control.
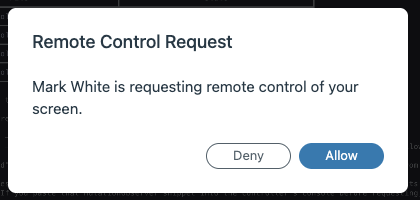
- The presenter is asked to approve your request.
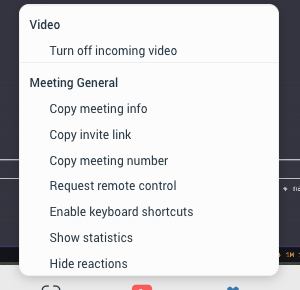
The presenter sees your request and chooses Allow or Deny. You are notified either way.
¶ Taking control back
Open Remote Control and click the participant's name again. Control returns to you immediately and they are notified.
Control is also released automatically when you:
- stop sharing your screen
- switch to sharing a single application window
- leave or end the meeting
¶ When Remote Control is unavailable
If Request remote control is greyed out, hover the ⓘ icon to see why.
| Message | Reason |
|---|---|
| Remote control not available for window share | The presenter is sharing a single application window instead of their entire screen. |
| Remote control unavailable - presenter is not using Desktop app | The presenter is using gloCOM Web. Remote control needs the desktop app. |
You will also see it greyed out if you already have control.
¶ Meeting Attendance Report
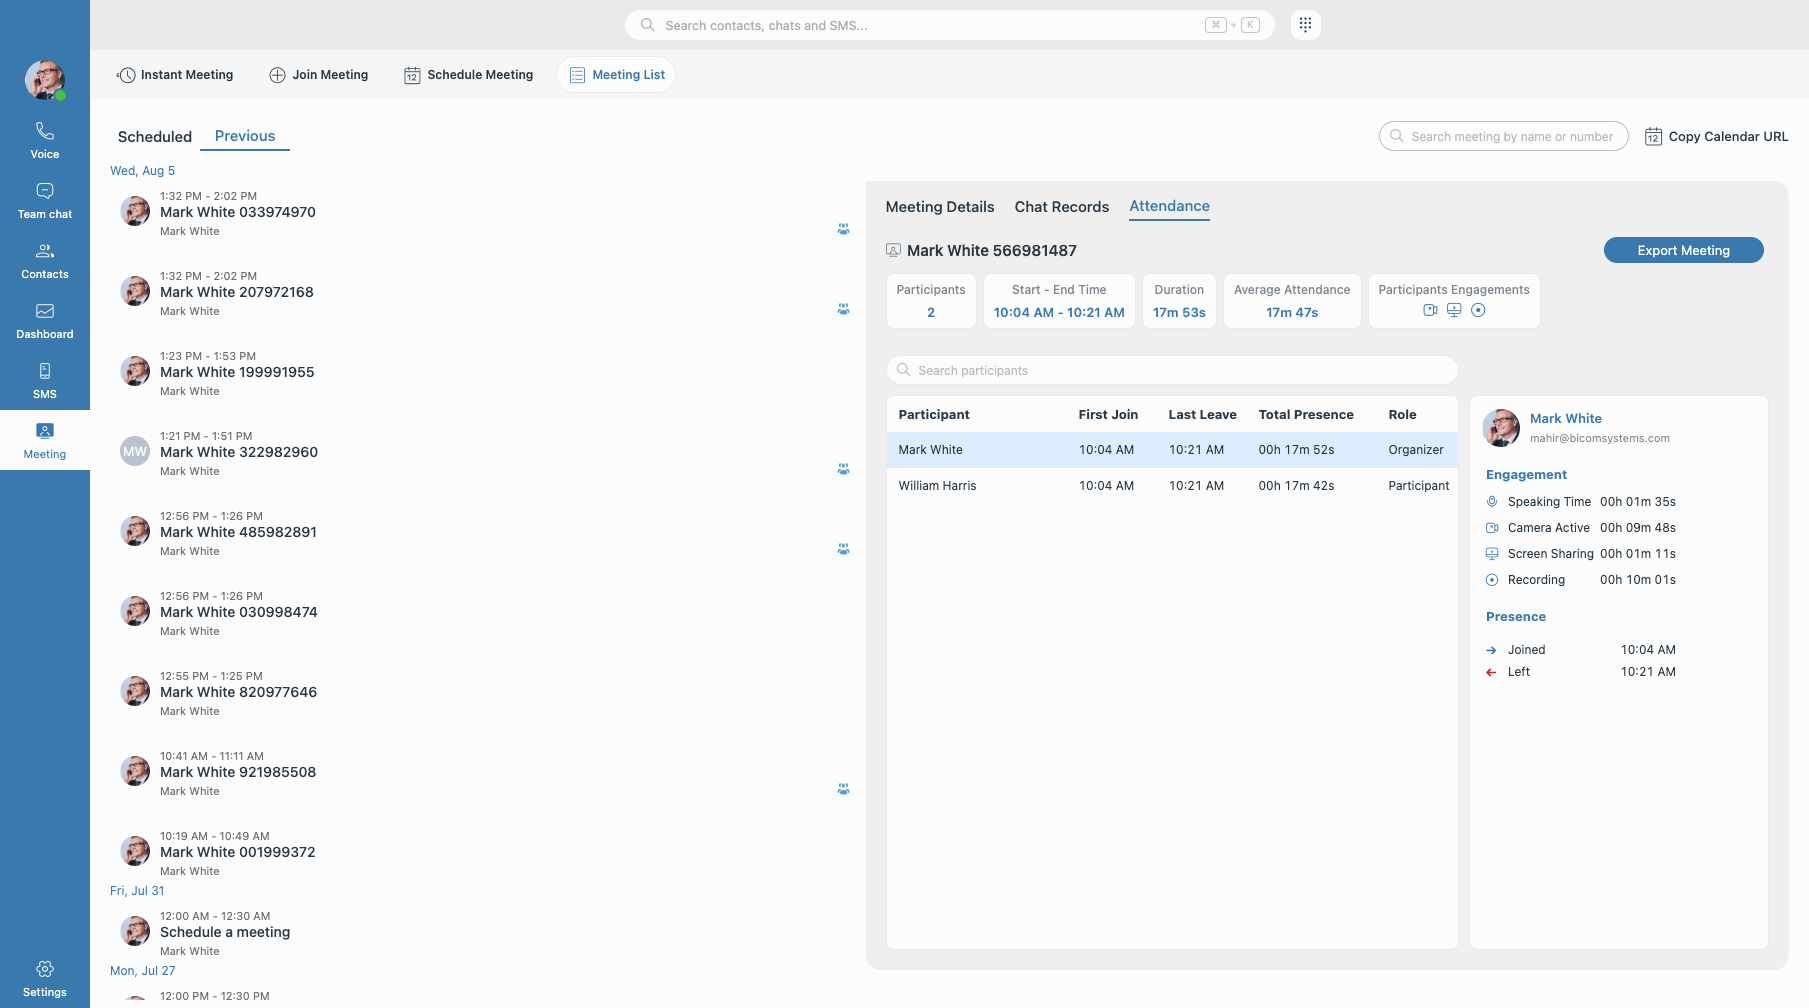
gloCOM Next provides a detailed Attendance report for every finished meeting, showing who attended, for how long, and how engaged each participant was — including speaking time, camera usage, screen sharing, and recording duration. The full report can also be exported as a CSV file for record-keeping or further analysis.
¶ Viewing an Attendance Report
- Click the Meeting icon and select Meeting List.
- Open the Previous sub-tab and select an ended meeting from the list.
- Click the Attendance tab, shown alongside Meeting Details and Chat Records.
Note: The Attendance tab is available only if the feature is supported and enabled on your system.
¶ Meeting Summary
The summary bar at the top of the Attendance tab gives an at-a-glance overview of the meeting:
- Participants: The total number of people who joined the meeting.
- Start – End Time: When the meeting began and ended.
- Duration: The total length of the meeting.
- Average Attendance: The average time participants spent in the meeting.
- Participants Engagements: Icons summarizing engagement across the meeting — speaking, camera, screen sharing, and recording.
¶ Participants Table
Below the summary, the participants table lists every attendee with:
| Column | Description |
|---|---|
| Participant | The participant's name |
| First Join | The time the participant first joined the meeting |
| Last Leave | The time the participant last left the meeting |
| Total Presence | The total time the participant spent in the meeting |
| Role | Organizer or Participant |
- Use the Search participants box to quickly filter the table by name.
- If the window is narrowed, the table displays a horizontal scrollbar so no data is cut off.
¶ Participant Details
Click any participant in the table to open their detail panel, showing that person's individual engagement in the meeting:
- Speaking Time: How long the participant was actively speaking.
- Camera Active: How long the participant's camera was turned on.
- Screen Sharing: How long the participant shared their screen.
- Recording: How long the participant recorded the meeting.
- Presence: The participant's join and leave timestamps.
¶ Exporting the Report
- Click the Export Meeting button on the Attendance tab.
- Choose a location in the save dialog to download the report.
The exported CSV file is named Attendance-<meeting number>.csv and contains one row per participant with all attendance and engagement metrics: first join and last leave timestamps, total presence, role, speaking time, camera active time, recording time, and screen sharing time (durations in seconds, timestamps in ISO 8601 format).
Tip: The CSV export is ideal for attendance record-keeping, training compliance, or importing meeting engagement data into external reporting tools.
Note: If the Meeting service cannot be reached, the Attendance tab displays a "Failed to establish connection with Meeting service" message instead of the report. Check your connection and try again.
¶ Adjusting Settings
- Click the "Settings" icon in the navigation bar to open the general settings screen.
- Use the General Settings side panel to navigate through the available sub-menus and personalize your application experience.
¶ General Settings Navigation
The general settings screen is organized into specific sections to help you manage your hardware endpoints, notifications, and core integrations quickly:
- Phone: Configure your phone configurations, extension options, caller ID choices, and default handling parameters for active voice calls.
- Audio: Set your audio hardware preferences, allowing you to select and test your preferred microphone, speakers, or headset output and integration.
- Alerts: Manage your notification preferences.
- Modules: Configure call popups and macro-driven third-party integrations to automatically trigger web pages based on specific call events.
- Meeting: Adjust defaults for meetings, including participant audio/video join states, layout behaviors, meeting alerts, and local recording storage.
- Chat: Customize text messaging preferences, select the local folder for downloaded files, and adjust the display text size for chat bubbles.
- CRM: Manage integrations with external customer relationship systems and configure data synchronization behaviors.
- Appearance: Personalize the visual interface by selecting your preferred application language and toggling between light, navy blue and dark visual themes.
- Other: Access general application behaviors, such as system startup preferences and default contact search actions.
¶ My Phones
The My Phones section in Settings → Phone allows you to control which phone devices are available for making calls.
- Open Settings → Phone and scroll to the My Phones section. Two checkboxes are available: "Use deskphone" and "Use softphone", both enabled by default.
- Uncheck a device to remove it from the Dialpad phone dropdown. If you uncheck your currently active device, the application automatically switches to the next available one.
- If both devices are unchecked, a warning is displayed: "You have not selected any phone device."
- Use the Go to My Phones link at the bottom of the Dialpad phone dropdown to navigate directly to this settings section.
- Your device preferences are saved and persist after page reload or re-login.
Note: If a PBXware administrator has set a Default Client Phone for your extension, both checkboxes will be disabled and a message will indicate that phone selection is restricted by the administrator. The forced device is automatically selected.
¶ Call Waiting
The Call Waiting option in Phone settings controls what happens when a new
call comes in while you are already on a call. It is found in
Settings → Phone, just above the "Call Waiting audio notification (BEEP
sound)" option.
¶ How It Works
- Call Waiting ON (default): a second incoming call is presented to you
while you are on a call, so you can answer, hold, or reject it. - Call Waiting OFF: gloCOM Next automatically rejects any new incoming
call while you are already on a call — you are not interrupted, and the
caller is told you are busy on another call.
A short explanation of this behavior is shown directly beneath the option.
Note: Call Waiting applies when you are using the Softphone. It does not
control calls handled by a deskphone.
¶ What the Caller Hears When Call Waiting Is Off
When you decline a call this way, the caller is routed to your busy
destination:
- If you have voicemail, the caller hears your busy greeting — by default,
"The person at extension … is on the phone" — and can leave a message. - If you have no voicemail, the caller simply hears a busy signal.
Note: The "user is busy" message comes from your busy destination
(voicemail). An extension without voicemail configured will give the caller a
plain busy signal rather than a spoken message.
¶ Good to Know
- Call Waiting only comes into play when your extension is allowed more than one
simultaneous call. If your extension is limited to a single call on the PBX,
a second caller is always sent to your busy destination while you are on a
call, regardless of this setting. If you expect to receive a second call and
it always goes to voicemail, ask your administrator to check your extension's
simultaneous-call limit.
¶ Caller ID switching preference
The Caller ID switching preference allows users to control how Caller ID changes are handled when making calls. Users can choose whether to be asked every time, apply the selected Caller ID for a single call, or remember the selection permanently.
Users can configure the preference under Settings → Phone or directly from the Caller ID selection pop-up by selecting Options.
This allows users who frequently change their Caller ID to configure their preferred setting without having to manage the prompt on every call.
¶ CRM Integrations
The CRM section within the application settings allows you to link your communication tools with external CRM systems to streamline your workflow.
-
Access CRM Settings: Navigate to the Settings menu and select the CRM section to view a list of all available CRM integrations.
-
View Connection Status: Each listed CRM system clearly displays its current status (e.g., Connected or Disconnected).
-
Connecting a CRM:
-
Click the Connect button next to your desired CRM to initiate the integration.
-
An OAuth2 login window will appear in a new popup.
-
Enter your CRM credentials and authorize the application.
-
Once successful, the popup will close, and the status in the main settings view will update to Connected.
-
-
Disconnecting a CRM:
-
To remove an integration, click the Disconnect button or link next to the active CRM.
-
The connection will be broken instantly, and the Connected label will be removed.
-
Note: The connection process is optimized for both Web and Electron environments, ensuring that the status updates correctly regardless of which platform you are using.
¶ MCP Server for AI Integration
Note: This feature is in Beta and is available only in the Desktop app.
The MCP (Model Context Protocol) Server allows AI assistants such as Claude and Cursor to securely access your chat history, call logs, and scheduled meetings in a read-only capacity. The server runs locally on the loopback address, starts automatically on login, and stops on logout.
- Navigate to Settings → MCP Server to configure the integration.
- Copy the ready-to-use configuration block for your preferred AI client:
- Claude Code
- Claude Desktop
- Generic MCP client
- Optionally enable Bearer Token Authentication to add an extra layer of security to the local server connection.
- Click Get more info to open the help dialog for additional setup guidance.
¶ Busylight
Note: Available on macOS and Windows in the Desktop app and Chromium-based browsers. Not supported on Linux. Disabled on Safari and Firefox.
Connect a Busylight device to display your real-time presence, call, and meeting status as a physical light indicator.
- Navigate to Settings → Busylight to configure your device.
- Assign a color to each presence state: Available, Busy, Away, and DND — colors update instantly when your status changes.
- Select a ringtone and adjust the volume slider for incoming call alerts.
- Use the interactive preview to test your configuration — it yields automatically to incoming traffic.
¶ Logs and Diagnostics
The application includes a built-in log viewer to assist with troubleshooting and technical support.
¶ Accessing the Log Viewer
- Navigate to the Help menu in the application header.
- Select the Logs option to open the integrated Log Viewer.
¶ Log Viewer Features
- Category Filtering: Use the category dropdown to isolate specific types of events.
- Search: Use the search bar to find specific keywords or error codes within the log entries.
- Log Management: You can manually Clear the current view, Copy log content to your clipboard, or Download the logs as a file for external review.
- Console Logs: Note that
console.logsare disabled in the browser dev tools on production and test servers; all activity must be viewed through the internal log viewer.
Tip: For more detailed troubleshooting, you can enable Verbose mode.