¶ Introduction - How to use the Sipura SPA 3000 with PBXware
This "How to" is written as a general guide on how to use your Sipura SPA 3000 with PBXware using 2.0.13(GWg) Sipura SPA 3000 firmware. It covers the most common tasks required to have your Sipura SPA 3000 working efficiently.
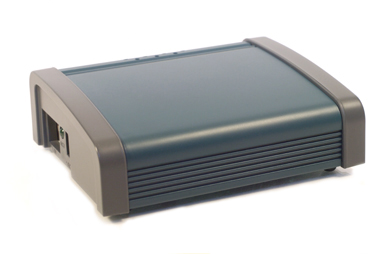
¶ Registering Sipura SPA 3000
¶ Requirements
1. Sipura SPA 3000 firmware.
- Make sure that the device is loaded with 2.0.13(GWg) firmware.
2. DHCP server.
- Fully configured and operational DHCP server.
3. Sipura SPA 3000 Dial Plan.
- Fully configured and operational DHCP server.
- The Sipura SPA 3000 "Dial Plan" field value needs to be changed using the web interface.
STEP ONE: Sipura SPA 3000 Web Interface.
1. Open a new browser window and enter the IP address in order to access the Sipura SPA 3000 administration interface.
Example: http://192.168.1.101
To learn how to find out the Sipura SPA 3000 IP Address go to chapter "Registering ATA" "STEP ONE" .

an example with IP address
2. Hit "Enter" on your keyboard.
STEP TWO: The Sipura SPA 3000 Dial Plan field value.
1. Click on "Admin Login".

2. Click on "advanced" link.

3. Click on "Line 1" link.

4. Navigate down to the "Dial Plan" group. Clear the "Dial Plan" field, then copy and paste the following value.
(*x.|**x.|*xx|[3469]11|0|00|[2-9]xxxxxx|1xxx[2-9]xxxxxx|xxxxxxxxxxxx.)

5. Click on the "Submit All Changes" button. The Sipura SPA 3000 will reboot for changes to take effect.
¶ Manual Configuration
¶ UAD Settings
STEP ONE: PBXware IP address.
1. Find out the IP address of the PBXware server.
STEP TWO: Login to PBXware.
1. Open a new browser window and enter the IP address to access the PBXware administration interface login screen.
Example: http://192.168.1.2
2. Hit "Enter" on your keyboard.
3. Login to PBXware with your e-mail address and password.
STEP THREE: UAD status.
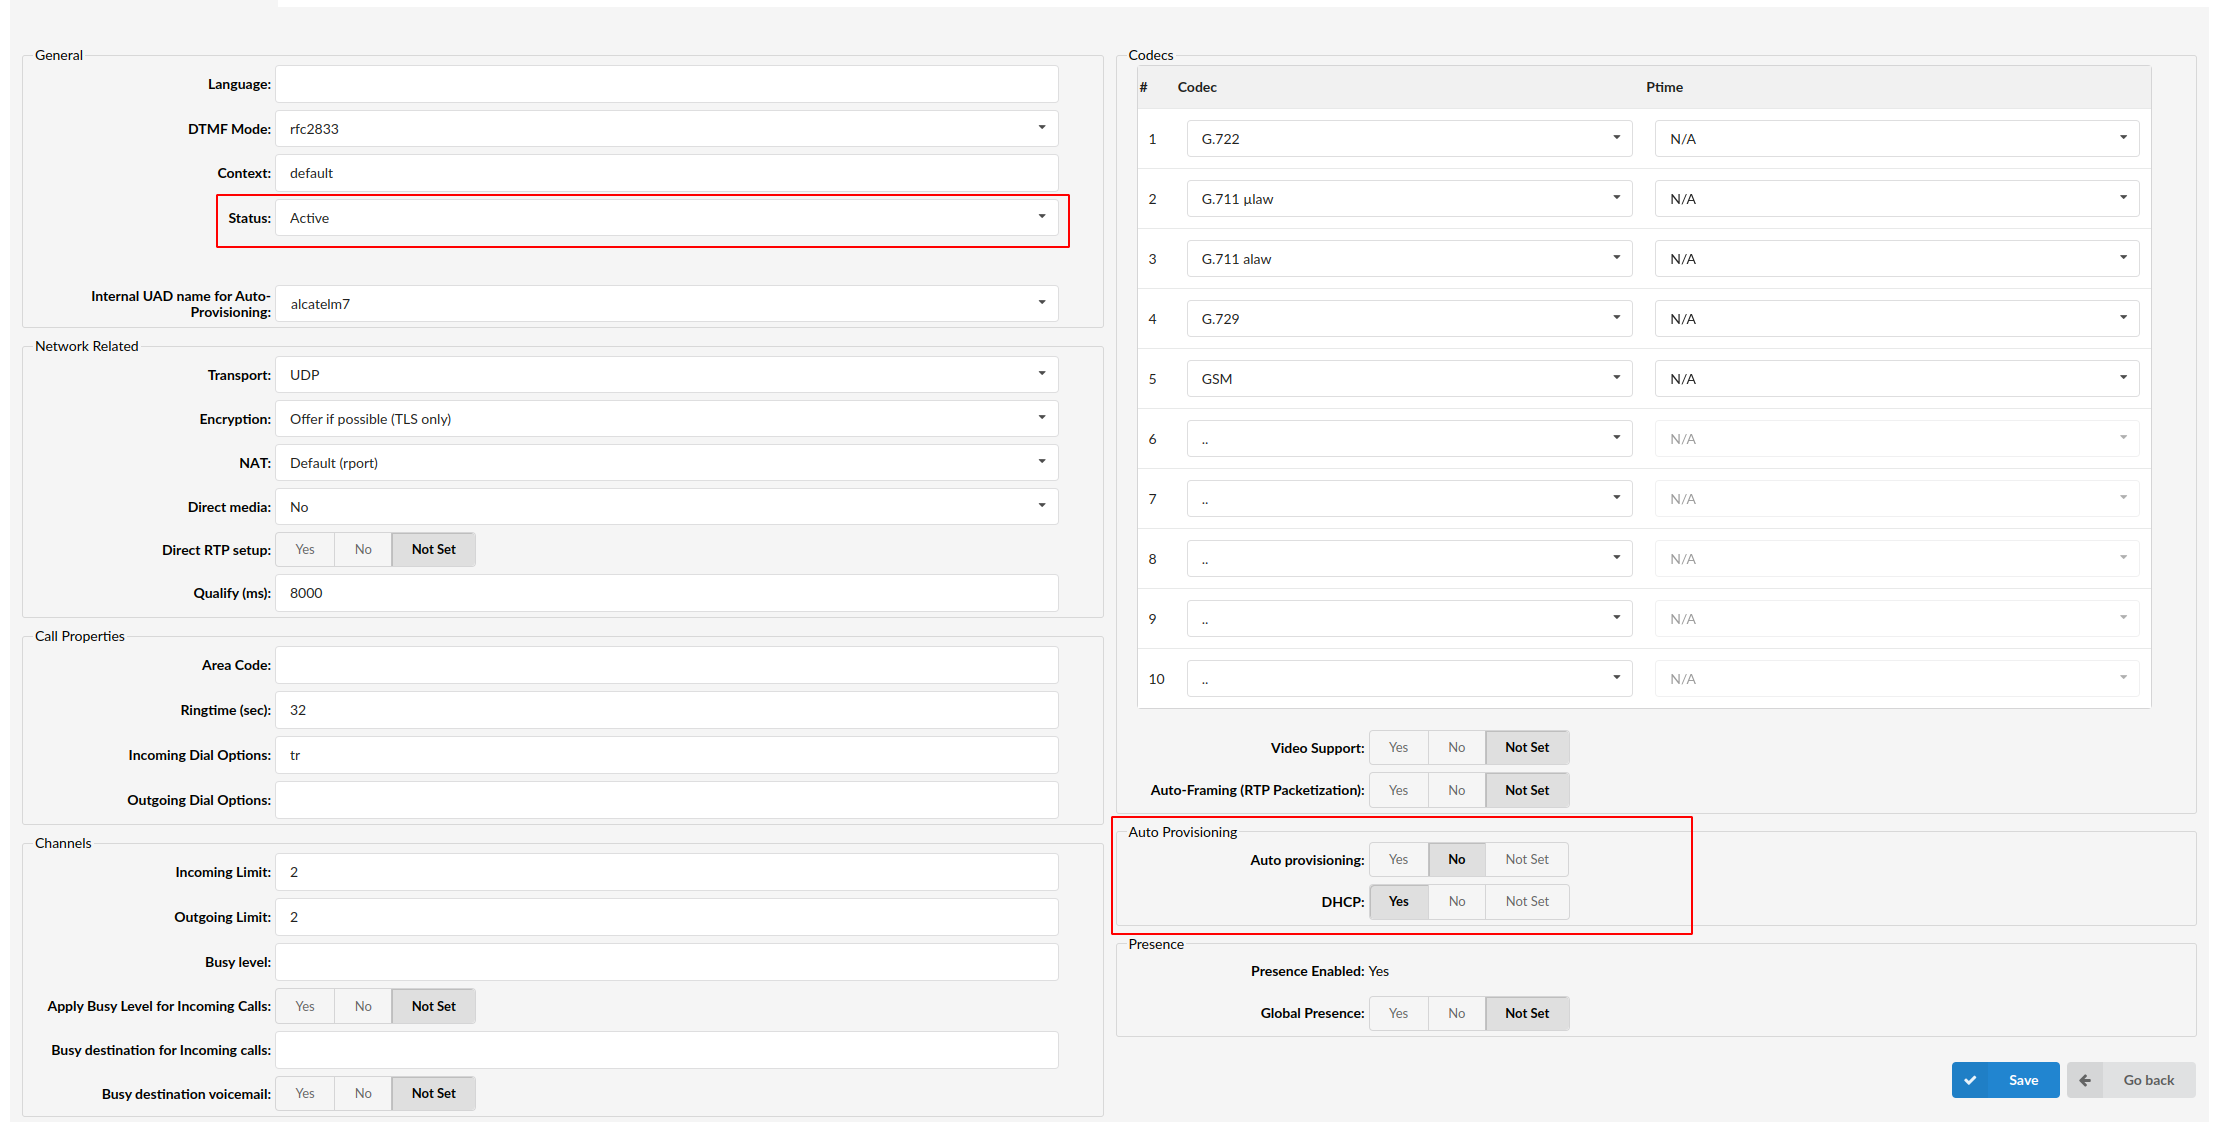
1. Make sure the UAD is enabled. To check the UAD status, navigate to "Settings:UAD", and click on the "edit" icon corresponding to "Sipura SPA 3000".
2. Make sure "Status" is set to "active", "Auto provisioning" is set to "No", and "DHCP" is set to "Yes".
3. Click on the "Save" button to save changes.
¶ Creating Extension
STEP ONE: Add Extension.
1. Navigate to "Extensions". Click on "Add Extension".
2. The standard options window (below) will be shown.
3. Select Sipura SPA 3000 from the "UAD" select box.
4. Select Location: "Local" or "Remote".
Note:
-"Local" is for all extensions registered on LAN.
-"Remote" is for all extensions registered from remote networks, WAN, Internet etc.
5. Click on the "Next" button.
STEP TWO: Extension values.
1. Enter values into the required field text boxes.
REQUIRED FIELDS:

Name:
Enter a name for the extension being created. Example: John Smith.
E-mail:
Enter the e-mail address associated with this extension. This e-mail address will receive all system notification messages. Example: john@domain.com.
2. Click on the "Save" button.
3. Click on the "Save & E-mail". Account details will be sent to the e-mail address associated with this extension.
OPTIONAL FIELDS:
Extension:
An auto-generated extension number based on the next available sequential number. An extension value can be changed. Example: 1000.
Username:
Username is auto generated/populated and cannot be changed since it allows the system to use this value for other important operations.
Secret:
A secret value associated with the UAD is auto-generated in order to allow the UAD to successfully register with the system. The secret value can be changed.
PIN:
An auto-generated PIN will allow access to voicemail and online self care.
¶ Registering ATA
STEP ONE: Electricity and Ethernet.
- Connect the other end of the cable to an analog telephone.
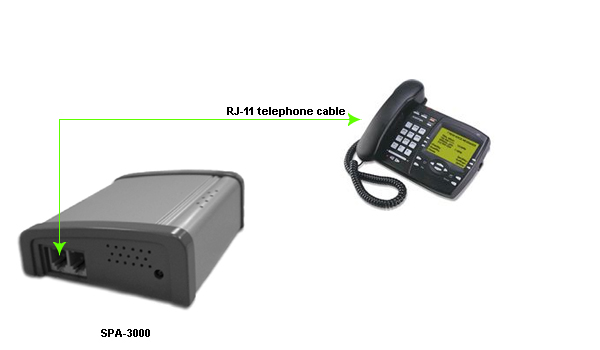
Registering ATA
- Your Sipura SPA 3000 needs electricity, so plug the adapter into its jack and connect it to the electricity network.
- Connect the ethernet port to a hub, router. or switch as access to LAN.
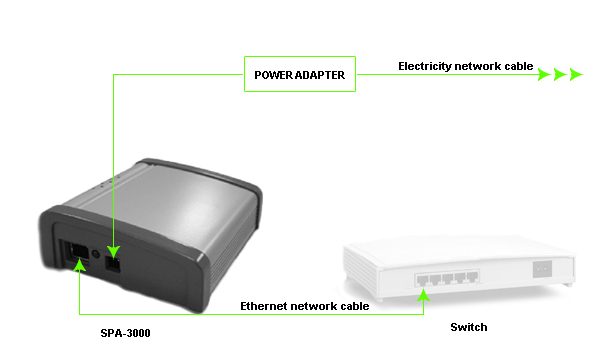
Registering ATA
After successfully connecting your Sipura SPA 3000 to the electricity and data networks, it is time to register it to PBXware.
STEP TWO: Sipura SPA 3000 IP address.
Find out the IP address of your Sipura SPA 3000 connected to network.
1. Dial ****.
2. Dial 110#.
STEP THREE: Sipura SPA 3000 Web Interface.
1. Open a new browser window and enter the IP address in order to access the administration interface.
Example: http://192.168.1.101

an example with IP address
2. Hit "Enter" on your keyboard.
STEP FOUR: Configuring your Sipura SPA 3000.
1. Click on "Admin Login" .

2. Click on "Line 1" .

3. Enter the following details into their respective fields.
REQUIRED FIELDS:
Proxy
IP address of the PBXware server. Example: 192.168.1.2
User ID
PBXware extension number. Example: 1000.
Password
The Secret of the extension as received in the e-mail associated with this extension. Example: 3dX3r5

an example with details filled in
4. Navigate to the bottom of the page and click on the "Submit All Changes" button. The Sipura SPA 3000 will reboot for changes to take effect.

OPTIONAL FIELDS:
Display name
Example: John Smith, Reception, Entrance Main, Agent One etc.
Auth ID
Usually the same number as for the account.
Other fields
Other "options" or "fields" should be left blank or as is by default, they are not important for registering your Sipura SPA 3000 to PBXware.
- Conclusion: If everything is done as above described, you should have successfully registered your Sipura SPA 3000 to PBXware. Dial *123 to verify registration.
- For further information, please contact the manufacturer or check their website www.sipura.com.
¶ Auto Provisioning
¶ UAD Settings
STEP ONE: PBXware IP address.
1. Find out the IP address of the PBXware server.
STEP TWO: Login into PBXware.
1. Open a new browser window and enter the IP address to access the PBXware administration interface login screen.
Example: http://192.168.1.2
2. Hit "Enter" on your keyboard.
3. Login to PBXware with your e-mail address and password.
STEP THREE: UAD status.
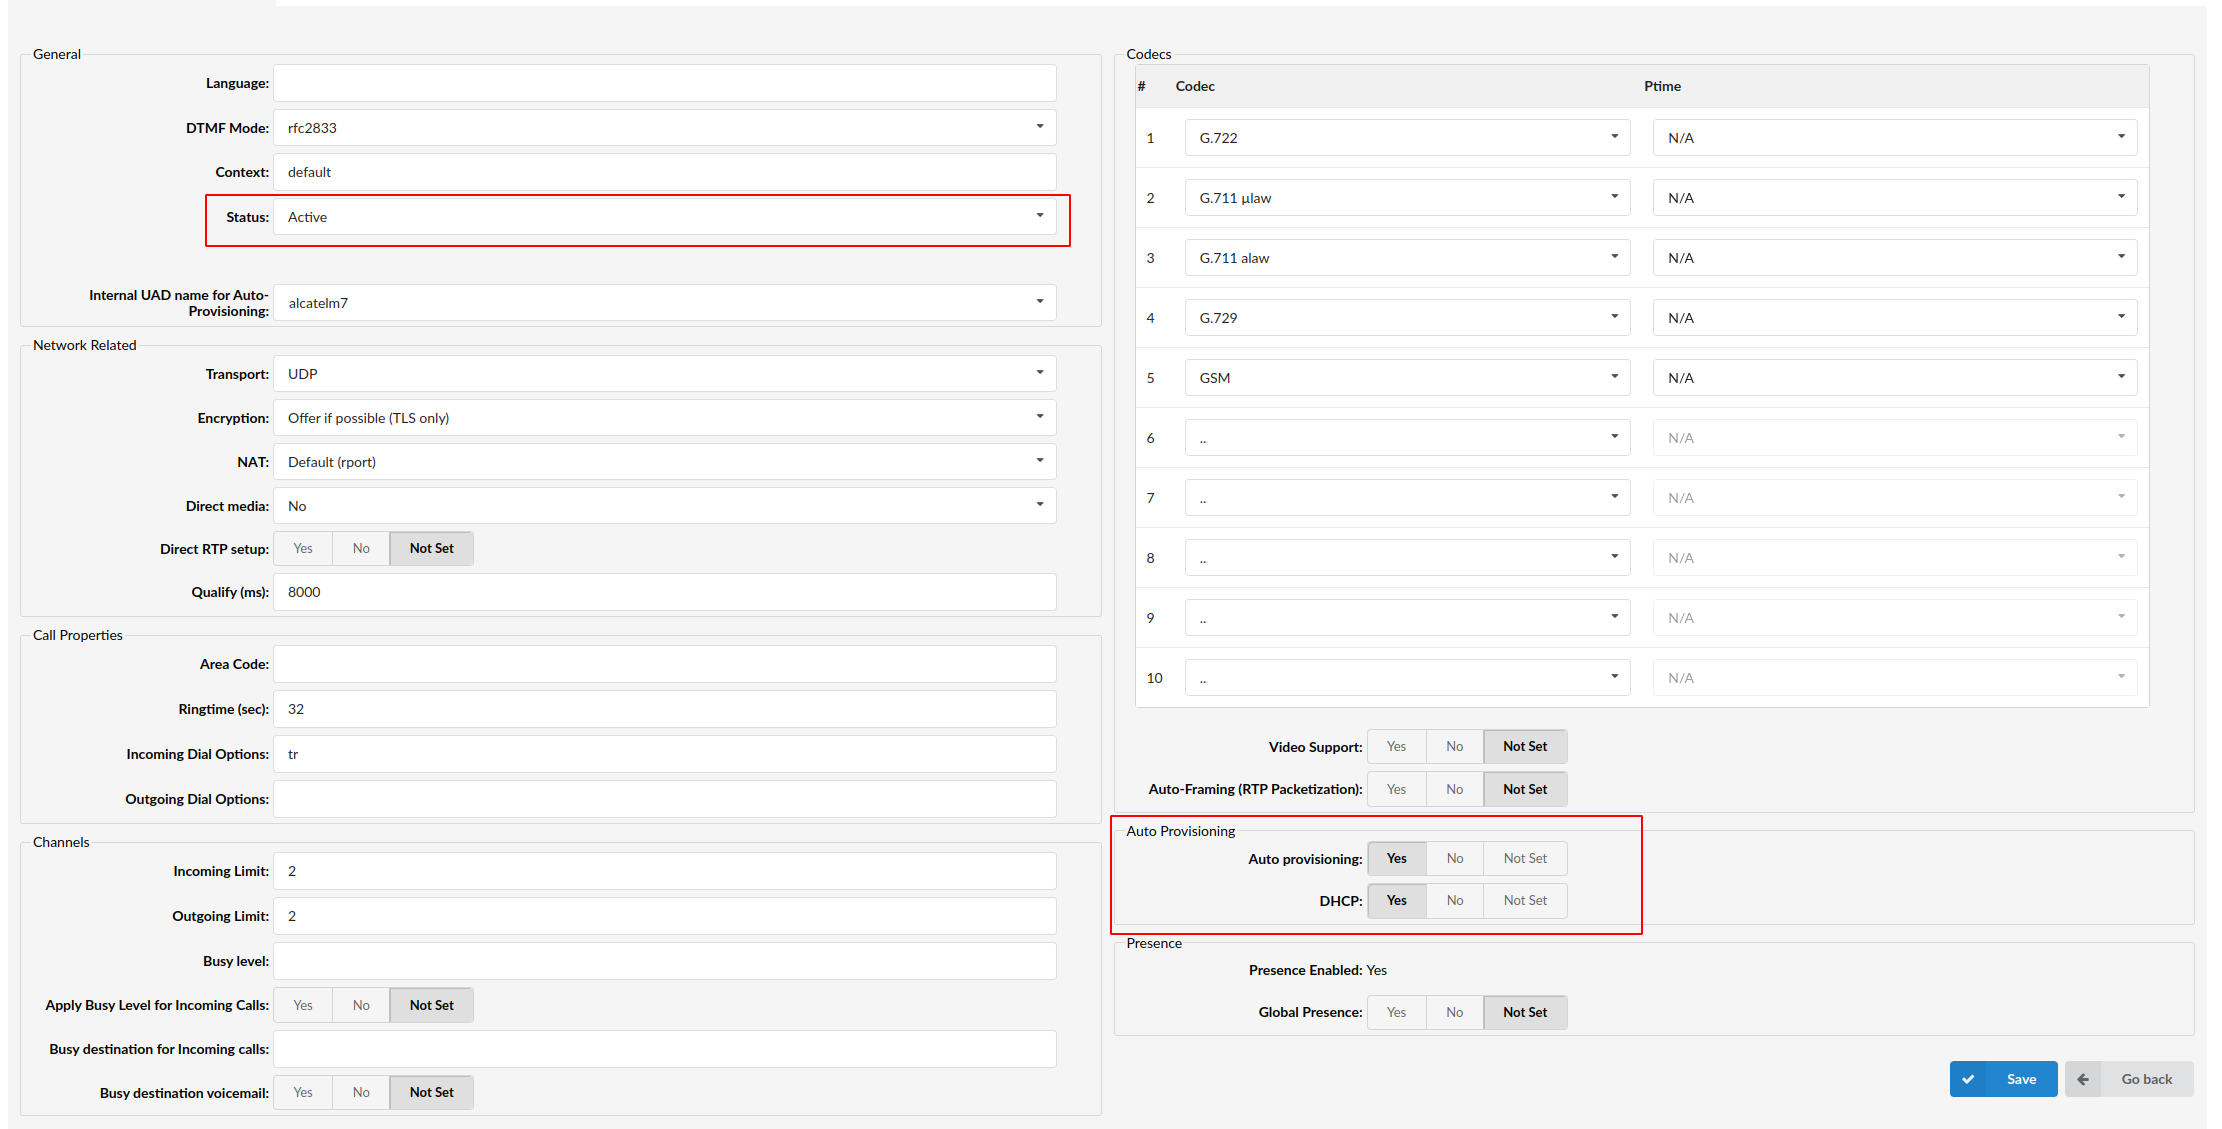
1. Make sure the UAD is enabled. To check the UAD status, navigate to "Settings:UAD" and click on the "edit" icon corresponding to "Sipura SPA 3000".
2. Make sure "Status" is set to "active", "Auto provisioning" is set to "No", and "DHCP" is set to "Yes".
3. Click on the "Save" button to save changes.
¶ Creating Extension
STEP ONE: Add Extension.
1. Navigate to "Extensions". Click on "Add Extension".
2. The standard options window (below) will be shown.
3. Select Sipura SPA 3000 from the "UAD" select box.
4. Select Location: "Local" or "Remote".
Note:
-"Local" is for all extensions registered on LAN.
-"Remote" is for all extensions registered from remote networks, WAN, Internet etc.
5. Click on the "Next" button.
STEP TWO: Extension values.
1. Enter values into the required field text boxes.
REQUIRED FIELDS:
Name:
Enter a name for the extension being created. Example: John Smith.
E-mail:
Enter the e-mail address associated with this extension. This e-mail address will receive all system notification messages. Example: john@domain.com.
Auto provisioning:
Set to "Yes".
MAC Address:
Sipura SPA 3000 MAC address. Example: 001646f5f797
2. Click on the "Save" button.

3. Click on the "Save & E-mail" button. Account details will be sent to the e-mail address associated with this extension.
OPTIONAL FIELDS:
Extension:
An auto-generated extension number based on the next available sequential number. An extension value can be changed. Example: 1000.
Username:
Username is auto generated/populated and cannot be changed since it allows the system to use this value for other important operations.
Secret:
A secret value associated with the UAD is auto-generated in order to allow the UAD to successfully register with the system. The secret value can be changed.
PIN:
An auto-generated PIN will allow access to voicemail and online self care.
¶ Registering ATA
STEP ONE: Electricity and Ethernet.
- Insert a standard RJ-11 telephone cable into the "Phone 1" port.
- Connect the other end of the cable to an analog telephone.

Registering ATA
- Your Sipura SPA 3000 needs electricity, so plug the adapter into its jack and connect it to the electricity network.
- Connect the ethernet port to a hub, router or switch as to access LAN.

Registering ATA
After successfully connecting your Sipura SPA 3000 to the electricity and data networks, it is time to register it to PBXware.
The "Profile Rule" field must be set with TFTP server value.
STEP TWO: Sipura SPA 3000 IP address.
Find out the IP address of your Sipura SPA 3000 connected to network.
1. Dial ****.
2. Dial 110#.
STEP THREE: Sipura SPA 3000 Web Interface.
1. Open a new browser window and enter the IP address in order to access the Sipura SPA 3000 administration interface.
Example: http://192.168.1.101

an example with IP address
2. Hit "Enter" on your keyboard.
STEP FOUR: Configuring "Profile Rule".
1. Click on "Admin Login" link.

2. Click on "advanced" link.

3. Click on "Provisioning" link.

4. Navigate down to "Profile Rule" field, it must be set with TFTP server value.
Example: 192.168.1.2/$MA.cfg
5. Navigate to the bottom of the page, click on the "Submit All Changes" button. The Sipura SPA 3000 will reboot for changes to take effect.

- Conclusion: If everything is done as above described, you should have successfully registered your Sipura SPA 3000 to PBXware. Dial *123 to verify registration.
- For further information, please contact the manufacturer or check their website www.sipura.com.
¶ LAN And WAN IP Address
Make sure your "Auto Provisioning" " LAN " and " WAN**" IP fields are set with the correct IP address.**
1. Navigate to "Settings:Servers", and click on the "edit" button corresponding to the server.
2. Navigate down to "Auto Provisioning" group.
- LAN IP: Enter your PBXware local (LAN) IP address. Example: 192.168.1.2
- WAN IP: Enter your PBXware wide (WAN) IP address. Example: 89.146.131.130
3. Click on the "Save" button. You'll be prompted to click on the "OK" button to restart <%PRODUCT%> for changes to take effect.
3. Click on the "Save" button. You'll be prompted to click on the "OK" button to restart PBXware for changes to take effect.
¶ Using the Sipura SPA 3000 as a SIP/PSTN gateway with PBXware
The Sipura SPA 3000 is a small and inexpensive ATA and SIP/PSTN gateway. With careful configuration, it may be used in conjunction with PBXware in place of the Digium Zaptel interface cards. This can be of particular advantage in some implementations since the Digium single-port X100P FXO cards for Asterisk cannot be used, for example, in the UK due to impedance mismatch, and the new TDM400P base price is more than double the cost of the Sipura unit even before adding the required FXO or FXS modules.
The only disadvantage is that for PBXware licensing, each Sipura SPA 3000 counts against the licensed number of VOIP trunks for the version of PBXware.
This how-to guide gives simple instructions on how to setup PBXware and the Sipura SPA 3000 to work together. You must use a fixed IP address with the Sipura SPA 3000 to work correctly because of limitations of either PBXware or the Sipura SPA 3000 having mutually exclusive authentication entities.

¶ Create A New Provider In PBXware
STEP ONE: Create a new provider.
1. Navigate to Settings:Providers. Click on "Add Custom Provider".
2. The standard options window (below) will be shown.
3. Enter values into the required field text boxes.
REQUIRED FIELDS:
Type:
Select "VOIP".
Protocol:
Select "SIP".
Name:
Enter, for example: "Generic SIP/FXO Gateway".
General
User Type:
Select "user and peer".
DTMF Mode:
Select "rfc2833".
Country:
Select, for example: "United Kingdom of Great Britain".
National dialing code:
Enter "0".
International dialing code:
Enter "00".
Network Related
Canreinvite:
Select "No".
Channels
Ensure that Channels are set to incoming and outgoing limits of 1 (it’s an analog line and can only have one call at a time).
Incoming Limit:
Enter "1".
Outgoing Limit:
Enter "1".
Authentication
Host and Peer host should be set to the IP address of the Sipura SPA 3000.
Host:
IP address of the Sipura SPA 3000. Example: 192.168.1.111
Peer Host:
IP address of the Sipura SPA 3000. Example: 192.168.1.111
Auth Method:
Select "none".
Register:
Select "Not required".
Insecure:
Select "very".
Codecs
Disallow:
Select "all".
Allow:
Select "G.711 ulaw" and "G.711 alaw".
4. Click on the "Save" button.
OPTIONAL FIELDS:
Other "options" or "fields" should be left blank or as is by default.
¶ Create A New Trunk
STEP ONE: Create a new trunk.
1. Navigate to "Trunks". Click on "Add Trunk".
2. The standard options window (below) will be shown.
3. Select the provider name "Generic SIP/FXO Gataway" from the "Provider" field.
4. Click on the "Next" button.
5. Click on the "Advanced Options" button.
6. Enter values into the required field text boxes.
REQUIRED FIELDS:
Name or Number:
Enter a trunk name. Example: "Spa3000".
Emergency trunk:
Select "No".
Username:
PBXware needs something in these fields, so put anything, it will not be used.
Peer Username:
The Sipura SPA 3000 needs something in these fields, so put anything, it will not be used.
7. Click on the "Save" button.
OPTIONAL FIELDS:
Qualify:
Enter "8000".
Other fields
Other "options" or "fields" should be left blank or as is by default.
¶ Create A DID For PSTN Line
STEP ONE: Create a DID for PSTN Line.
1. Navigate to "DID's".
2. Click on the "Add DID" button.
3. The standard options window (below) will be shown.
4. Enter values into the required field text boxes.
REQUIRED FIELDS:
Trunk:
Select the trunks just created, "Spa3000".
DID/Channel (start):
Enter your phone number as DID. Example: 07811112222
Destination:
Direct it to Extension, IVR Queues, Voicemail etc. Example: Extension.
Value:
Enter destination number. Example: 1000
5. Click on the "Save" button.
Note: you MUST setup a DID because PBXware places each VOIP trunk into its own context. Therefore, when we get to the Sipura SPA 3000 configuration, if the dial plan points to an extension, PBXware will respond with error 404 (Not Found) because the extensions are not in the same context as the trunk.
¶ Configuring Sipura SPA 3000
STEP ONE: Electricity and Ethernet.
- Connect the other end of the cable to an analog telephone.

Configuring Sipura SPA 3000
- Your Sipura SPA 3000 needs electricity, so plug the adapter into its jack and connect it to the electricity network.
- Connect the ethernet port to a hub, router, or switch to access LAN.

Configuring Sipura SPA 3000
After successfully connecting your Sipura SPA 3000 to the electricity and data networks, it is time to register it to Sipura SPA 3000.
STEP TWO: Sipura SPA 3000 IP address.
Find out the IP address of your Sipura SPA 3000 connected to network.
1. Dial ****.
2. Dial 110#.
STEP THREE: Sipura SPA 3000 Web Interface.
1. Open a new browser window and enter the IP address in order to access the administration interface.
Example: http://192.168.1.101

an example with IP address
2. Hit "Enter" on your keyboard.
STEP FOUR: Configuring your Sipura SPA 3000.
1. Click on "Admin Login" link.

2. Click on "advanced" link.

3. Click on "PSTN Line" link.

4. Navigate down to "Sip Settings" group.
SIP Port:
Enter 5060 into SIP Port field.

5. Navigate down to "Proxy and Registration" group.
Proxy:
IP address of PBXware server. Example: 192.168.1.2
Register:
Select "no".
Use Outbound Proxy:
Select "no".
Use OP Proxy In Dialog:
Select "no".
Make Call Without Reg:
Select "yes".
Ans Call Without Reg:
Select "yes".
DNS SRV Auto Prefix:
Select "no".

6. Navigate down to "Dial Plan" group.
In the Dial Plans section, ensure that Dial Plan 1: has the following: Example: "(S0<:07811112222@192.168.1.2:5060>) "
This format of the dial plan creates a “hotline” functionality between the PSTN and the target SIP address. The Sipura SPA 3000 will immediately call the SIP address upon receipt of an incoming call from the PSTN and will not answer the PSTN call until the SIP destination answers the call.
Leave the remaining dial plans as default (xx.)

7. Navigate down to "VoIP-To-PSTN Gateway Setup".
Voip-To-PSTN Gateway Enable:
Select "yes".
Line 1 VoIP Caller DP:
Select "none".
Line 1 Fallback DP:
Select "none".
VoIP Caller Auth Method:
Select "none".
One Stage Dialing:
Select "yes".
VoIP Caller Default DP:
Select "none".

8. Navigate down to "PSTN-To-Voip Gateway Setup".
PSTN-To-VoIP Gatewey Enable:
Select "yes".
PSTN Ring Thru Line 1:
Select "no".
PSTN CID For VoIP CID:
Select "no".
PSTN Caller Default DP:
Select "1".
PSTN Caller Auth Method:
Select "none".

9. Navigate down to "FXO Timer Values (sec)".
VoIP Answer Delay:
Enter "0".
PSTN Answer Delay:
Enter "0".
PSTN-To-VoIP Call Max Dur:
Enter "0".

10. Navigate down to "PSTN Disconnect Detection" and "International Control".
The rest of the configuration depends on the country’s telephone company analog PSTN configuration. The example shown here is for the UK. Refer to Sipura SPA 3000 localization documentation for country-specific FXO configuration options.

11. Click on the "Submit All Changes" button. The Sipura SPA 3000 will reboot for changes to take effect.
¶ Glossary
- DHCP = Dynamic Host Configuration Protocol (DHCP) is a communications protocol that lets network administrators manage and automate the assignment of Internet.
- HUB = A common connection point for devices in a network.
- IP Address = Internet Protocol address.
- Local = A local area network (LAN) is a computer network covering a local area, like a home, office or small group of buildings such as a college.
- LAN = Local Area Network.
- PIN = Personal Identification Number.
- Remote = Network devices that are managed or controlled from a network system other than the system to which they are directly connected.
- Router = A device that forwards data packets from one local area network (LAN) or wide area network (WAN) to another.
- Switch = Network device that selects a path or circuit for sending a unit of data to its next destination.
- UAD = User Agent Device.
- VoiceMail = The electronic transmission of voice messages over the Internet. The messages are stored on a computer until the recipient accesses and listens to them.
- WAN = Wide Area Network.
- Web Interface = A web interface is the system of controls with which the user controls a device.