¶ Introduction

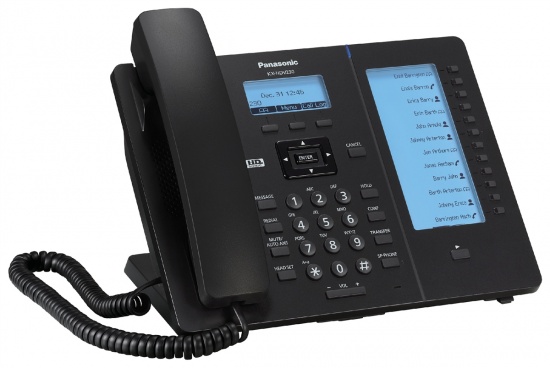
This Configuration Guide is written as a general guide on how to configure the Panasonic phone model KX-HDV230C to work with PBXware 5.3.9.
¶ Requirements
¶ Identifying Phone Model
To start and successfully complete the registration of your Panasonic phone, you need to know which phone model to set up.
On the back of each Panasonic phone, there is model information that you should check. Although various phone models can have exactly the same requirements and installation procedures, phone models can also have significantly different requirements and installation procedures, so that is why it is important to know the model you own which results in you setting up the phone successfully.
¶ Phone Firmware
- Make sure that the phone is loaded with an appropriate firmware version, HDV230/11.180.
- To find out the firmware version of the Panasonic phone model, open a new browser window and enter the phone's IP address in order to access the phone's web administration interface login screen. Example: http://192.168.1.22.
NOTE: The phone's web administration web interface is disabled by default. To enable access, go to Settings --> Network Settings and enable the Embedded Web option.
- Log in to the phone's web administration interface with the username and password. Please note that the factory default login details are as follows: username is admin and password is adminpass.
¶ DHCP Server
Fully configured and operational DHCP server.
¶ PBXware Version
PBXware Version 5.3.8
In order to find out the PBXware version:
- Log in to PBXware
- Navigate to Settings: About.
On the top of the About page is a code similar to this one Edition: Multi-Tenant, Release: 5.3.8.0 (2223ce45), Running: 13.23.1-gc-040bbaca, Proxy v5.3.8 (231c5f3), API: 5.3, libmemcached version: 1.0.18, where 'Release' denotes the exact version of PBXware.
¶ Installation
This section describes how to install and connect the phone to the electrical power and data network as well as how to apply factory settings.
The following topics are covered:
- Power Adapter
- Power Over Ethernet (PoE)
- Factory Settings
¶ Power Adapter
Connect the Network and Power
- Connect the DC plug on the power adapter to the DC port on the phone and connect the other end of the power adapter into an electrical power outlet.
- Connect the Ethernet cable between the Internet port on the phone and the network port on a router or switch to access LAN.
NOTE: If you are using Power over Ethernet (PoE), you do not need to connect the AC adapter. Make sure the Ethernet cable and router or switch is Power over Ethernet (PoE) compliant.
¶ Power over Ethernet (PoE)
Connect the Network (only)
Using a regular ethernet cable, your phone can be powered from a Power over Ethernet (PoE) compliant router or switch.
- Connect the Ethernet cable between the Internet port on the phone and an available port on the in-line power router or switch.
NOTE: If you are using Power over Ethernet (PoE), you don't need to connect the AC adapter. Please make sure that the Ethernet cable and router or switch is Power over Ethernet (PoE) compliant.
¶ Find the Phone's IP Address
Find out your Panasonic phone IP Address.
- Press the Status tab.
- Press Network Status.
The IP address will be displayed on the display.
¶ Reset to Factory Settings
This step is not required for brand new out-of-the-box phones, however, if the phone has been already used then it is a must.
- Open a new browser window and enter the phone's IP address in order to access the phone's web administration interface login screen. Example: http://192.168.1.22.
- Log in to the phone's web administration interface with the username and password. Please note that the factory default login details are as follows: username is admin and password is adminpass.
- Click the Maintenance tab.
- Click the Reset to Defaults section in the left navigation menu.
- Click the Reset to Carrier Defaults button in order to factory reset the phone.
- Wait some time for the phone to reboot.
NOTE: Do not unplug or remove power to the phone while it is updating firmware and configuration.
¶ Registering Phone
This section describes how to identify the Panasonic phone model, requirements that must be met and how to register the phone using manual configuration or auto provisioning.
The following topics are covered:
- Manual Configuration
- Auto Provisioning
¶ Manual Configuration
This section describes how to set UAD settings, create a PBXware Extension, and register the phone.
The following topics are covered:
- UAD Settings
- Creating an Extension
- Registering a Phone
¶ UAD Settings

UAD settings
Log in to the PBXware's web administration interface
- Open a new browser window and enter the IP address in order to access the PBXware's web administration login screen. Example: http://192.168.1.10.
- Log in to PBXware with the e-mail address and password.
UAD Settings
- Navigate to Settings:UAD.
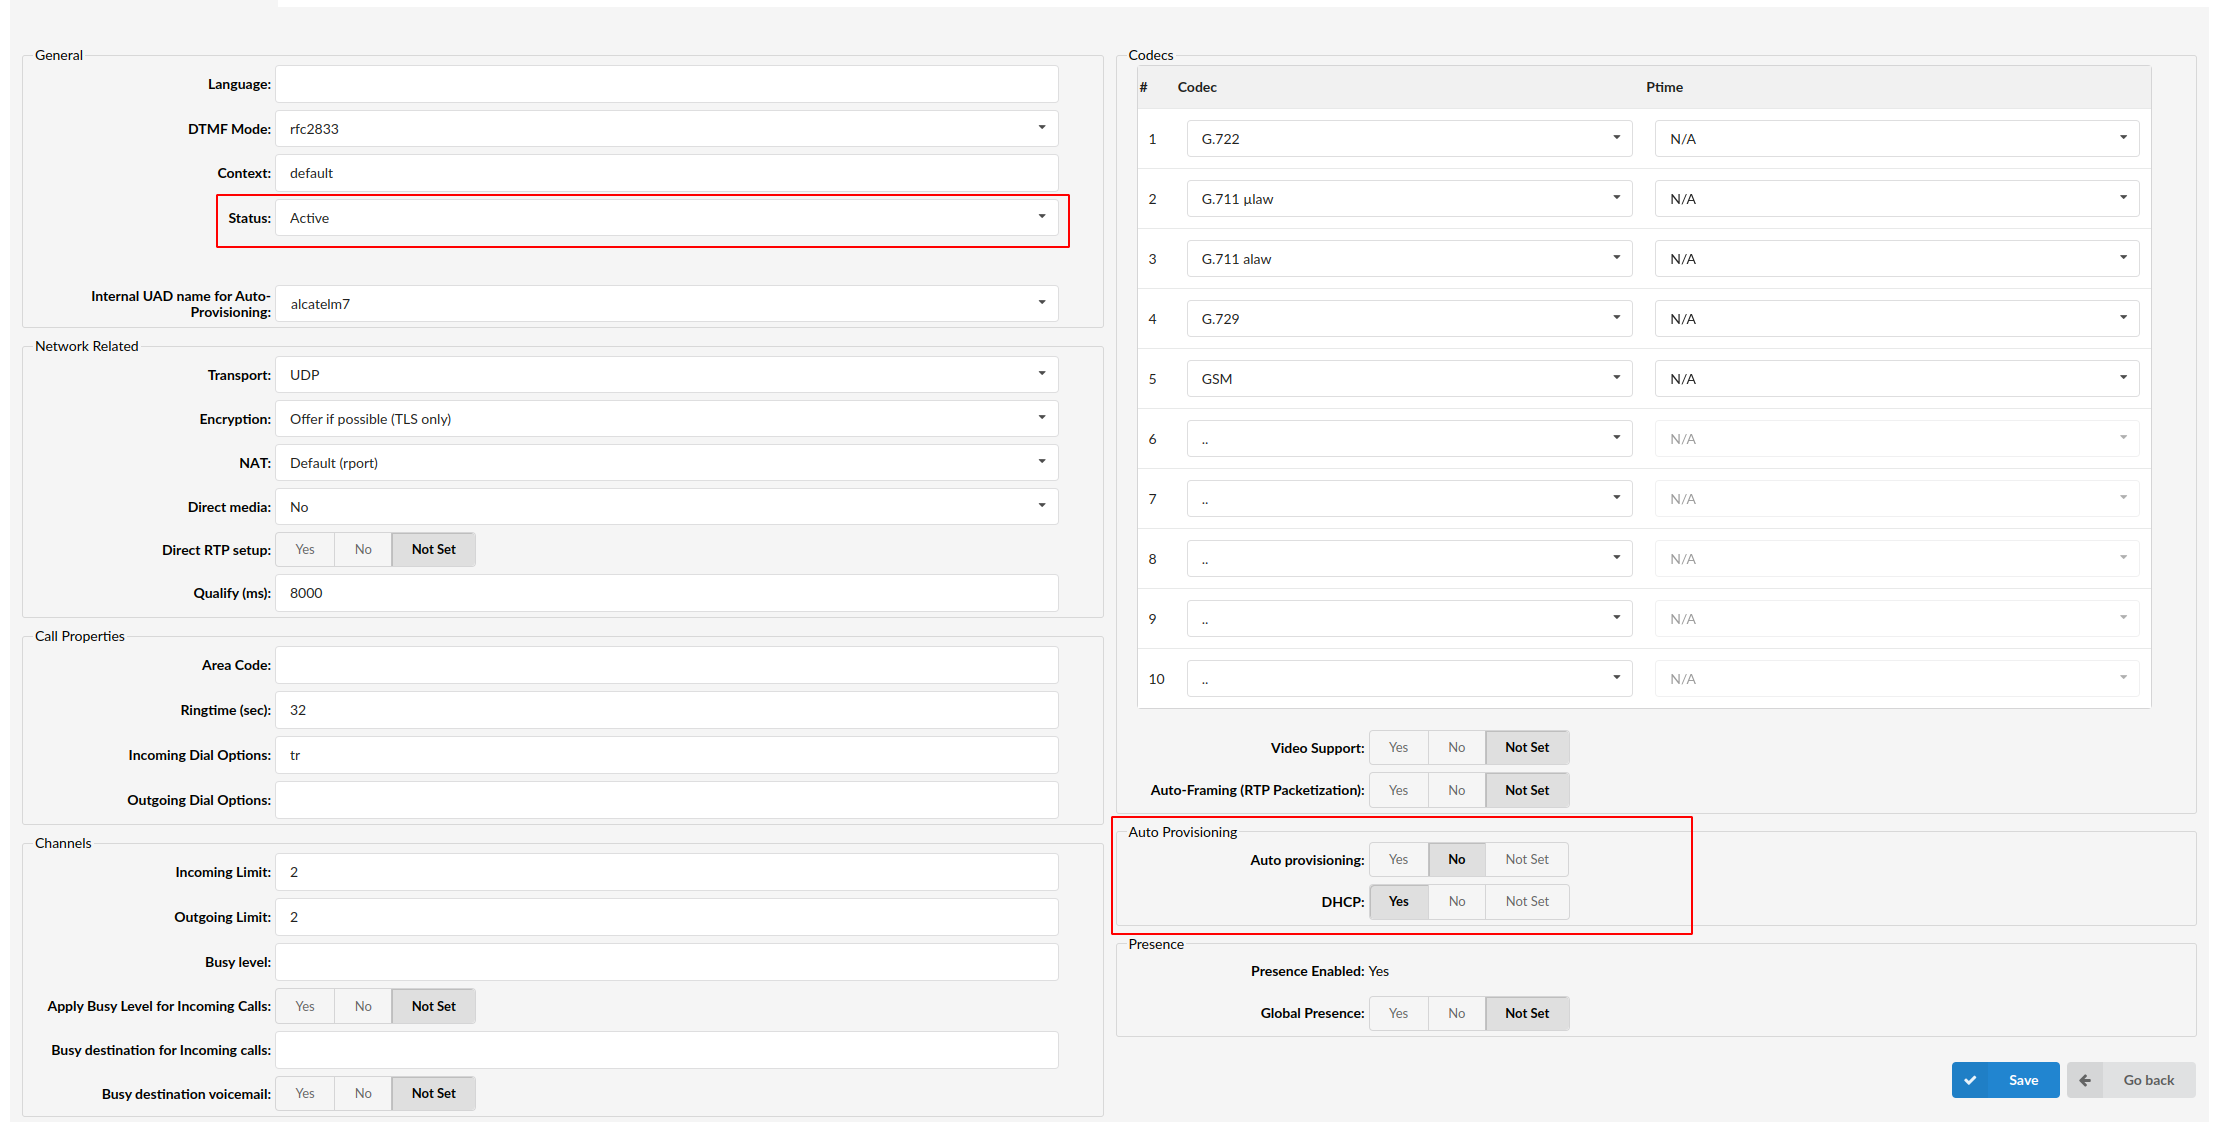
- Make sure Panasonic UAD is enabled. To check the UAD status, click the Edit icon corresponding to the Panasonic phone.
- Make sure Status is set to Active, Auto provisioning is set to No, and DHCP is set to Yes.
- Click the Save button to save changes.
¶ Creating an Extension

Creating Extension
Add an Extension
- Navigate to Extensions. Click Add Extension.
- The standard options window will be shown below.
- Select the Panasonic phone model from the UAD select box.
- Select Location: Local or Remote.
Local is for all Extensions registered on the LAN and Remote is for all Extensions registered from remote networks, WAN, Internet etc.
- Click the Next step button.
Extension Values
Enter values into the required field text boxes.
REQUIRED FIELDS:
- Name
Enter a name for the Extension being created. Example: John Smith.
Enter the e-mail address associated with this Extension. This e-mail address will receive all system notification messages. Example: john.smith@bicomsystems.com
- Department
Department to which this Extension belongs. Example: Sales.
- Click the Save button.
¶ Registering a Phone
This section describes how to register a Panasonic phone using Hostname or IP Address.
¶ Hostname or IP Address
Log in to the phone's web administration interface
- Open a new browser window and enter the phone's IP address in order to access the phone's web administration interface login screen. Example: http://192.168.1.22
- Log in to the phone's web administration interface with the username and password. Please note that the factory default login details are as follows: username is admin and password is adminpass.
- Click VoIP in the navigation tab.
- Click Line 1 in the left navigation tab, section SIP Settings.
- Enter or set the following details into the respective fields.
REQUIRED FIELDS:
- Phone Number
Usually the same number as the Authentication ID.
- Registrar Server Address
Enter the Hostname or IP Address of the PBXware.
- Example of a Hostname: voip.bicomsystems.com
- Example of an IP Address: 192.168.1.10
- Proxy Server Address
Same as the Registrar Server Address.
- Authentication ID
PBXware Extension number. Example: 1003
- Authentication Password
The Secret of the Extension as received in the e-mail associated with this Extension. Example: _%Z4M3*Ts9y7. A password is generated automatically for each newly created Extension.
- Click the Save button.
- If everything is done as described above, you should have successfully registered your phone to PBXware.
Dial *123 to verify the registration.
¶ Auto Provisioning
This section describes how to set UAD settings, create PBXware Extension and register the phone using DHCP or Static IP address.
The following topics are covered:
- UAD Settings
- Creating an Extension
- Registering a Phone
¶ UAD Settings

UAD settings
Log in to the PBXware's web administration interface.
- Open a new browser window and enter the IP address in order to access the PBXware's web administration login screen. Example: http://192.168.1.10.
- Log in to PBXware with the e-mail address and password.
UAD Settings
- Navigate to Settings: UAD.
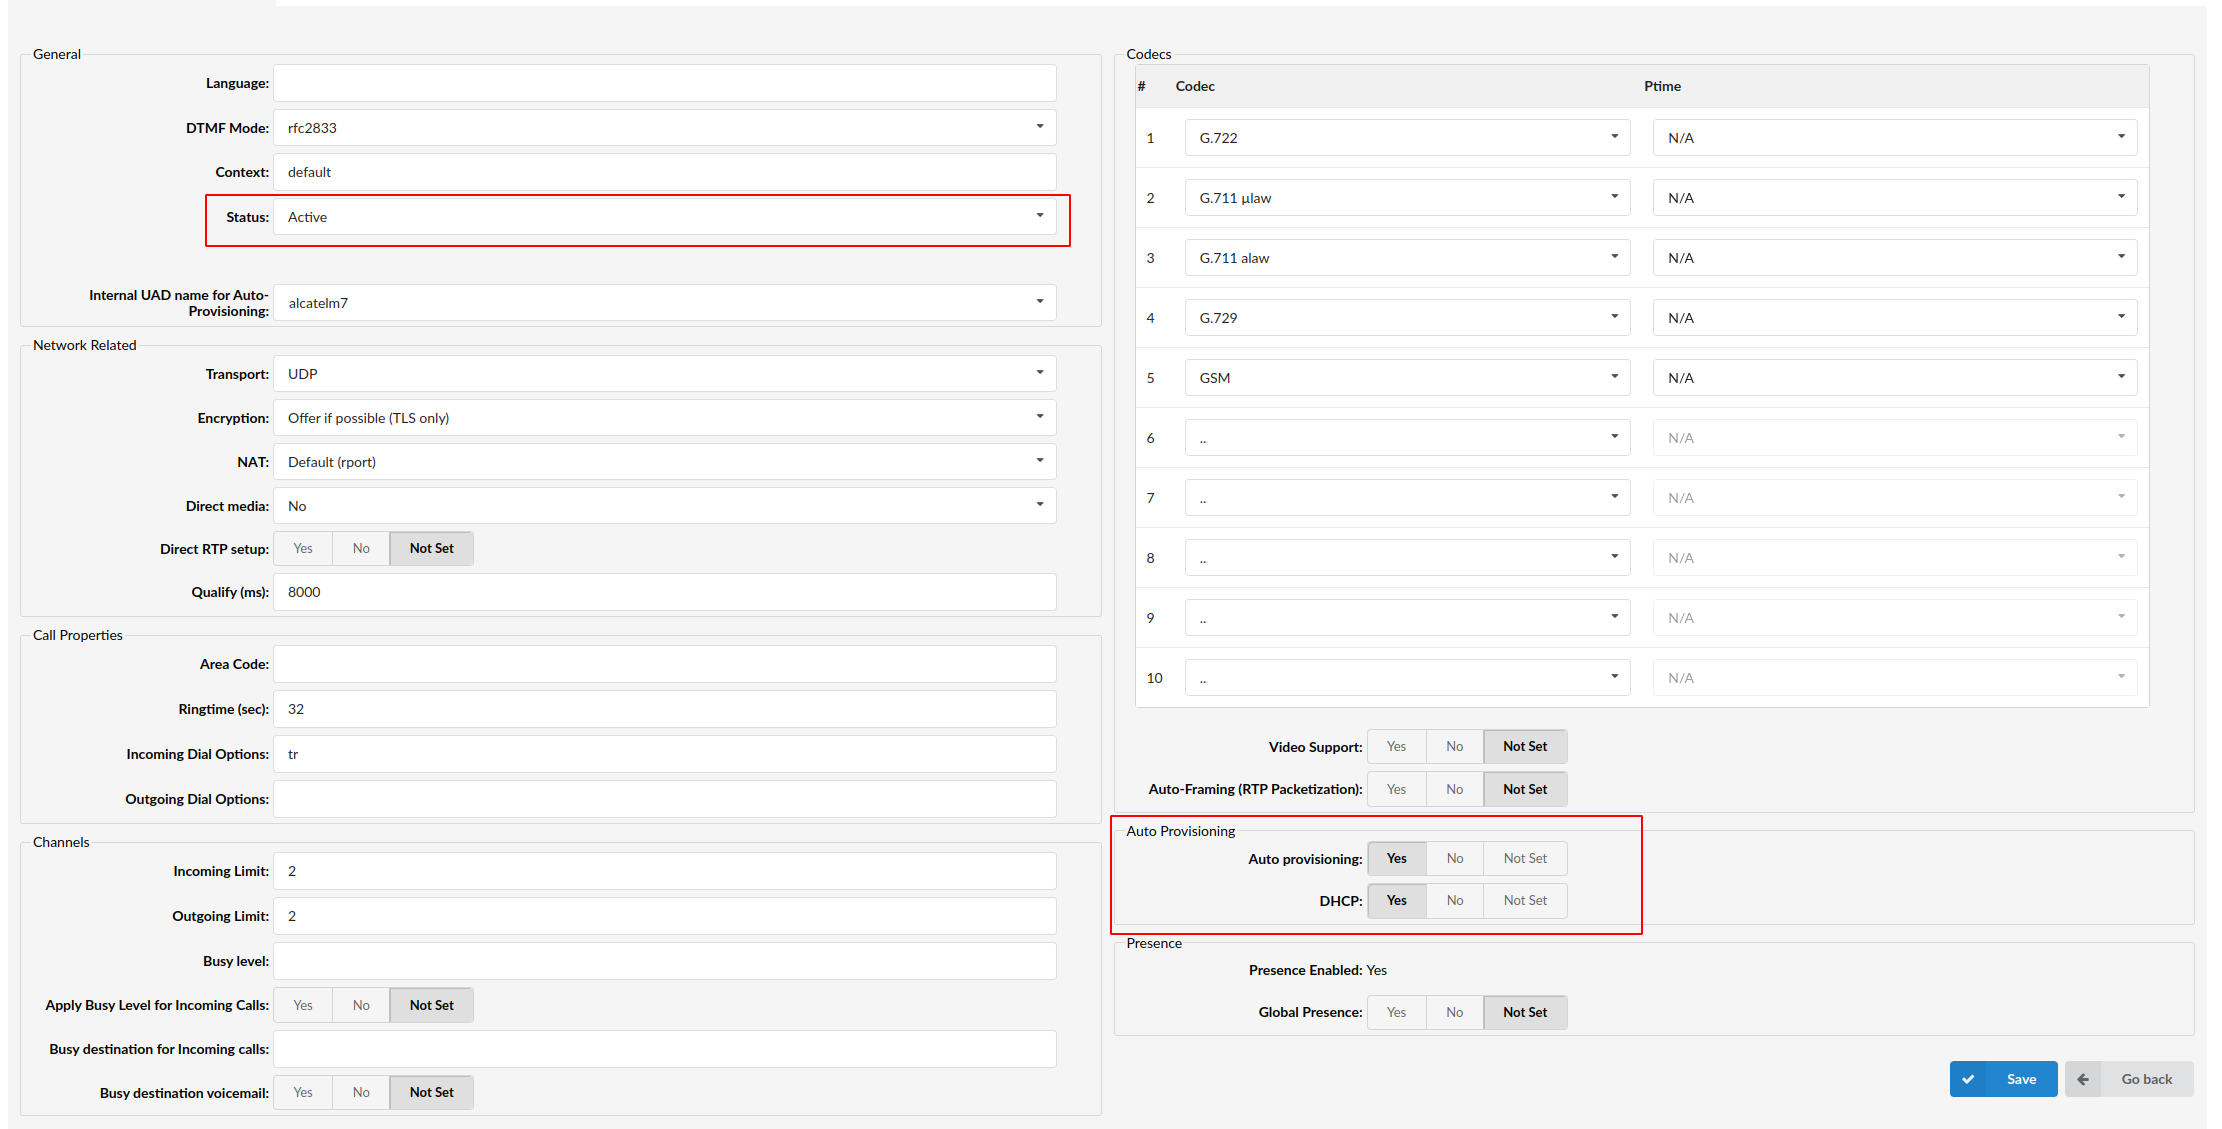
- Make sure Panasonic UAD is enabled. To check the UAD status, click the Edit icon corresponding to the Panasonic phone.
- Make sure Status is set to Active, Auto provisioning is set to Yes, and DHCP is set to Yes.
- Click the Save button to save changes.
¶ Creating an Extension

Creating Extension
Add an Extension
- Navigate to Extensions. Click Add Extension.
- The standard options window will be shown below.
- Select a Panasonic phone model from the UAD select box.
- Select Location: Local or Remote.
Local is for all Extensions registered on the LAN and Remote is for all Extensions registered from remote networks, WAN, Internet etc.
- Click the Next step button.
Extension Values
Enter values into the required field text boxes.
REQUIRED FIELDS:
- Name
Enter a name for the Extension being created. Example: John Smith.
Enter the e-mail address associated with this Extension. This e-mail address will receive all system notification messages. Example: john.smith@bicomsystems.com
- Auto Provisioning
Set to Yes.
- MAC Address
Enter the Panasonic phone's MAC address. Example: bcc342123456. The MAC address can be found at the back of the phone.
- Click the Save button.
¶ Registering a Phone
This section describes how to register a Panasonic phone using DHCP, TFTP or HTTP.
The following topics are covered:
- DHCP
- TFTP or HTTP
¶ DHCP
Configure DHCP
- Make sure your DHCP router is configured to use option 66 to automatically instruct phones with the URL for auto provisioning. For more information, refer to the router documentation or contact your network administrator.
Phone's first boot or user-initiated reboot
- The auto provisioning process will start during the phone's first boot or after the reboot process has been initiated by the user. The DHCP server will instruct the phone from where to pickup an appropriate configuration file. If everything is done as described above, you should have successfully registered your phone to PBXware.
Dial *123 to verify registration.
¶ TFTP or HTTP
- Open a new browser window and enter your phone IP address, e.g. http://192.168.1.22.
- Enter username and password and press the Confirm button. NOTE: The factory default login details are as follows: username is admin and password is adminpass.
- Click the Maintenance tab.
- Click the Provisioning Maintenance link in the left navigation menu.
- Choose what server type you intend to use: HTTP or Trivial FTP. NOTE: Our recommendation is to use HTTP.
If you choose to use server type HTTP, enter http:// followed by Hostname or IP Address, followed then by /prov in Standard File URL.
Example of a Hostname using HTTP: http://username:password@192.168.1.1/prov/{mac}.cfg
Example of an IP Address using HTTP: http://username:password@192.168.1.1/prov/{mac}.cfg
- Enter the Auto Provisioning username and password into the Authentication ID and Authentication Password fields.
If you choose to use server type TFTP, enter tftp:// followed by Hostname or IP Address
Example of a Hostname: tftp://192.168.1.136/{mac}.cfg
Example of a IP Address: tftp://192.168.1.136/{mac}.cfg
- Click the Save button.
- You will have to wait a couple of seconds for the configuration to be updated. NOTE: Do not power off your phone.
- If everything is done as described above, you should have successfully registered your phone to PBXware.
Dial *123 to verify registration.