¶ Introduction
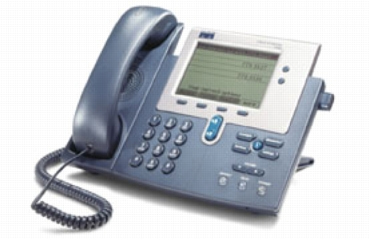
This "How to" is written as general guide on how to use Cisco 7940 with PBXware using SIP 7.1 Cisco 7940 firmware. It covers the most common tasks that are required to have your Cisco 7940 working efficiently.
¶ Requirements
¶ Identifying phone model
To start and successfully complete registration of your Cisco phone you need to know which phone model you will setup.
On the front of each Cisco phone there are exact model information that you should check. Although different phone models can have exactly the same requirements and installation procedure, phone models can also have significantly different requirements and installation procedure, so that ignorance of your own model may result in the inability to successfully set up your phone.
¶ Phone firmware
Make sure that device is loaded with firmware (Application Load ID) 7.X or 8.X.
- Press the Settings button.
- Scroll to Status and press the select button.
- Scroll to Firmware Versions and press the select button.
- The firmware is listed under Application Load ID.
¶ DHCP server
Fully configured and operational DHCP server.
¶ PBXware version
In order to find out the PBXware version, please login to PBXware and navigate to Settings: About. On the top of About page is a code similar to this one "PBXware Edition: Business, Release: 3.1 (041373f), Running: 1.4.24-gc-75ee203", where "Release" denotes the exact version of your PBXware.
¶ Installation
This chapter describes how to install and connect the phone to the electrical power and data network as well as how to apply factory settings.
The following topics are covered:
- Power adapter
- Factory settings
¶ Power adapter
Connect the Network and Power
- Connect the DC plug on the power adapter to the DC port on the phone and connect the other end of the power adapter into an electrical power outlet.
- Connect the ethernet cable between the Internet port on the phone and the network port on a router or switch to access LAN.
¶ Reset to factory settings
Reset to factory settings
This step is not required for out-of-the-box phones, however, if the phone has been already used then it is a must.
- Unplug the power cable from the phone.
- Hold down the # key, and then plug the power cable in again. The phone should begin its power up cycle.
- Release the # key after the Speaker button is no longer lit. You should this message displayed on the phone: Reset key sequence detected
- Press 123456789*0# (or in some cases this sequence is 3491672850*# ) within 60 seconds after the Headset, Mute, and Speaker buttons begin to flash.
-If you fail to complete this key sequence or do not press any keys, the Headset, Mute, and Speaker buttons will stop flashing after 60 seconds and the phone will continue with its normal start-up process. The phone will not reset.
-If you enter an invalid key sequence, the buttons will stop flashing immediately and the phone will continue with its normal start-up process. The phone will not reset.
- If you enter this key sequence correctly, the phone displays this prompt:
Keep network cfg? 1 = yes 2 = no
-To maintain existing network configuration settings for the phone when the phone resets, press 1.
-To reset network configuration settings when the phone resets, press 2.
-If you press another key or do not respond to this prompt within 60 seconds, the phone will continue with its normal start-up process and will not reset.
¶ Registering Phone
¶ Manual Configuration
¶ UAD Settings
STEP ONE: PBXware IP address.
1. Find out the IP address of PBXware server.
STEP TWO: Login to PBXware.
1. Open a new browser window and enter the IP address to access the PBXware administration interface login screen.
Example: http://192.168.1.2
2. Hit "Enter" on your keyboard.
3. Login to PBXware with your e-mail address and password.
STEP THREE: UAD status.
1. Make sure the UAD is enabled. To check the UAD status navigate to "Settings:UAD", and click on the "edit" icon corresponding to "Cisco 7940".
2. Make sure the "Status" is set to "active", "Auto provisioning" is set to "No" and "DHCP" is set to "Yes".
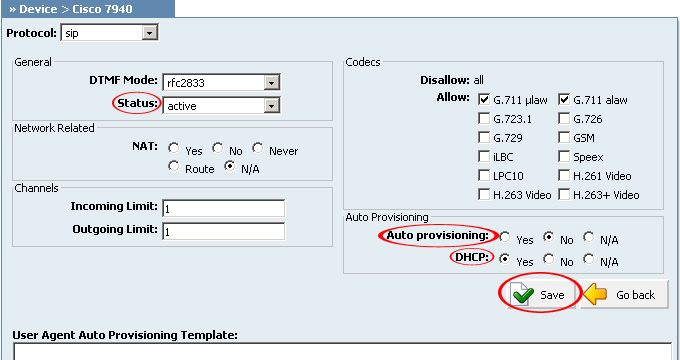
3. Click on the "Save" button to save changes.
¶ Creating Extension
STEP ONE: Add Extension.
1. Navigate to "Extensions". Click on "Add Extension".
2. The standard options window will be shown below.
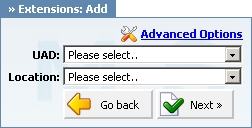
3. Select Cisco 7940 from "UAD" select box.
4. Select Location: "Local" or "Remote".
Note:
-"Local" is for all extensions registered on LAN.
-"Remote" is for all extensions registered from remote networks, WAN, Internet etc.
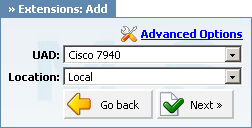
5. Click on the "Next" button.
STEP TWO: Extension values.
1. Enter values into the required field text boxes.
REQUIRED FIELDS:
Name:
Enter a name for the extension being created. Example: John Smith.
E-mail:
Enter the e-mail address associated with this extension. This e-mail address will receive all system notification messages. Example: john@domain.com.
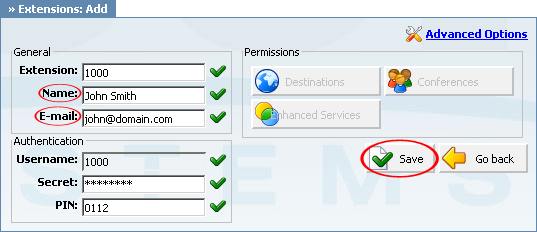
an example with details filled in
2. Click on the "Save" button.
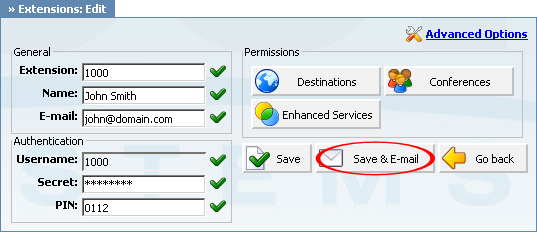
an example with details filled in
3. Click on the "Save & E-mail" button. Account details will be sent to the e-mail address associated with this extension.
OPTIONAL FIELDS:
Extension:
An auto-generated extension number based on the next available sequential number. An extension value can be changed. Example: 1000.
Username:
Username is auto generated/populated and cannot be changed since it allows the system to use this value for other important operations.
Secret:
A secret value associated with the UAD is auto-generated in order to allow the UAD to successfully register with the system. The secret value can be changed.
PIN:
An auto-generated PIN will allow access to voicemail and online self care.
¶ Registering Phone
STEP ONE: Electricity and Ethernet.
- Plug the power adapter into a power jack then connect it to the electricity network.
- Connect ethernet port to a hub, router or switch as to access LAN.
After successfully connecting the Cisco 7940 to the electricity and data networks, it is time to register it to PBXware.
STEP TWO: Cisco 7940 settings configuration.
Unlock configuration:
1. Press the "settings" button.
2. Use the "navigation" button and navigate down to "Unlock Config".
3. Press the "Select" button.
4. Enter password (Default factory password is "cisco").
5. Press the "Accept" button to unlock configuration.
SIP Configuration
1. Using the "navigation" button navigate up to "SIP Configuration".
2. Press the "Select" button.
3. Press the "Select" button to enter into "Line 1 Settings".
4. Enter details into:
REQUIRED FIELDS:
Name
Cisco 7940 extension number. Example: 1000.
Authentication Name
Usually the same number as "Name".
Authentication Password
The Secret of the extension as received in the e-mail associated with this extension. Example: 3dX3r5
Proxy Address
IP address of PBXware server. Example: 192.168.1.2
OPTIONAL FIELDS
Shortname
Example: John Smith, Reception, Entrance Main, Agent One etc.
Display Name
Example: John Smith, Reception, Entrance Main, Agent One etc.
Proxy Port
By default 5060
5. Press accept button and reboot Cisco 7940.
- Conclusion: If everything is done as above described you should have successfully registered your Cisco 7940 to PBXware. Dial *123 to verify registration.
- For further information, please contact the manufacturer or check their web site www.cisco.com.
¶ Auto Provisioning Configuration
¶ UAD Settings
STEP ONE: PBXware IP address.
1. Find out the IP address of PBXware server.
STEP TWO: Login into PBXware.
1. Open a new browser window and enter the IP address to access the PBXware administration interface login screen.
Example: http://192.168.1.2
an example with IP address
2. Hit "Enter" on your keyboard.
3. Login to PBXware with your e-mail address and password.
STEP THREE: UAD status.
1. Make sure the UAD is enabled. To check the UAD status navigate to "Settings:UAD", and click on the "edit" icon corresponding to "Cisco 7940".
2. Make sure "Status" is set to "active", "Auto provisioning" is set to "Yes" and "DHCP" is set to "Yes".
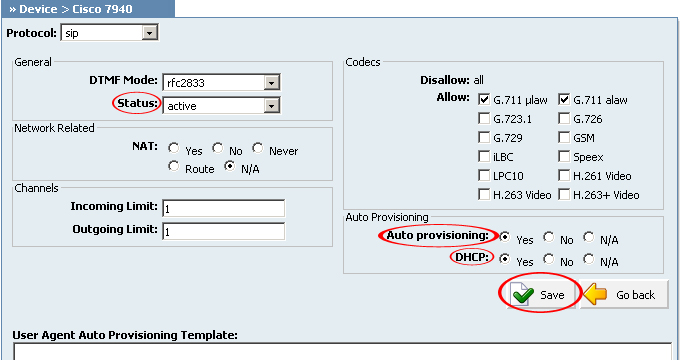
3. Click on the "Save" button to save changes.
¶ Creating Extension
STEP ONE: Add Extension.
1. Navigate to "Extensions". Click on "Add Extension".
2. The standard options window will be shown below.

3. Select Cisco 7940 from "UAD" select box.
4. Select Location: "Local" or "Remote".
Note:
-"Local" is for all extensions registered on LAN.
-"Remote" is for all extensions registered from remote networks, WAN, Internet etc.

5. Click on "Next" button.
STEP TWO: Extension values.
1. Enter values into required field text boxes.
REQUIRED FIELDS:
Name:
Enter a name for the extension being created. Example: John Smith.
E-mail:
Enter the e-mail address associated with this extension. This e-mail address will receive all system notification messages. Example: john@domain.com
Auto provisioning:
Set to "Yes".
MAC Address:
Cisco 7940 MAC address. Example: 001646f5f797
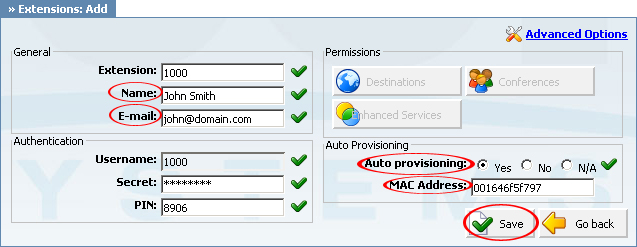
an example with details filled in
2. Click on the "Save" button.
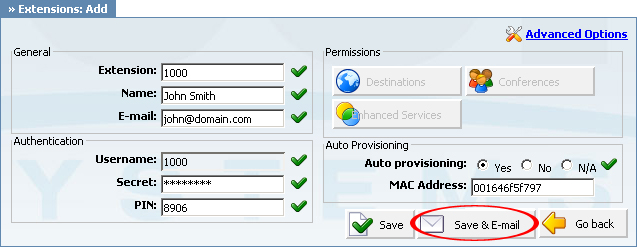
an example with details filled in
3. Click on the "Save & E-mail" button. Account details will be sent to the e-mail address associated with this extension. OPTIONAL FIELDS:
Extension:
An auto-generated extension number based on the next available sequential number. An extension value can be changed. Example: 1000.
Username:
Username is auto generated/populated and cannot be changed since it allows the system to use this value for other important operations.
Secret:
A secret value associated with the UAD is auto-generated in order to allow the UAD to successfully register with the system. The secret value can be changed.
PIN:
An auto-generated PIN will allow access to voicemail and online self care.
¶ Registering Phone
STEP ONE: Electricity and Ethernet.
- Plug the power adapter into a power jack then connect it to the electricity network.
- Connect the ethernet port to a hub, router or switch as to access LAN.
"TFTP Server" must be set with TFTP server value.
STEP TWO: Cisco 7940 TFTP configuration.
Unlock configuration:
1. Press the "settings" button.
2. Use the "navigation" button and navigate down to "Unlock Config".
3. Press the "Select" button.
4. Enter password (Default factory password is "cisco").
5. Press the "Accept" button to unlock configuration.
SIP Configuration
1. Use the "navigation" button and navigate up to "Network Configuration".
2. Press the "Select" button.
3. Navigate down to "TFTP server".
4. Press the "Select" button to edit TFTP value.
5. Enter details into TFTP value field.
6. Press accept button and reboot the Cisco 7940.
- Conclusion: If everything is done as above described you should have successfully registered your Cisco 7940 to PBXware. Dial *123 to verify registration.
- For further information, please contact the manufacturer or check their web site www.cisco.com.