¶ Trunks
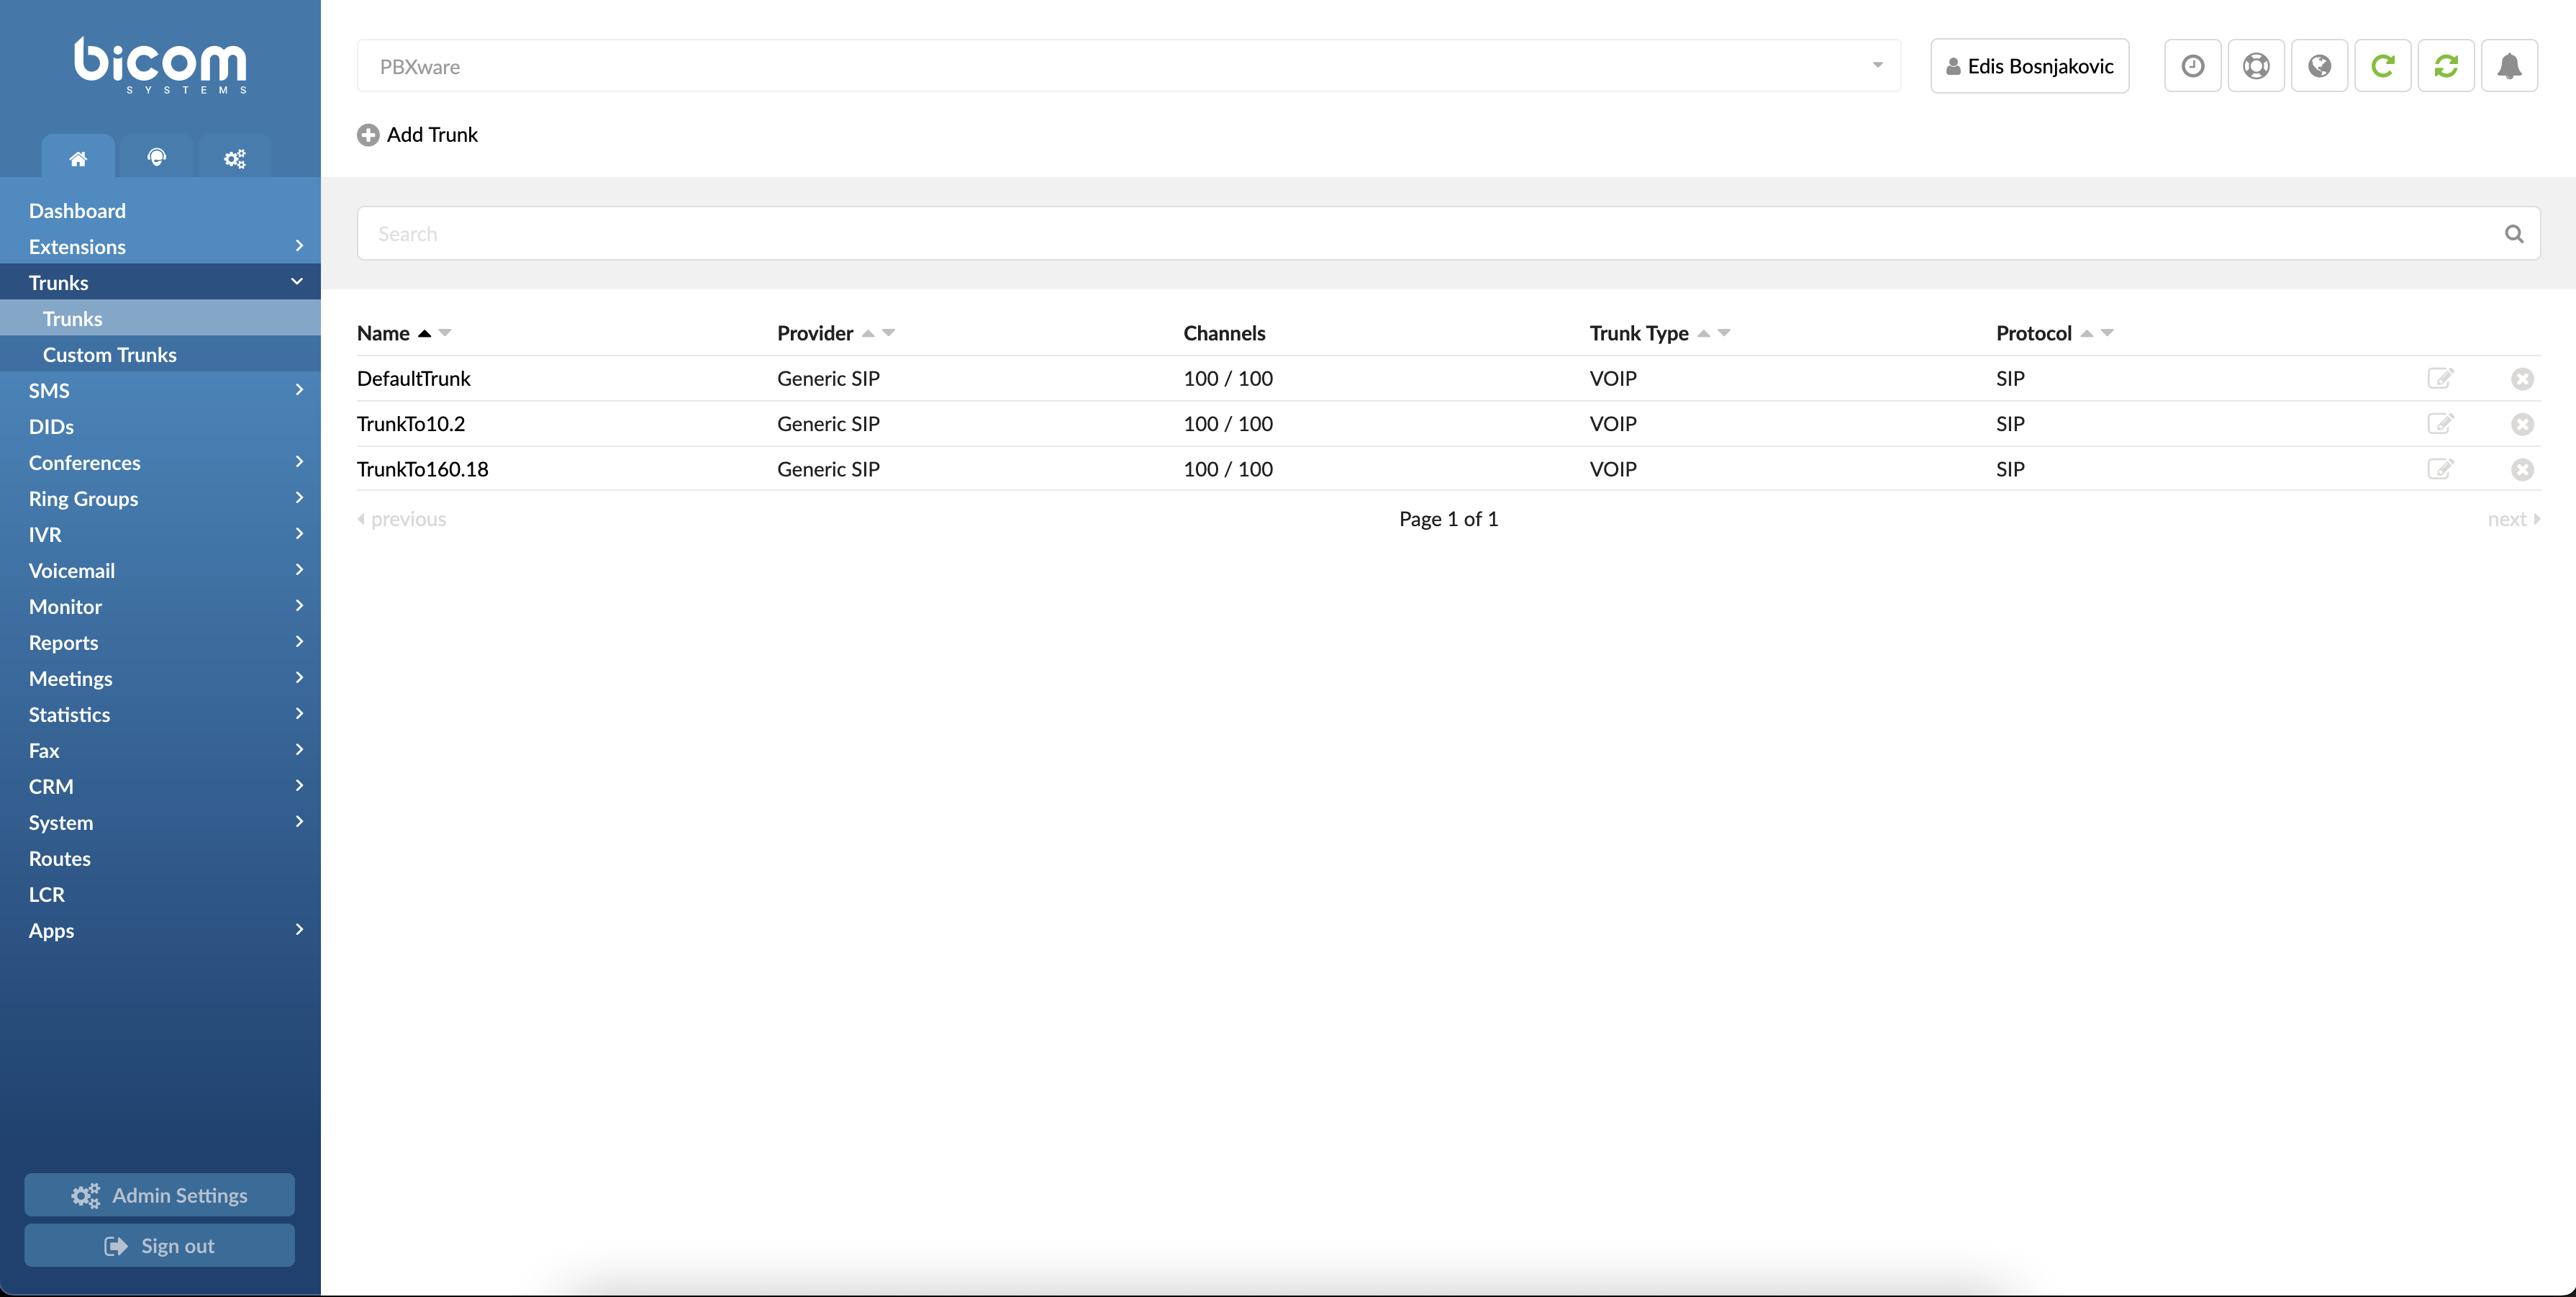
Trunks Display Screen
Trunks are transmission lines between two systems. This transmission is done using a wide range of PSTN and VOIP technologies. Users can find trunks in Home -> Trunks. This screen lists all system Trunks with the following details:
- Name
Here we can see the name of a trunk. It can be a name or an IP address.
(Display)
- Provider
Provider template name.
(E.g., SIP TRUNK)
- Channels
A maximum number of inbound/outbound channels available for the trunk.
E.g., 10/10
- Trunk Type
Type of a trunk.
(E.g., PSTN, VOIP, etc.)
- Protocol
Protocol used by the trunk.
(E.g., SIP, IAX, etc.)
 Click this button if you want to edit trunk configuration.
 Click this button in order to delete a trunk from the system
¶ Search
The search bar filters trunks by their name and provider.

Search filter
- Search
Provide a search phrase here and hit enter to filter the records.
([a-z][0-9])
¶ Add/Edit Trunk
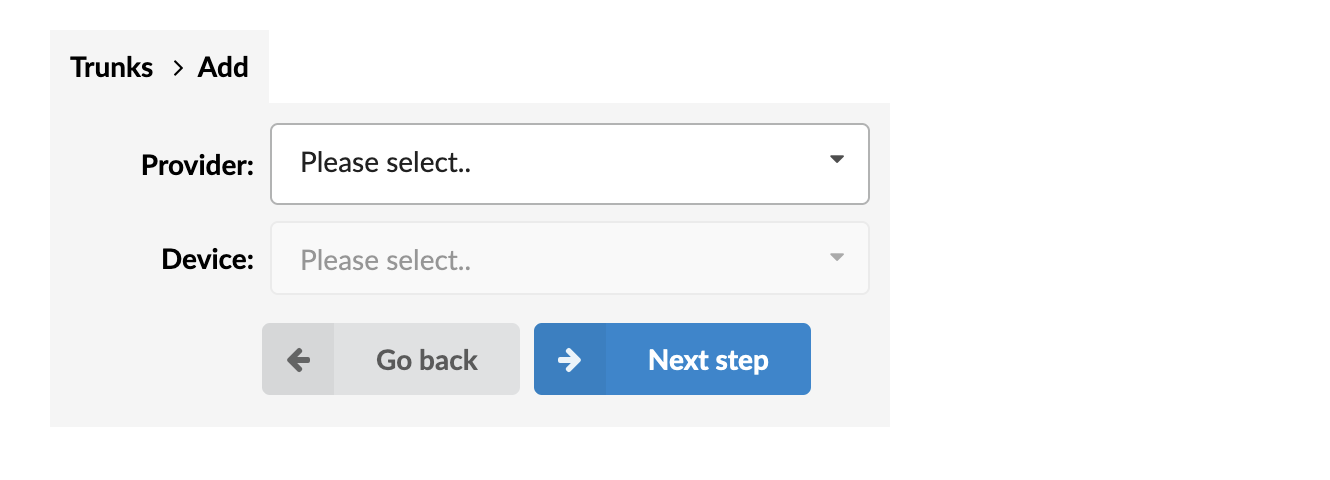
When adding a new trunk, the first step requires a 'Provider' and 'Device' selection.
TIP:
Although users can create a new trunk without it, it is recommended first to create a ‘Provider template’ under Settings -> Providers.
Add a new trunk window.
- Provider
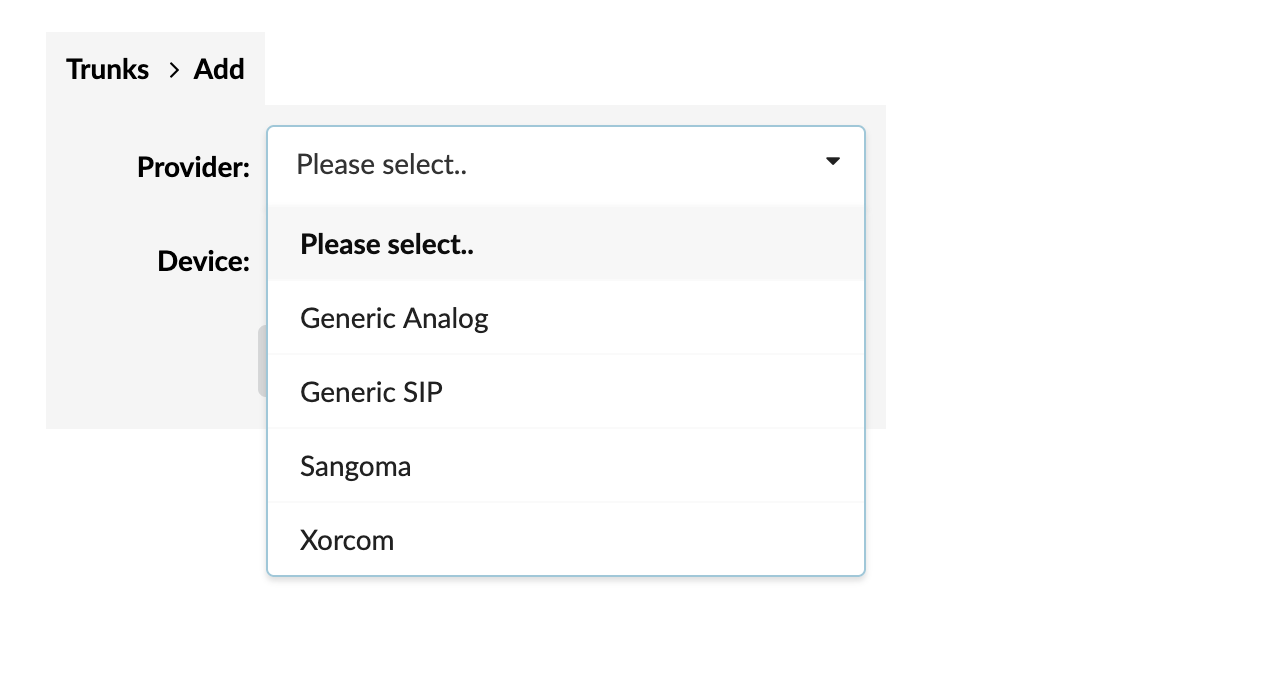
Select a service provider template.
(Select box)
- Device
If the provider requires a device in order to provide the service, this field will become visible.
(E.g., None, T100)
(Select box)
¶ VoIP (SIP/IAX)
The second step of the trunk installation and trunk edit command opens the following options:
¶ General

Edit trunks window.
- Name or Number
Some providers require this field to be equal to the DID number (e.g.55510205), but if connecting two systems, users may use the IP address.
(E.g., 2554433, myvoiceboxlink)
([a-z] [0-9])
- Country
Country where the service provider resides.
(Select USA, for example, if the provider is from the United States)
(Select box)
- Emergency Trunk
Determine if emergency services (Police, Ambulance, etc.) should be dialed through this trunk.
(E.g., 911)
(Option buttons)
¶ Authentication
- Peer Host
The IP address of a peer host system sends the calls to.
(E.g., 192.168.1.1)
(IP Address)
- Username
The username for authenticating with the service provider.
(E.g., 2554433)
([0-9])
- Peer Username
The peer username for authenticating with the service provider.
(E.g., 2554433)
([a-z] [0-9])
- Secret
The Secret/Password used for authenticating with the service provider.
(E.g., 123456)
([a-z] [0-9])
- Peer secret
The peer secret/password used for authenticating with the service provider.
(E.g., 123456)
([a-z] [0-9])
¶ Advanced Options
¶ General
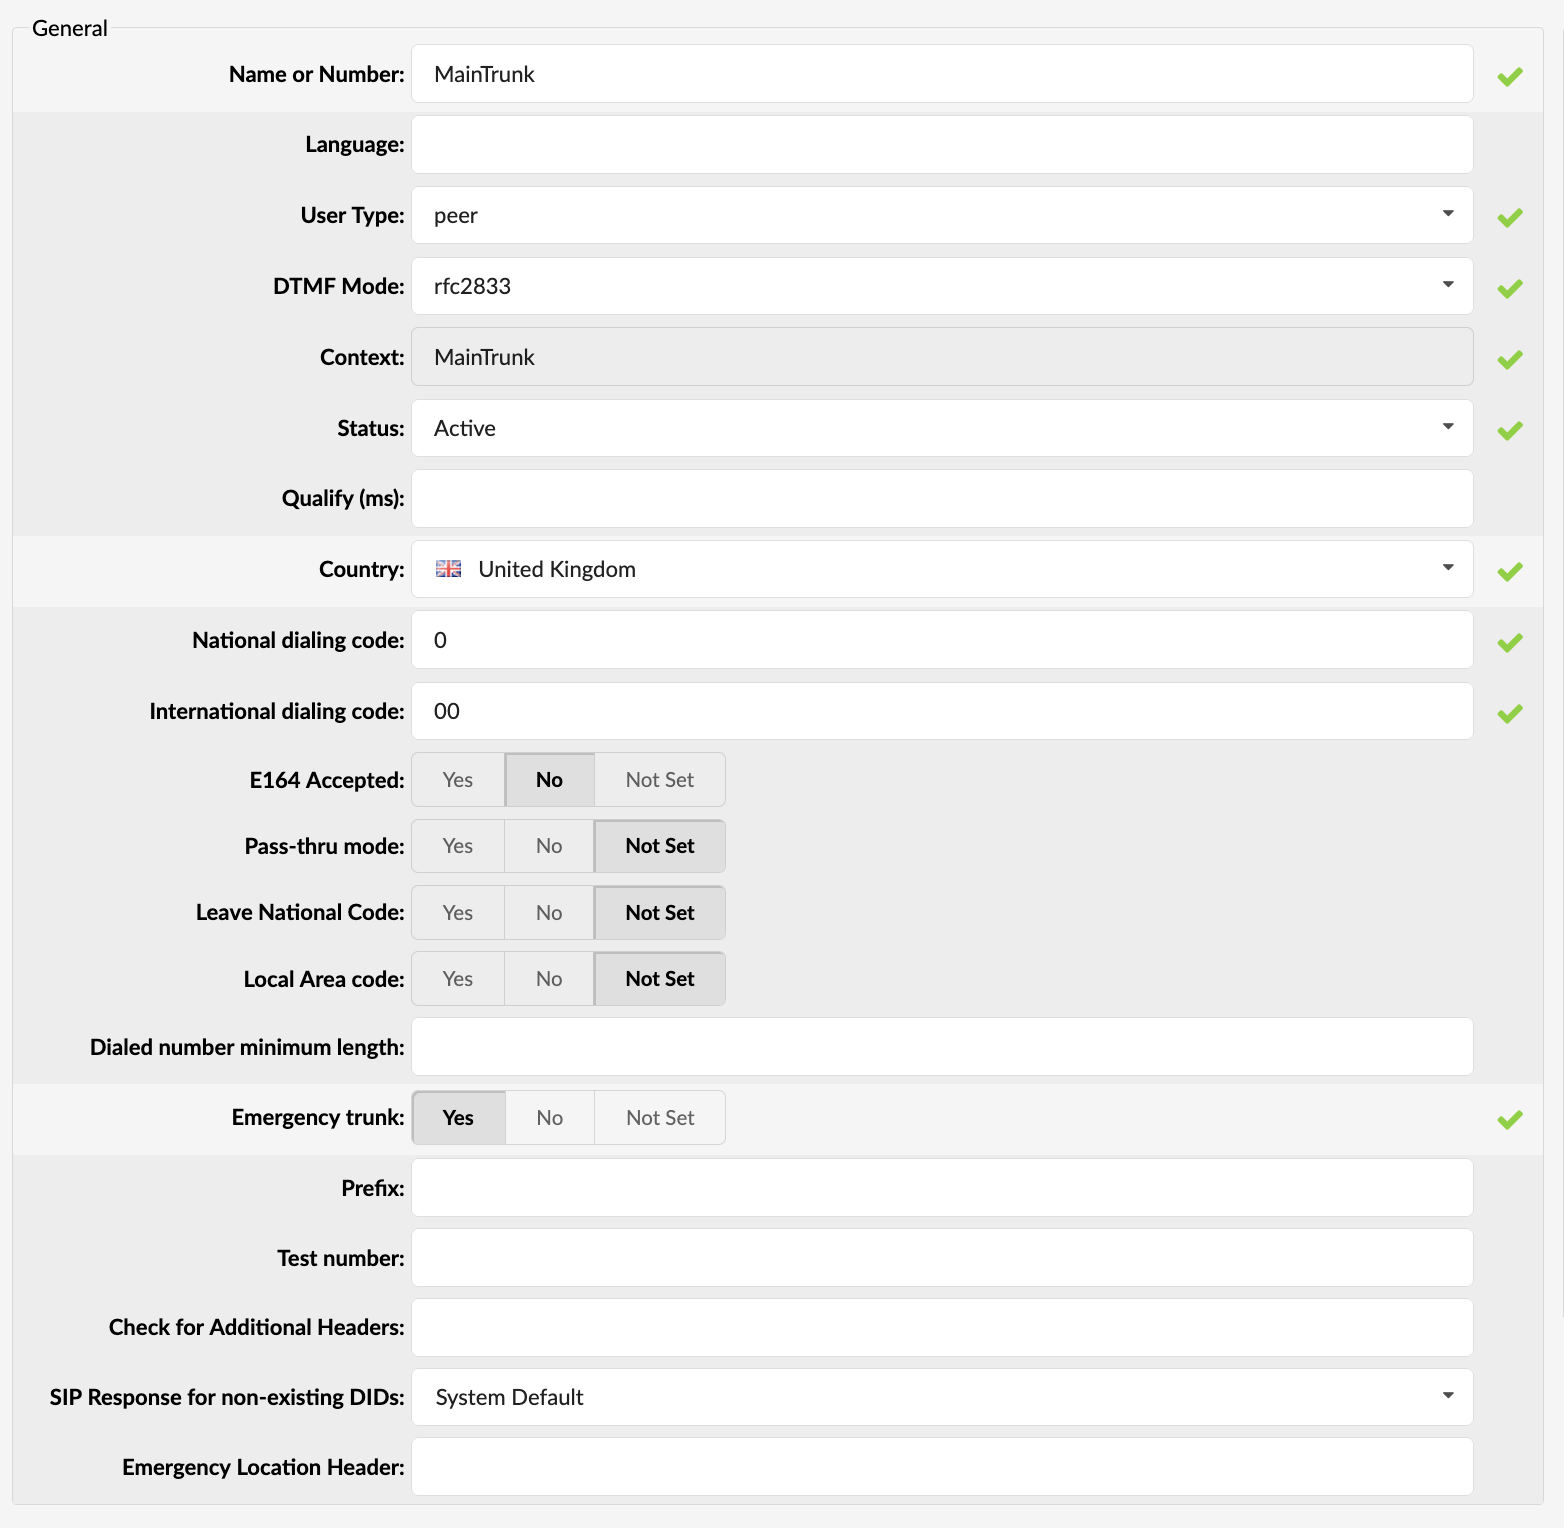
These options are used frequently and are required for normal trunk operation. Some of these fields are pre-configured with the default values. It is not recommended to change them.
General options
- User Type
The user's relationship to the system.
- user - The trunk accepts incoming calls only
- peer - The trunk makes outgoing calls only
- friend - The trunk does both incoming and outgoing calls
(Select box)
- DTMF Mode (Dual Tone Multi-Frequency)
Trunk DTMF mode. A specific frequency (consisting of two separate tones) to each key so that a microprocessor can quickly identify it.
Example:
- inband - inband audio (requires 64 kbit codec - alaw, ulaw)
- rfc2833 - default
- info - SIP INFO messages
- Auto - Asterisk will use rfc2833 for DTMF relay by default but will switch to inband DTMF tones if the remote side does not indicate support of rfc2833 in SDP
(Select box)
- Context
Contexts define a scope within PBXware. The trunk context cannot be modified and is the same as the trunk name or number.
(E.g., 2554433)
([a-z][0-9])
- Status
Set trunk status on the system. (Active/Not Active/Suspended)
(E.g., Rather than deleting the trunk, you can disable it on the system level by selecting 'Not Active' here)
(Select box)
- Qualify
Timing interval in milliseconds at which a 'ping' is sent to a host to find its status. In PBXware 5.1, 'Qualify' is set to 8000 by default.
(E.g., You set this field to 2000, if more time than this is needed to reach the host, the host is considered offline)
([0-9])
- National Dialing Code
National dialing code used at the trunk destination.
(E.g., For the United States, it is number 1, for the United Kingdom or Germany, it is number 0)
(Select box)
- International Dialing Code
International dialing code used at the trunk destination.
(E.g., For USA 011. For the United Kingdom and Germany 00)
([0-9])
- E164 Accepted
Whether the trunk will support dialing destinations in the E164 format.
(By enabling this option, every dialed number will be transformed to this form: COUNTRY_CODE + AREA_CODE + DIALED_NUMBER.
(E.g., If you dial ‘5551020’, the system will dial ‘12125551020’.)
(Option buttons)
- Pass-thru mode
Pass the dialed digits without conversion (E164, National, Area code).
NOTE: When active, 'Leave National Code and 'Local Area Code' will be disabled.
NOTE: If this option is disabled, PBXware will convert all dialed numbers to E164 format (COUNTRY_CODE + AREA_CODE + DIALED_NUMBER) and then make a call to the converted number. If this option is enabled, PBXware will directly call the DIALED_NUMBER without making any number of conversions.
(Option buttons)
- Leave National Code
In some countries, the national code is stripped automatically. If set to 'Yes', the national code will not be stripped from the dialed number.
NOTE: Before setting this option to 'Yes', go to 'Settings: Servers' and enable this option.
(E.g., 035123456 will not be stripped of 0)
(Option buttons)
- Local Area Code
Add the local area code to the dialed number if required by the service provider. (By default, the local area code is stripped when dialing).
(E.g., The user dials 55510205, and the local area code is 212. If call goes through this trunk, PBXware will dial 21210205)
(Option buttons)
- Dialed number minimum length (6.6.1)
Set a minimum number of digits dialed for a call to leave the system
The value has to be greater than 0 for this to have an effect. The dialed number minimum length set on a Trunk has priority over the Dialed number minimum length set on the system.
The dialed number length will be matched just before dialing through the trunk. The length will also include all the required prefixes and codes that are added to the dialed string.
Ex. If a user dials number 70, the national and international codes will be added to the number and we get 00170. The dialed number length is then 5 and that number will be matched to the option value.
- Prefix
Value added to all dialed numbers going over the trunk.
(E.g., Prefix 5 + Dialed number 123 = System dials 5123)
([0-9])
- Test number
This is the number that the trunk will try to call when Trunk Monitoring is turned on. If the answer is not: ANSWER, BUSY, CANCEL, or NOANSWER, this call is considered non-functional, and the monitoring system will send a notification email.
([0-9])
- Check for Additional Headers
Some trunk providers can send incoming INVITEs with additional headers (X-Mnet-InLeg) containing custom strings. When a call enters PBXware, and the call flow results in some kind of Call Forwarding back to the provider, they could request the same custom header with the same value, so they know which call is in question.
Example:
System 1 > Trunk > Custom SIP Headers > X-Mnet-Inleg: 1alpha457908
System 2 > Trunk > Check for Additional Headers > X-Mnet-Inleg
System 1 Calls System 2. System 2 should detect the X-Mnet-Inleg header and preserve it.
IMPORTANT: Please note that if a phone transfer is used, the headers CANNOT be preserved. The reason is that after the transfer is initiated, the call is treated as a completely new call, and we cannot get the information about preserved headers and their values. Everything should be okay if # is used for the transfer.

Check for Additional Headers
NOTE: Avoid using all default invite headers when checking for additional headers.
Here is the list of unsupported headers which should be case insensitive: "via", "from", "to", "cseq", "call-id", "contact", "allow", "user-agent", "accept-language", "supported", "allow-events", "max-forwards", "content-type", "content-length", "p-asserted-identity", "privacy", and "remote-party-id".
E.g., Trunk > Show Advanced Options > Check for Additional Headers

Warning Message
If one of the headers mentioned above is typed in, as shown in the screenshot, the warning message should appear saying that the header is not allowed.
- SIP Response for non-existing DIDs
Select which SIP response will be sent to a provider if a DID that was called does not exist on the system.
(E.g., System Default)
(Select box)
The following options are as follows:
- System Default
- 403 - Call Rejected
- 404 - Not Found
- 408 - Request Timeout
- 410 - Gone
- 480 - Temporarily Unavailable
- 484 - Address Incomplete
- 486 - Busy Here
- 488 - Not Acceptable Here
- 500 - Internal Server Error
- 501 - Not Implemented
- 502 - Bad Gateway
- 503 - Not Implemented
NOTE: Please note that if 'System Default' is chosen, PBXware will behave as if this option was never set. Additionally, the option selected on 'Trunk' overrides the option selected on 'Servers' if something else but 'System Default' is chosen. If 'System Default' is set on 'Trunk', the option set on 'Servers' is applied.
¶ Authentication
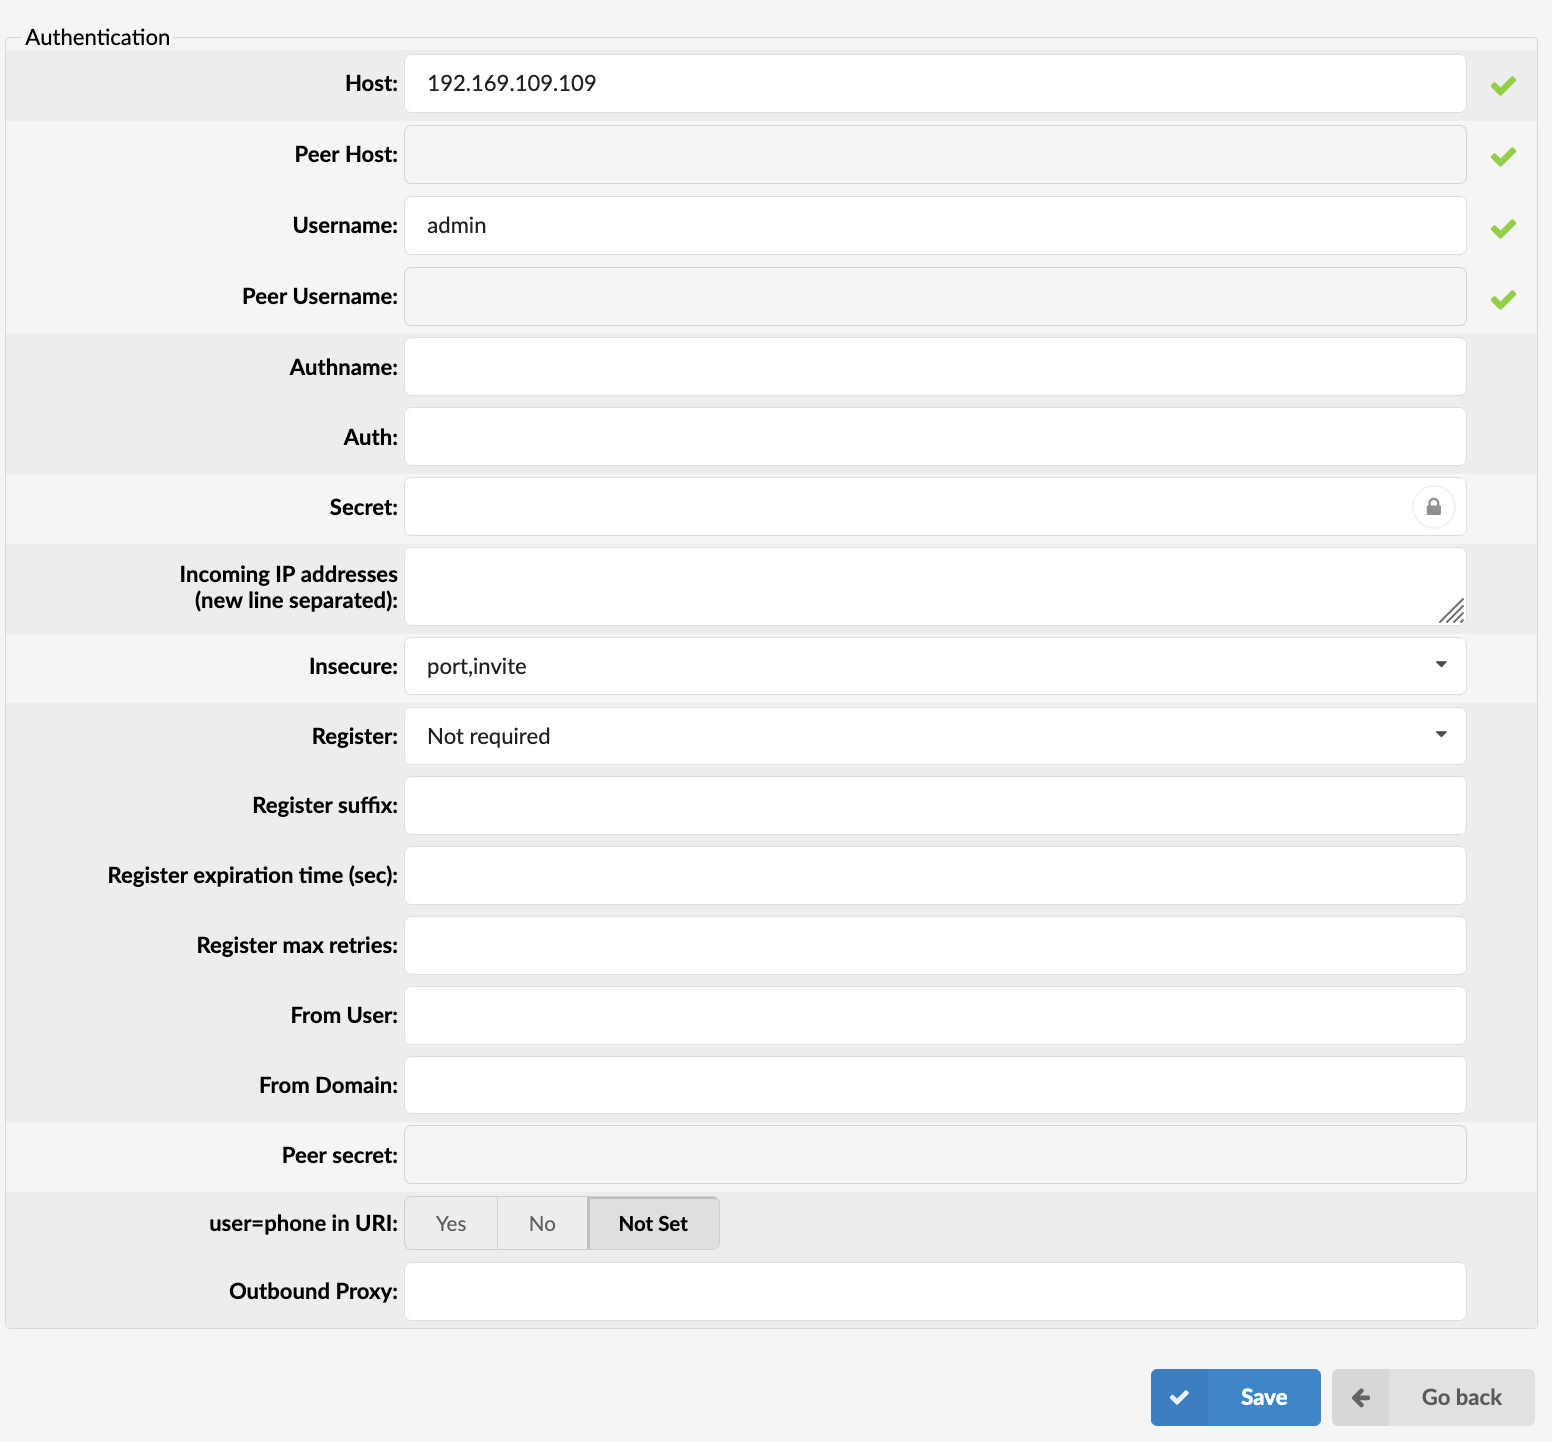
Authentication settings
- Host
The IP address that the host trunk is connecting to.
(E.g., 192.168.1.1)
([0-9][a-z])
NOTE: Please note that only one IP can be added as a host. You cannot add multiple IPs.
- Authname
the value assigned to the Digest username = SIP header
(E.g., 2222)
([0-9][a-z]
- Auth
Authenticate for outbound calls to other realms.
(E.g., user:secret@realm)
([0-9][a-z])
- Incoming IP address (new line separated)
You may limit SIP traffic to and from this peer to a certain IP or network.
If your trunk provider has multiple IP addresses from which traffic was send, all those IP’s need to be listed here,.
(E.g., 10.1.1.9)
([0-9])
- Insecure
Typically used to allow incoming calls while having a "friend" type entry defined with a username and password.
Example:
- Port - Ignores the port number where the request came from
- Invite - Does not require authentication of incoming INVITEs
- Port-Invite - Does not require initial INVITE to authenticate and ignore the port where the request came from
- Very - Ignore authentication (user/password)
(Select box)
- Register
Method for registering to the remote server.
(E.g., Providers may require a different form of registration to their server. You may choose between 'registration not required', 'register with phone number', 'register with username', 'register with authname', 'register with authname@host', and 'register with authname@trunk-name').
(Select box)
- Register suffix
The service provider may request different registration methods for their services. Select the proper method, as required by the provider.
(E.g., 1234567)
([0-9])
- Register expiration time (sec)
Expiration time for registrations in seconds. (default is 3600)
(E.g., 5000)
- Register max retries
A maximum number of registration attempts. (default is 10)
(E.g., 15)
- From user
What to show when calling TO this peer FROM asterisk.
(E.g., 152)
([0-9])
- From Domain
Domain data is required by some providers.
(E.g., If your provider requires this information, provide the exact value here).
([a-z][0-9])
- user=phone in URI
If this option is set to 'Yes', "user=phone" is added to uri that contains a valid phone number.
(E.g., Yes, No, N/A)
(Option buttons)
- Outbound Proxy
Send outbound signaling to this proxy, not directly to the peer.
(E.g., outbound.proxy.com)
([0-9][a-z].)
- Use loose routing for outbound proxy (6.7 beta)
By selecting Yes for this option, you will ensure “Loose routing” is used with Outbound Proxy, which will add “;lr” flag after your Outbound Proxy address in SIP INVITE packets.
In case you manually entered this flag in the Outbound proxy field after your proxy address (I.e. your-outbound-proxy.com;lr ), enabling or disabling Use Loose routing for outbound proxy should not have any effect.
This was implemented to ensure future compatibility and prevent any issues for customers that had this workaround in place to enable Loose routing for outbound proxy, before this feature was available.
(E.g. Yes, No, N/A)
¶ Network Related
These options set important network-related values regarding NAT.

Network Related settings
- Transport:
Type of transfer protocol that will be used on PBXware.
UDP (User Datagram Protocol) - With UDP, computer applications can send messages, in this case, referred to as datagrams, to other hosts on an Internet Protocol (IP) network without prior communications to set up special transmission channels or data paths.
TCP (Transmission Control Protocol) - provides reliable, ordered, error-checked delivery of a stream of octets between programs on computers connected to an intranet or the public Internet.
TLS (Transport Layer Security) - a cryptographic protocol that provides communication security over the Internet.[1] They use asymmetric cryptography for the authentication of key exchange, symmetric encryption for confidentiality, and message authentication codes for message integrity.
NOTE: Changing transport to TLS will automatically set Encryption to Required. If you change the Encryption to another value and Save, it will be set back to Required in the background.
Type: Dropdown
- Encryption:
This option enables or disables encryption in PBXware transport.
Available options:
- Offer if possible (TLS only)
Offer encryption only if it is possible and only with TLS protocol.
- Required
Encryption always required.
- Offer (TLS only)
Always offer encryption with TLS.
- Direct media
Should you allow RTP voice traffic (Real-time Transport Protocol - RTP, is a network protocol for delivering audio and video over IP networks) to bypass PBXware.
NOTE: All enhanced services for the extension have to be disabled.
NOTE: Some devices do not support this, especially if one of them is behind a NAT.
- Direct RTP setup:
Here you can enable or disable the new experimental direct RTP setup. Setting this value to yes sets up the call directly with media peer-2-peer without re-invites. It will not work for video and cases where the callee sends RTP payloads and fmtp headers in the 200 OK that do not match the caller INVITE. This will also fail if direct media is enabled when the device is behind NAT.
Options: Yes, No, N/A
- Default IP
The IP address will be used until the registration.
(E.g., 192.168.1.1)
(IP Address)
¶ Caller ID
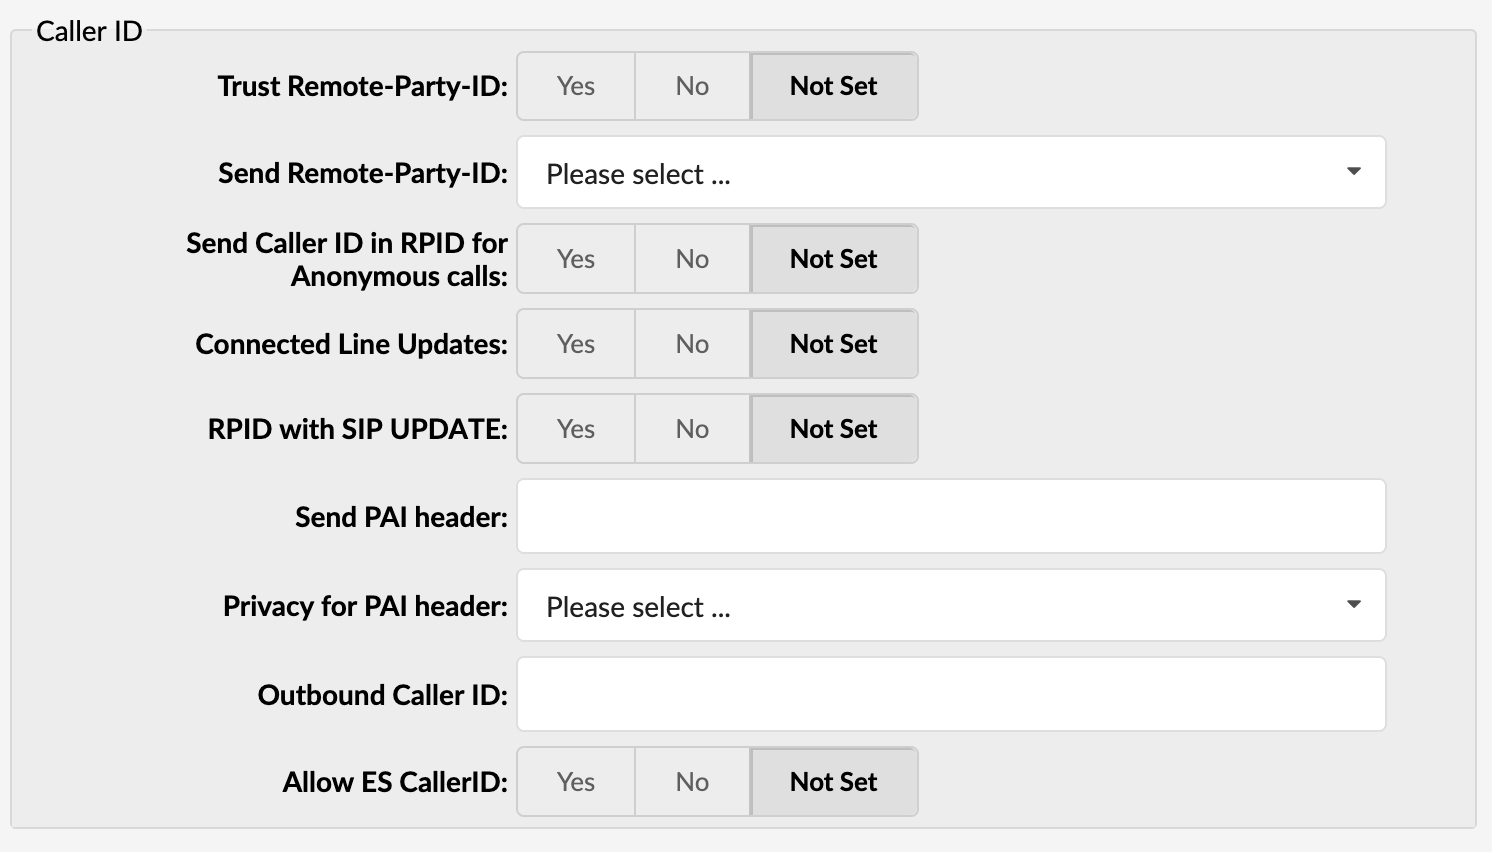
- Trust Remote-Party-ID
Define whether PBXware allows the 'Remote-Party-ID' header.
(Options button)
- Send Remote-Party-ID
Select whether 'Remote-Party-ID' should be added to URI.
The options are as follows:
- Use Remote-Party-ID - Use the 'Remote-Party-ID' header to send the identity of the remote party
- Use P-Asserted-Identity - Use the 'P-Asserted-Identity' header to send the identity of the remote party
(Select box)
- Send Caller ID in RPID for Anonymous calls
Select whether to send the original Caller ID in RPID.
NOTE: When making anonymous calls, FROM and PAI are presented as anonymous, while PAI should also send the original CallerID. Some providers require this setting and would not present an anonymous Caller ID otherwise.
(Options button)
- Connected Line Updates
Enable or prevent RPID updates from being sent after the call is established.
NOTE: This option is beneficial with some providers. If Use PAI is enabled, calls might start dropping a short time after the update is sent. Setting 'Connected Line Updates' to 'No' will prevent these call drops.
(Options button)
- RPID with SIP UPDATE
In some instances, the only method by which a connected line change may be immediately transmitted is with a SIP UPDATE request. If communicating with another Asterisk server, and users wish to transfer such UPDATE messages to it, they must enable this option. Otherwise, we will have to wait until we can send a reinvite to share the information.
(Options button)
- Send PAI header
The P-Asserted-Identity contains the Caller ID information for the call on the INVITE SIP packet. This is the acceptable way of specifying privacy information for calls. This field enables users to send the preferred PAI header by using one fo the following variables:
- %CALLERIDNUM%
- %EXT%
([0-9])
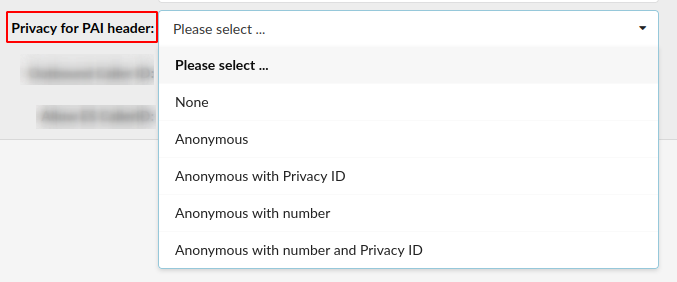
- Privacy for PAI header
Set privacy for a PAI header
Users can select one of the privacy options from the drop-down menu:
- None - The CallerID name and number are not anonymous when dialing out of the Trunk
- Anonymous - The CallerID name and number are anonymous when dialing out of the Trunk
- Anonymous with Privacy ID - The CallerID name and number are anonymous when dialing out of the Trunk, but the Privacy ID is added to the SIP header
- Anonmymous with number - The CallerID name is set to anonymous, but the number is displayed
- Anonymous with number and Privacy ID - The CallerID name is set to anonymous, but the number is displayed and the Privacy ID is added to the SIP header
(E.g., Anonymous with Privacy ID)
(Select box)
NOTE: If nothing is set in this field, the privacy will default be set to 'none'.
- Outbound Caller ID
If the UAD does not set the Caller ID, the value provided here will be used for all outgoing calls.
(E.g., 55599999)
([0-9])
- Allow ES Caller ID
This option defines whether the ES (Enhanced Services) Caller ID will be allowed over this Trunk. Any Extension can set a custom Caller ID for each system Trunk. When this option is set to ‘Yes’, that Caller ID will be used instead of the Trunk outbound Caller ID.
(Options button)
¶ Channels

Channels settings
- Incoming Limit
Define the number of simultaneous incoming calls that the Trunk can handle.
(E.g., Setting this option to 4 means that four simultaneous incoming calls are possible. Any additional call will get a busy sound.)
([0-9])
- Outgoing Limit
Define the number of simultaneous outgoing calls that the Trunk can handle.
(E.g., Setting this option to 4 means that four simultaneous outgoing calls are possible. Any additional call attempting to use this Trunk will be rejected or redirected to other Trunks depending on what is set under the system/Extensions.)
([0-9])
- Ringtime (sec)
Define the ring timeout (in seconds) for outbound calls through the Trunk.
(E.g., 50)
([0-9])
- E-mail on exceeded limit
Send an e-mail when the outgoing limit is reached.
(E.g., Yes/No/Not Set)
(Options button)
- Outgoing Dial Options
Set advanced dial options for all outgoing calls.
(E.g., trT)
([a-z])
¶ Codecs
Codecs convert voice signals from analog to digital and vice versa—these options set the preferred codecs used by the extension.
TIP:
If some of the desired codecs cannot be selected, go to 'Settings: Servers: Edit: Default Codecs' and enable them under the 'Remote' group.
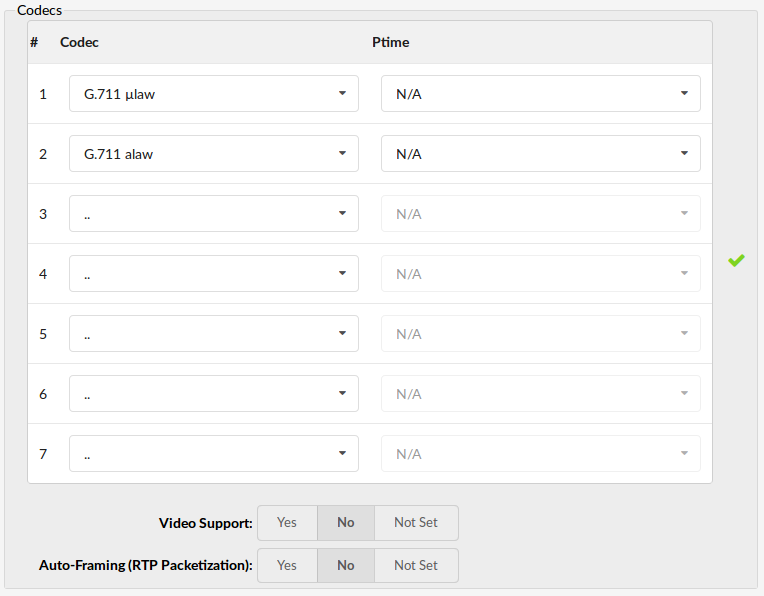
Codecs settings
Codecs
- ITU G.711 ulaw - 64 Kbps, sample-based, used in US
- ITU G.711 alaw - 64 Kbps, sample-based, used in Europe
- ITU G.723.1 - 5.3/6.3 Kbps, 30ms frame size
- ITU G.726 - 16/24/32/40 Kbps
- ITU G.729 - 8 Kbps, 10ms frame size
- GSM - 13 Kbps (full rate), 20ms frame size
- iLBC - 15Kbps,20ms frame size: 13.3 Kbps, 30ms frame size
- Speex - 2.15 to 44.2 Kbps
- LPC10 - 2.5 Kbps
- H.261 Video - Used over ISDN lines with the resolution of 352x288
- H.263 Video - Low-bit rate encoding solution for video conferencing
- H.263+ Video - Extension of H.263 provides additional features that improve compression over packet-switched networks.
(Dropdown menu)
- Ptime
Set the Ptime for each Codec.
(Dropdown Menu)
(E.g., 20ms)
- Video Support
Enable or disable SIP video support.
(Option buttons)
- Auto-Framing (RTP Packetization)
The system will choose a packetization level based on remote end preferences if auto-framing is turned on.
(E.g., If the remote end requires RTP packets to be of 30 ms, your PBXware system will automatically send packets of this size if this option is turned on. The default is set to 20 ms and also depends on the codecs minimum frame size, like G.729, which has 10 ms as a minimum)
(Option buttons)
¶ Additional config
Additional config
This option provides additional config parameters for SIP, IAX, and MGCP configuration files. The values provided here will be written into these configuration files.
NOTE: Unless sure, do not change or add to this template.
¶ SIP Custom headers (separated by new line)
The SIP header is a function of SIP. These headers help convey message attributes to ensure that information packets travel along the correct path when communicating between devices existing on separate networks.
To use SIP Custom headers, these are the variables that can be used:
- %CALLERIDNUM%
- %EXT%
NOTE: Unless sure, do not change or add to this template.
¶ PSTN(Public switched telephone network)
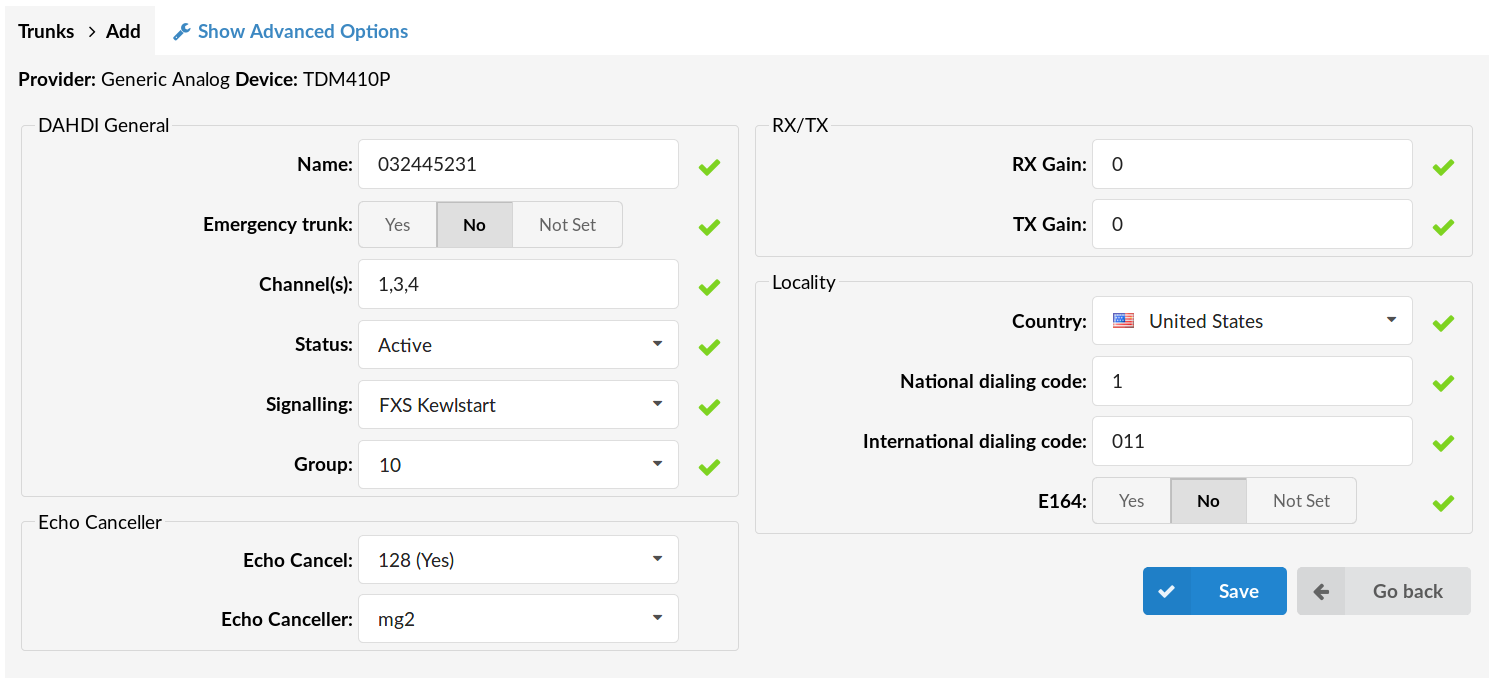
Trunks: Edit screen
NOTE: To see these options user needs to create PSTN Trunk first. To do that PSTN card is needed.
These options can be found when adding a trunk and selecting the device.
¶ DAHDI General
- Name
Trunk name/number.
(E.g., 032445231)
([a-z][0-9])
- Channel(s)
Which card channels are used, separated by commas.
(E.g., If channels 2 and 4 are used on your card, set '2, 4' here. Suppose all four channels are used, set '1-4' here).
([0-9], [,-])
- Status
Set the status of the trunk.
(Dropdown Menu)
- Signaling
Signaling protocol for analog circuits that better detects far-end disconnects.
(Dropdown Menu)
- Group
Every PSTN trunk has to belong to a group. Selecting any group will enable the trunk.
NOTE: This option is auto-detected and set with most cards. If that is the case with your card - do not change this field.
(Dropdown Menu)
¶ Echo Canceler
- Echo Cancel
Enable Echo Canceler.
(Dropdown Menu)
- Echo Canceler
Select the type of Echo Canceler.
(Dropdown Menu)
¶ RX/TX
- RX Gain
Receive signal decibels.
(E.g., If the incoming sound is low and you cannot hear the other party well, set this option to 2. That should increase incoming sound by 2 decibels.)
([0-9])
- TX Gain
Transmit signal decibel.
(E.g., If the outgoing sound is low and the other party cannot hear you well, set this option to 2. That should increase outgoing sound by 2 decibels).
([0-9])
¶ Locality
- Country
Destination of the trunk connection.
(E.g., If your system is located in the USA, select the USA here)
(Dropdown Menu)
- National Dialing Code
National dialing code used at the trunk destination.
(E.g., For the USA, it is 1, for the United Kingdom and Germany, it is 0.)
([0-9])
- International Dialing Code:
The international dialing code at the trunk destination.
(E.g., For the USA 011, for the United Kingdom and Germany 00, etc.)
([0-9])
- E164
Whether the trunk will support dialing destinations in the E164 format, by enabling this option, every dialed number will be formatted in the following form: COUNTRY_CODE+AREA_CODE+DIALED_NUMBER.
(E.g., If you dial 5551020, the system will dial 12125551020).
(Option buttons)
¶ Advanced Options
¶ DAHDI General
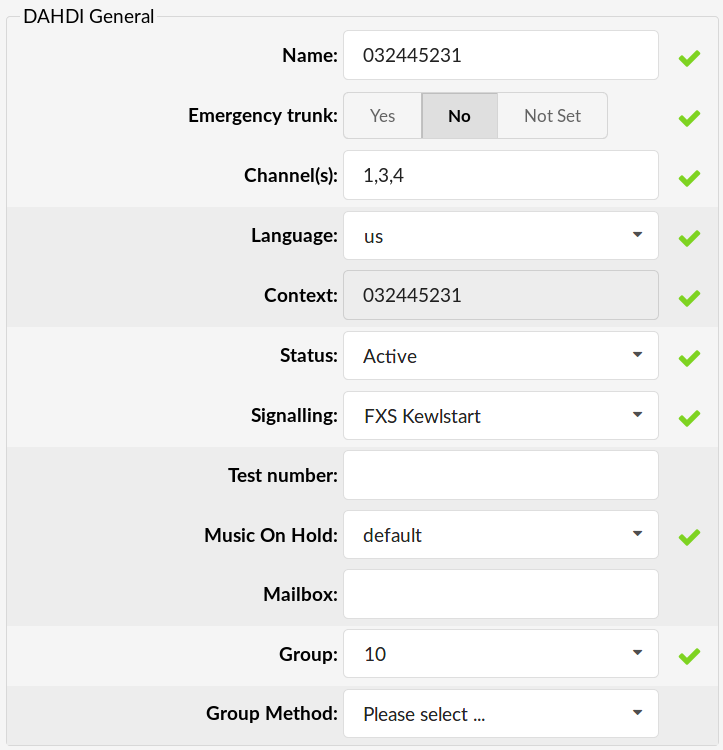
Zapata General settings
- Language
Default language.
(E.g., us)
(Select box)
- Context
Contexts define a scope within the PBXware.
([a-z][0-9])
- Status:
Trunk status.
- Active
- Not Active
(Dropdown Menu)
- Signalling
Signaling method.
- E&M
- E&M Wink
- FXS Loopstart
- FXS Groundstart
- FXS Kewlstart
- FXO Loopstart
- FXO Groundstart
- FXO Kewlstart
- PRI CPE side
- PRI Network side
- BRI CPE side
- BRI Network side
- BRI CPE PTMP
- BRI Network PTMP
- Test number
This is the number that the trunk will try to call when Trunk Monitoring is turned on. If the answer is not: ANSWER, BUSY, CANCEL, or NOANSWER, this call is considered non-functional, and the monitoring system will send a notification email.
(E.g., 1009)
([0-9])
- Music On Hold
Select which class of music to use for music on hold. If not specified, the 'default' will be used.
(Dropdown Menu)
- Mailbox
Define a voicemail context.
(E.g., 1234, 1234@context)
([a-z][0-9)
- Group Method
([a-z][0-9])
This option specifies how to choose a channel to use in the specified group.
The four possible options are:
- g: select the lowest-numbered non-busy DAHDI channel (aka. ascending sequential hunt group).
- G: select the highest-numbered non-busy DAHDI channel (aka. descending sequential hunt group).
- r: use a round-robin search, starting at the next highest channel than last time (aka. ascending rotary hunt group).
- R: use a round-robin search, starting at the next lowest channel than last time (aka. descending rotary hunt group).
¶ RX/TX

RX/TX settings
- RX Wink
Set timing parameters
- Pre-wink (50ms)
- Pre-flash (50ms)
- Wink (150ms)
- Receiver flash time (250ms)
- Receiver wink (300ms)
- Debounce timing (600ms)
(Dropdown Menu)
- RX Gain
Receive signal decibels.
(E.g., If the outgoing sound is low and the other party cannot hear you well, set this option to 2. That should increase outgoing sound by 2 decibels).
([0-9])
- TX Gain
Transmit signal decibel.
(E.g., If the outgoing sound is low and the other party cannot hear you well, set this option to 2. That should increase outgoing sound by 2 decibels).
([0-9])
¶ PRI
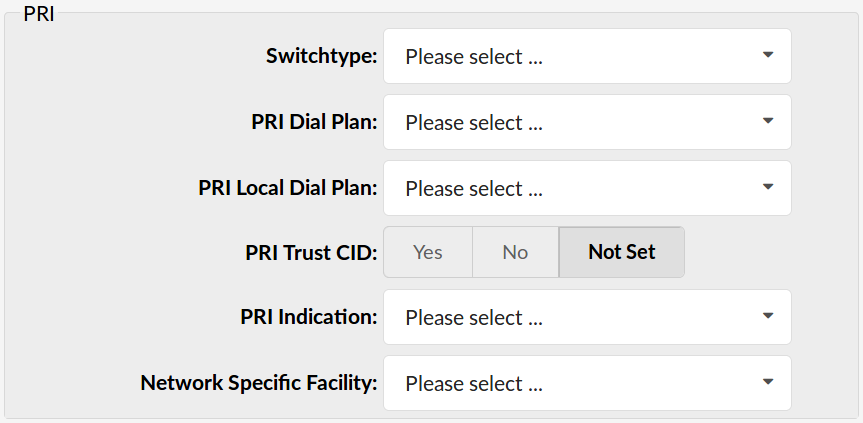
PRI settings
- Switchtype
Set switch type
Example:
- National ISDN 2
- Nortel DMS100
- AT&T 4ESS
- Lucent 5ESS
- EuroISDN
- Old National ISDN 1
(Dropdown Menu)
- PRI Dial Plan
Set the dial plan used by some switches
Example:
- Unknown
- Private ISDN
- Local ISDN
- National ISDN
- International ISDN
(Dropdown Menu)
- PRI Local Dial Plan
Set the numbering dial plan for destinations called locally
Example:
- Unknown
- Private ISDN
- Local ISDN
- National ISDN
- International ISDN
(Dropdown Menu)
- PRI Trust CID
Trust provided Caller ID information.
(Option buttons)
- PRI Indication
How to report 'busy' and 'congestion' on a PRI
Example:
- outofband - Signal Busy/Congestion out of band with RELEASE/DISCONNECT
- inband - Signal Busy/Congestion using in-band tones
(Dropdown Menu)
- Network Specific Facility
If required by a switch, select the network-specific facility.
Example:
- none
- sdn
- megacom
- accunet
(Dropdown Menu)
¶ Caller ID
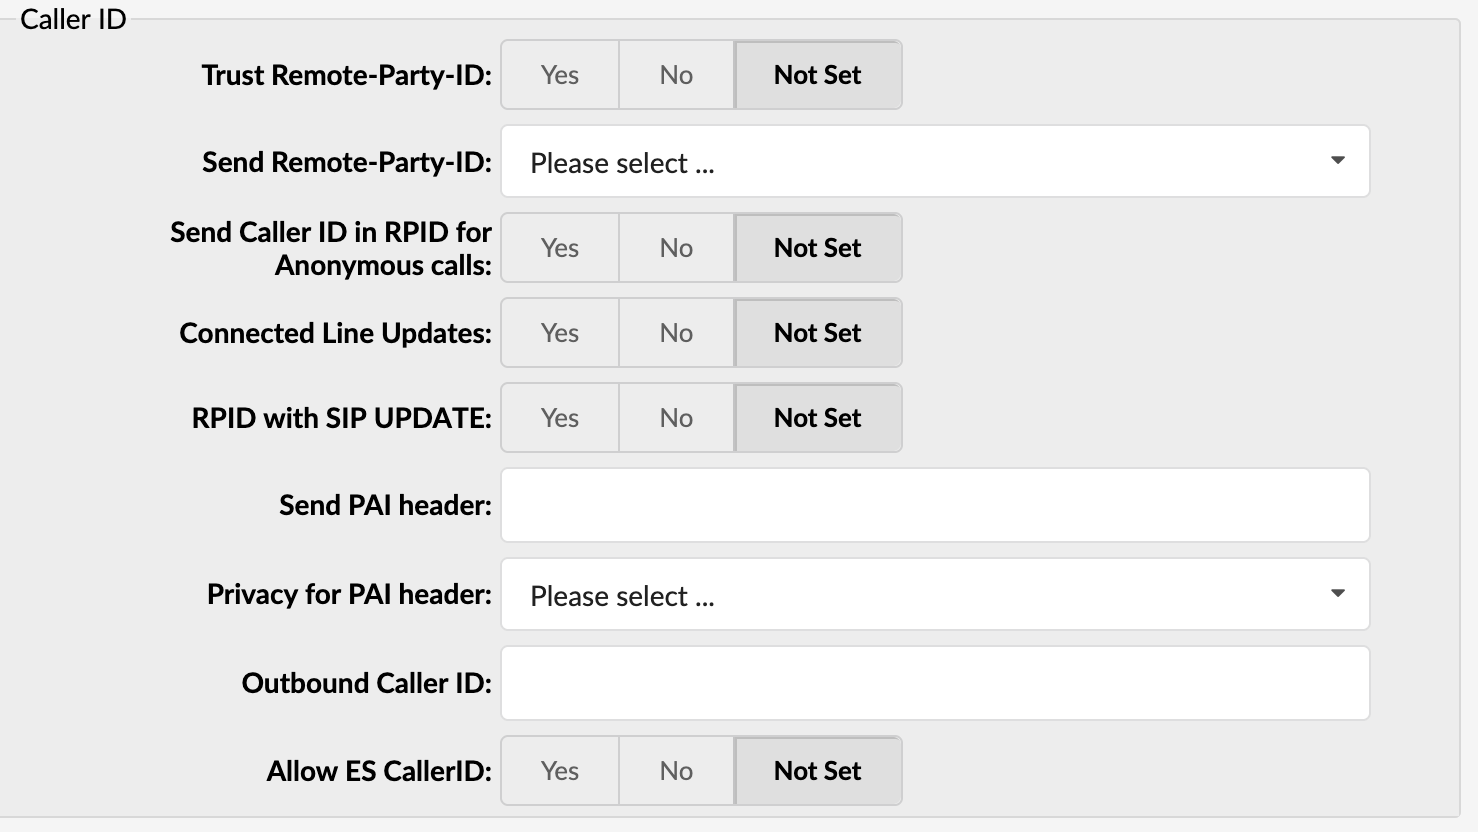
Caller ID settings
- Outbound Caller ID
Caller ID set for all outbound calls where the Caller ID is not set or supported by a device.
(E.g., john@domain.com)
([0-9])
- Allow ES Caller ID
This option defines whether the ES (Enhanced Services) Caller ID will be allowed over this trunk. Any extension can set a custom Caller ID for each system trunk. When this option is set to ‘yes’ that Caller ID will be used instead of the trunk outbound Caller ID.
([0-9])
- Caller ID (for analog or inbound)
CallerID can be set to 'asreceived' or a specific number if you want to override it.
NOTE: Caller ID can only be transmitted to the public phone network with supported hardware, such as a PRI. It is not possible to set external caller ID on analog lines.
(E.g., 'asreceived', 555648788)
([a-z][0-9])
- Use Caller ID
Whether or not to use the caller ID.
(Option buttons)
- Hide Caller ID
Whether or not to hide the outgoing caller ID.
(Option buttons)
- Restrict CID
Whether or not to use the caller ID presentation for the outgoing call the calling switch is sending.
(Option buttons)
- Use CallerID Presentation
Whether or not to use the caller ID presentation for the outgoing call the calling switch is sending.
(Option buttons)
- CID Signalling
Set the type of caller ID signaling
Example:
- bell - US
- v23 - UK
- dtmf - Denmark, Sweden, and Netherlands
(Dropdown Menu)
- CID Start
What signals the start of the Caller ID.
Example:
- ring = a ring signals the start
- polarity = polarity reversal signals the start
(Dropdown Menu)
- Call Waiting CID
Whether or not to enable call waiting on FXO lines.
(Option buttons)
- Send CallerID After
Some countries, like the UK, have different ring tones (ring-ring), which means the Caller ID needs to be set later on, and not just after the first ring, as per the default.
(Dropdown Menu)
¶ Echo Canceller

Echo Canceler settings.
- Echo Cancel
Level of enabled echo cancelation.
(Dropdown Menu)
- Echo Training
Mute the channel briefly, for 400ms, at the beginning of the conversation, canceling the echo. (Use this only if 'Echo Cancel' doesn't work as expected).
(Option buttons)
- Echo Cancel When Bridged
Enable echo cancellation when bridged. Generally not necessary and undesirable to echo cancel when the circuit path is entirely TDM.
(Option buttons)
¶ Call Features
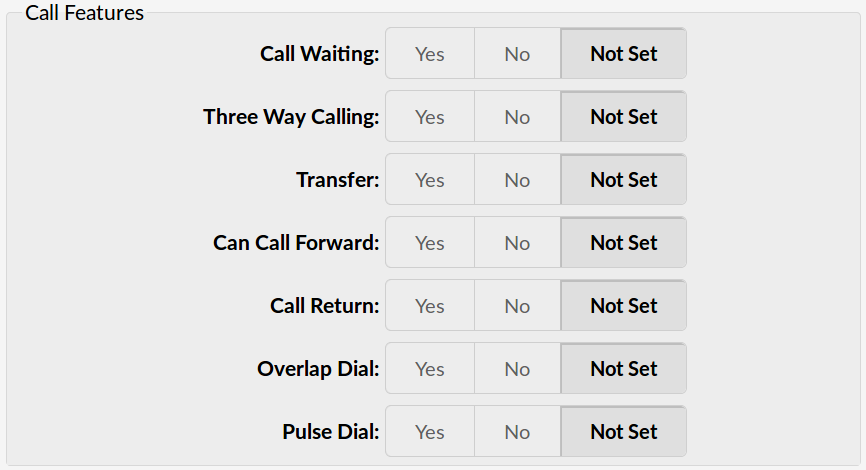
Call Features options
- Call Waiting
Whether or not to enable call waiting on FXO lines.
(Option buttons)
- Three Way Calling
Support three-way calling. If enabled, the call can be put on hold, and one can make another call.
(Option buttons)
- Transfer
Supports call transfer and also enables call parking (overrides the 'canpark' parameter).
NOTE: Requires 'Three Way Calling' set to 'Yes'.
(Option buttons)
- Can Call Forward
Supports call forwarding.
(Option buttons)
- Call Return
Whether or not to support Call Return '*69'. Dials last caller extension number.
(Option buttons)
- Overlap Dial
Enables overlap dialing mode (sends overlap digits).
(Option buttons)
- Pulse Dial
Use pulse dial instead of DTMF. Used by FXO (FXS signaling) devices.
(Option buttons)
¶ Call Indications
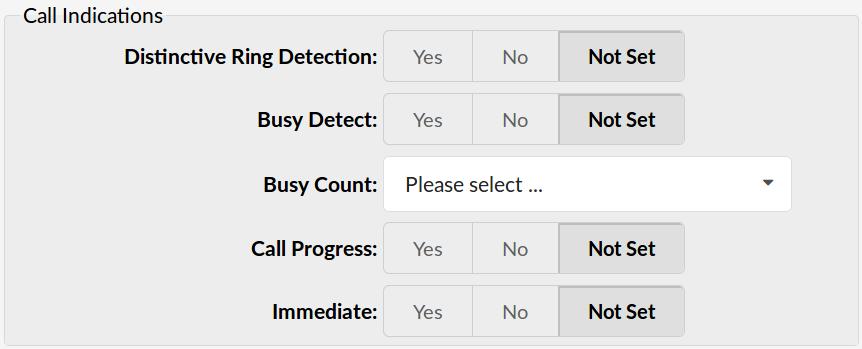
Call Indications settings
- Distinctive Ring Detection
Whether or not to do distinctive ring detection on FXO lines.
(Option buttons)
- Busy Detect
Enable listening for the beep-beep busy pattern.
(Option buttons)
- Busy Count
It represents how many busy tones to wait before hanging up. More extensive settings lower the probability of random hang-ups. 'Busy Detect' has to be enabled.
- 4
- 6
- 8
(Dropdown Menu)
- Call Progress
Easily detect false hangups.
(Option buttons)
- Immediate
Should the channel be answered immediately, or should the simple switch provide a dial tone, read digits, etc.
(Option buttons)
¶ Call Groups

Call Groups
- Call Group
Which group is allowed to pick up incoming calls by dialing *8. The default value is empty.
(E.g., 1, 1-4)
([0-9])
- Pickup Group:
Which groups are allowed to pick up calls by dialing *8. The default value is empty.
(E.g., 1, 1-4)
([0-9])
¶ FXS Channels

FXS Channels settings
- FXS Loopstart
Signals the far end that it wants the dial tone by shorting the leads.
([0-9])
- FXS Groundstart
Signals the far end that it wants the dial tone by grounding one of the leads.
([0-9])
- FXS Kewlstart
Signaling protocol for analog circuits that better detects far-end disconnects.
(E.g., Select card channels to be monitored with it. For example '1, 4' or '1-4'. These numbers should match the 'Channel(s)' field).
([0-9], [,-])
¶ Locality
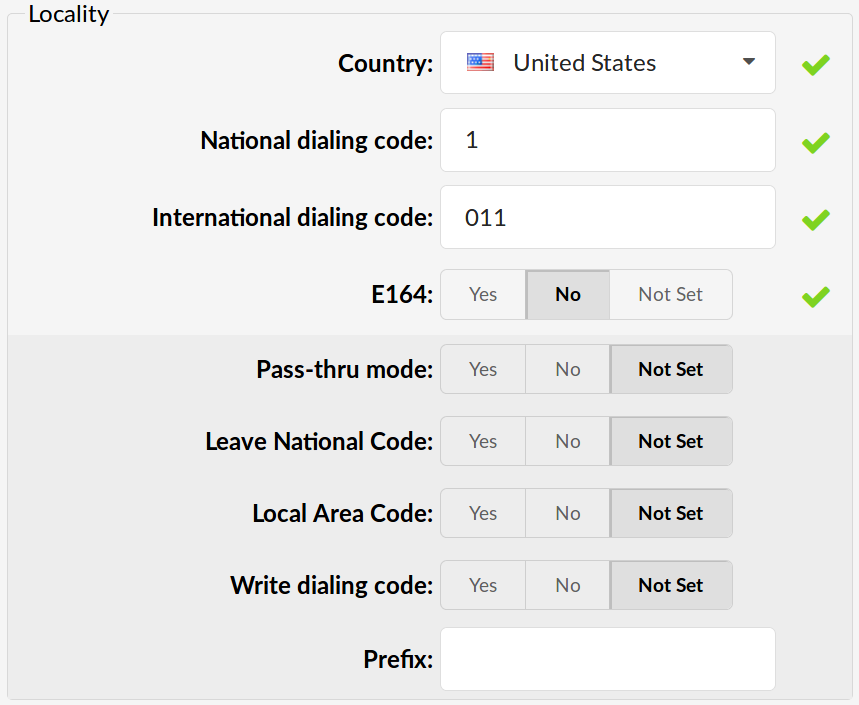
Locality settings
- Country
Destination of the trunk connection.
(E.g., USA)
(Select box)
- National Dialing Code
The national dialing code at the trunk destination.
(E.g., For the USA, the number is 1. For the United Kingdom and Germany 0 etc.)
([0-9])
- International Dialing Code
International dialing code at the trunk destination.
(E.g., For the USA, numbers are 011. For the United Kingdom and Germany 00 etc.)
([0-9])
- E164 Accepted
Whether the trunk will support dialing destinations in E164 format.
(E.g., Enabling this option will reformat any dialed number into the following form COUNTRY_CODE+AREA_CODE+DIALED_NUMBER. For example, if you dial 5551020, the system will dial 12125551020).
(Option buttons)
- Pass-thru Mode
If this option is enabled, the dialed number is passed through the trunk without modification.
(Option buttons)
- Leave National Code
In some countries, the national code is stripped automatically. If set to 'Yes', the national code will not be stripped from the dialed number.
NOTE: Before settings this option to 'Yes', go to 'Settings: Servers' and enable this option as well.
(E.g., John dials 121255510205. With this option enabled, the whole number will be seen.)
([0-9])
- Local Area Code
Add the local area code to the dialed number, if required by the service provider. (By default, the local area code is stripped when dialing)
(E.g., The user dials 55510205, the local area code is 212. If the call goes through this trunk PBXware will dial 21255510205).
([0-9])
- Write dialing code
Should the National and International prefix be written into the configuration files.
(E.g., Enable this option if required by the provider).
([0-9])
- Prefix
Value added to all dialed numbers going over the trunk.
(E.g., If the Prefix is 5, the dialed number is 123 System will dial 5123).
([0-9])
¶ Other PSTN Options
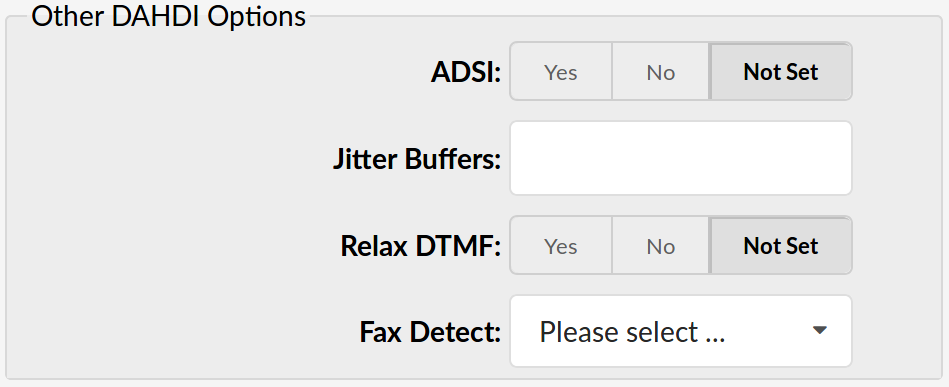
Other PSTN Options
- ADSI (Analog Display Services Interface)
Enable remote controlling of the screen phone with softkeys. (Only if you have ADSI compatible CPE equipment).
(Option buttons)
- Jitter Buffers
Configure jitter buffers. Each one is 20ms long.
(E.g., 4)
([0-9])
- Relax DTMF
If you are having trouble with DTMF detection, you can relax the DTMF detection parameters.
(Option buttons)
- Fax Detect
Enable fax detection
Example:
- both
- incoming
- outgoing
- no
(Dropdown Menu)
¶ Span
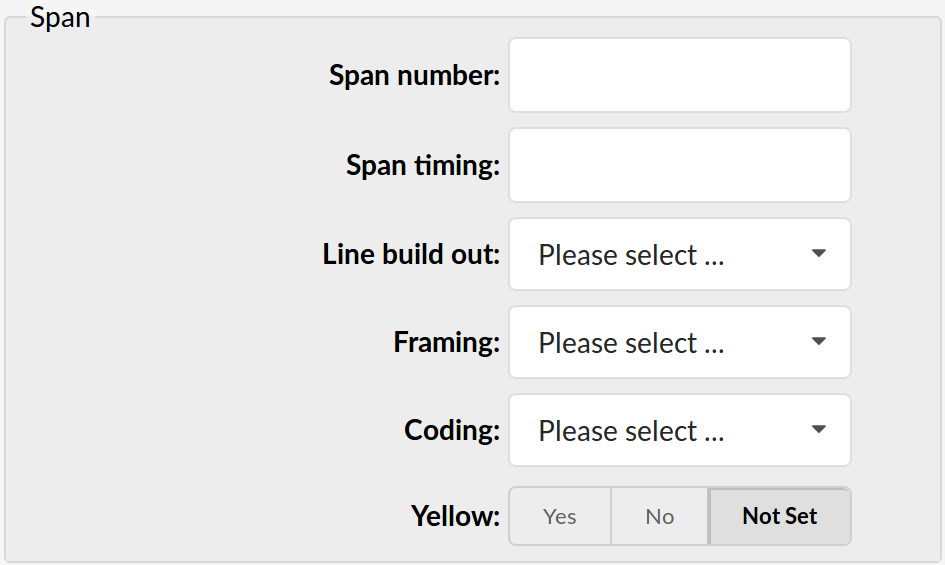
Span settings
- Span number
A number of the span.
(E.g., 1)
([0-9])
- Span timing
How to synchronize the timing devices.
Example:
- 0 - do not use this span as sync source
- 1 - use as primary sync source
- 2 - set as secondary and so forth
([a-z])
- Line build out
Length of the last leg of the connection and is set to zero if the length is less than 133 feet.
Example:
- 0 db (CSU) / 0-133 feet (DSX-1)
- 133-266 feet (DSX-1)
- 266-399 feet (DSX-1)
- 399-533 feet (DSX-1)
- 533-655 feet (DSX-1)
- -7.5db (CSU)
- -15db (CSU)
- -22.5db (CSU)
(Dropdown Menu)
- Framing
How to communicate with the hardware at the other end of the line.
Example:
- For T1: Framing is one of d4 or esf.
- For E1: Framing is one of cas or ccs.
(Dropdown Menu)
- Coding
How to encode the communication with the other end of line hardware.
Example:
- For T1: coding is one of ami or b8zs
- For E1: coding is one of ami or hdb3 (E1 may also need crc)
(Dropdown Menu)
- Yellow
Whether the yellow alarm is transmitted when no channels are open.
(Option buttons)
¶ Dynamic Span
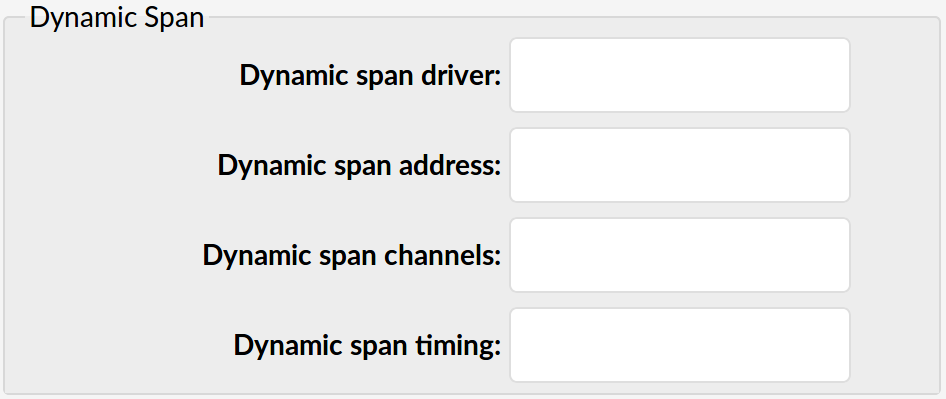
Dynamic Span settings
- Dynamic span driver
The name of the driver (E.g., eth).
([0-9][a-z])
- Dynamic span address
Driver specific address (like a MAC for eth).
([0-9][a-z])
- Dynamic span channels
A number of channels.
(E.g., 6)
- Dynamic span timing
Sets timing priority, like for an average span. Use '0' in order not to use this as a timing source, or prioritize them as primary, secondary, etc.
(E.g., 0)
¶ FXO Channels

FXO Channels settings
- FXO Loopstart
Channel(s) are signaled using the FXO Loopstart protocol.
- FXO Groundstart
Channel(s) are signaled using the FXO Groundstart protocol.
- FXO Kewlstart
Channel(s) are signaled using the FXO Kewlstart protocol.
¶ PRI Channels

PRI Channels settings
- D-Channel(s)
For example, every ISDN BRI card has 1 D- (control) channel.
(E.g., 1)
([0-9])
- B-Channels(s)
For example, every ISDN BRI card has 2 B- (data) channels.
(E.g., 2)
([0-9])
¶ Custom Trunks
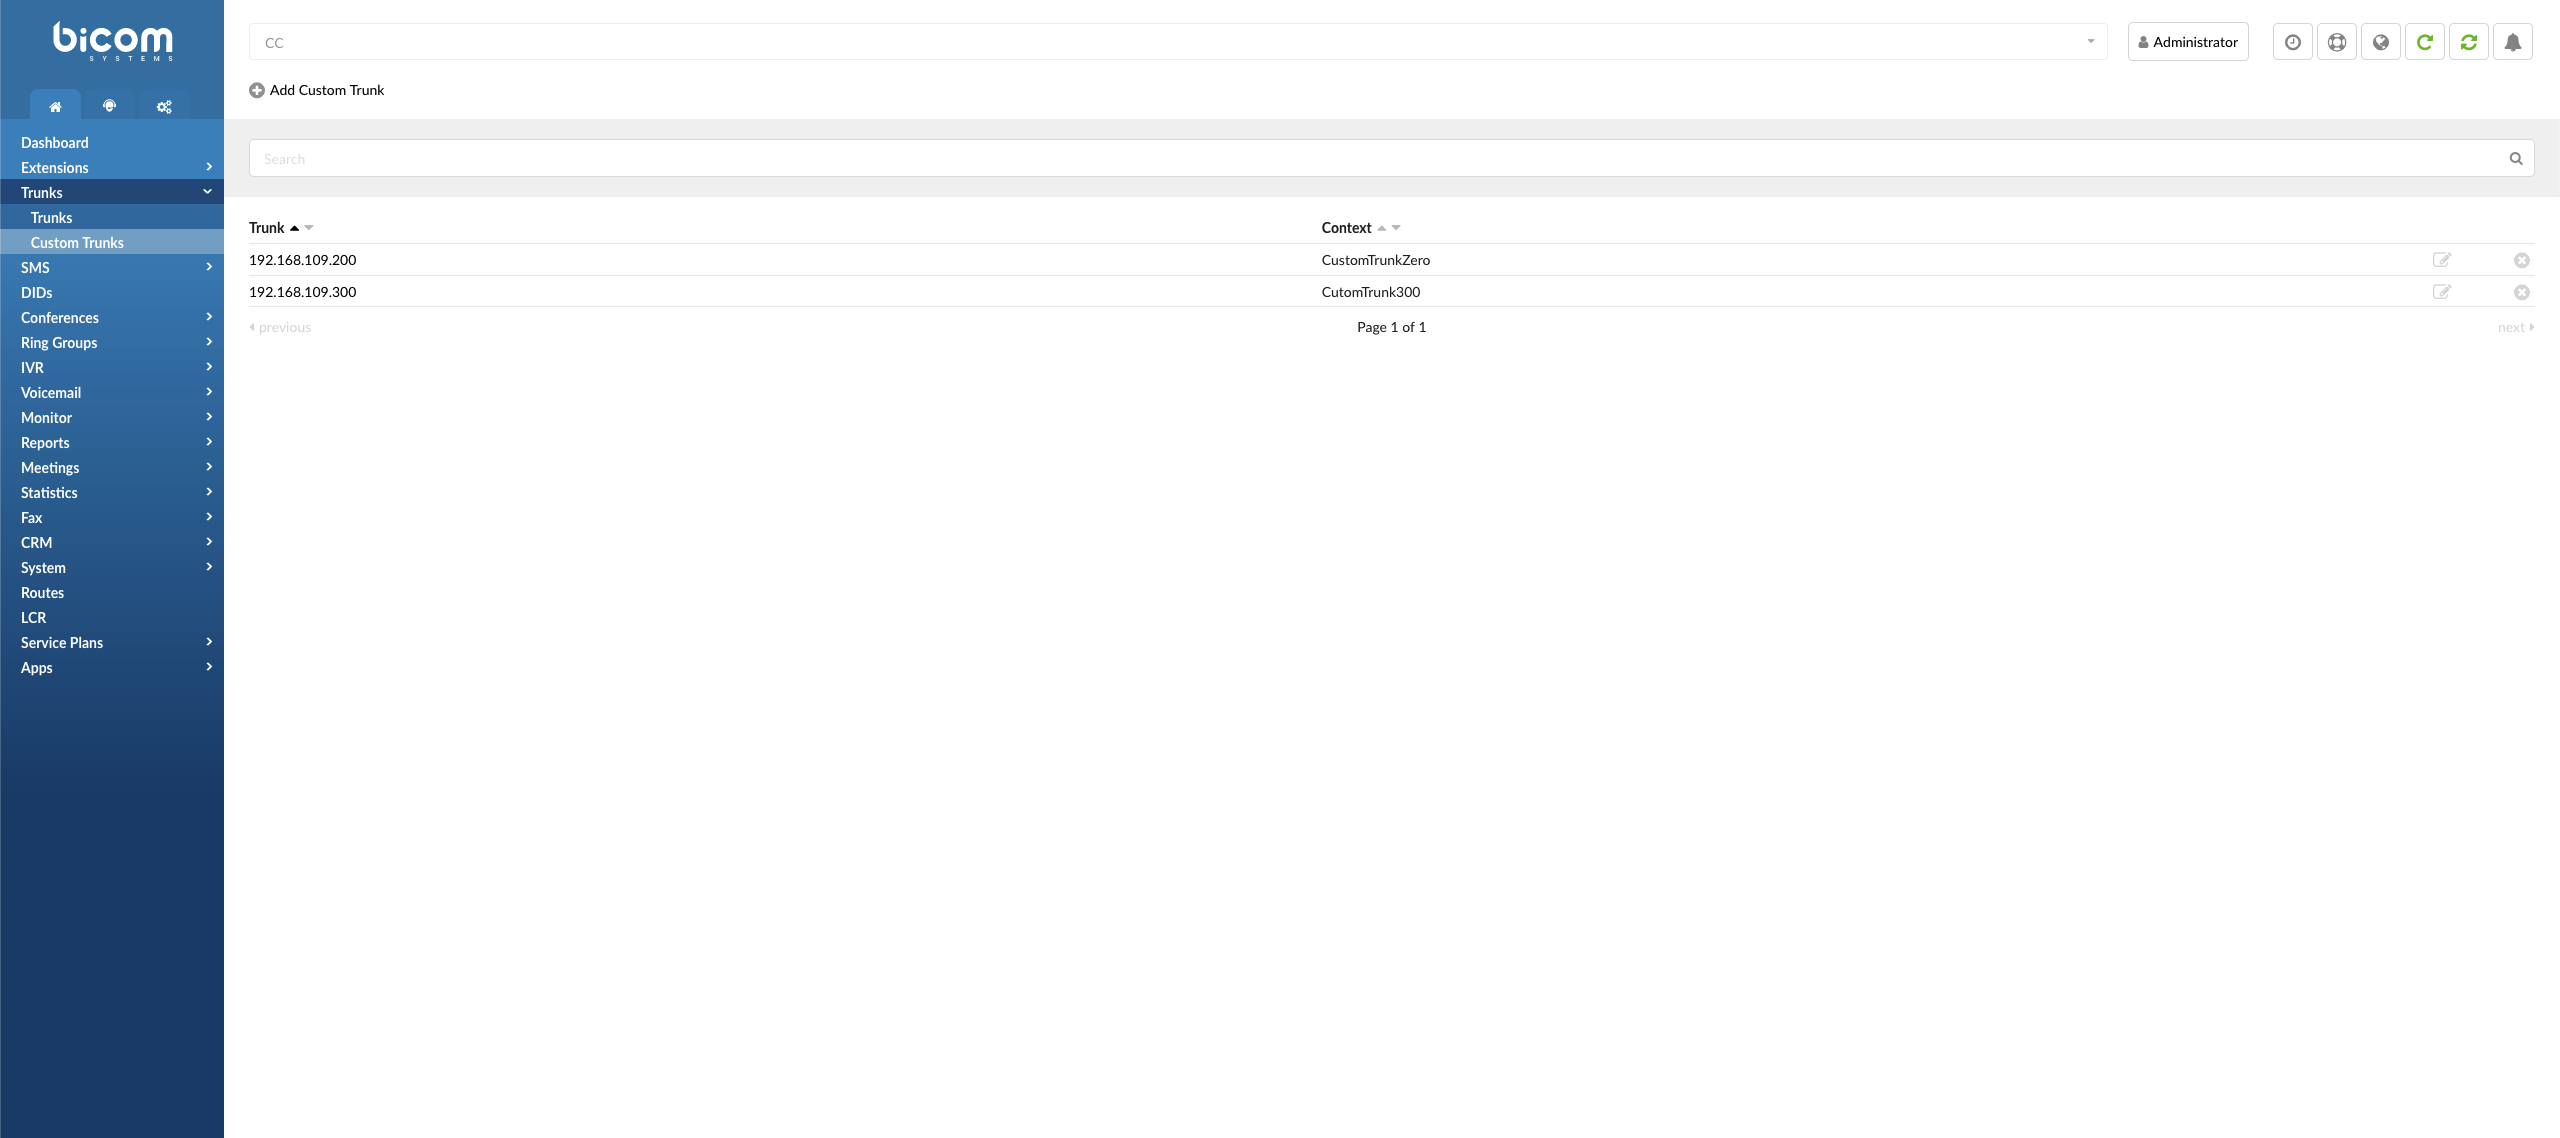
Add Custom Trunk
Custom Trunks are used in rare cases where the PBXware Trunk setup features do not provide enough flexibility for some provider configurations. In such cases, users must create a custom Trunk and then change the dialplan in the conf file.
- Search
Users can search the existing Custom Trunks by using the search bar.
(E.g., Test)
([a-z][0-9])
- Trunk
Displays the name of the Custom Trunk
(E.g., Test)
(Display)
NOTE: Hovering the mouse over the name of a Custom Trunk and clicking it will prompt users to the 'Custom Trunk -> Edit' window.
- Context
Displays the context of the specific Custom Trunk
(E.g., 21)
(Display)
 Click this button to edit the existing Custom Trunk.
NOTE: Upon clicking the 'Edit' button, users will be prompted to a 'Custom Trunk -> Edit' window where they can edit details regarding existing Custom Trunks.
(Button)
 Click this button to delete the existing Custom Trunk.
NOTE:
Upon deleting the existing Custom Trunk, the warning message will appear saying "Are you sure you want to remove XYZ?". The specified Custom Trunk will be deleted if a user confirms their deletion action by clicking 'OK'.
(Button)
¶ Add Custom Trunk

Once this button is clicked, users will be prompted to a different window where they can create new Custom Trunks.
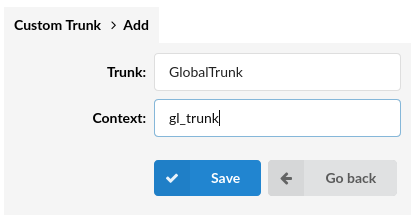
- Trunk
Enter the name of a Custom Trunk that will be visible in the PBXware GUI
(E.g., Test)
([a-z][0-9])
NOTE: Please be notified that spaces are not allowed while adding the name of a Custom Trunk. Please refer to the further visual explanation.
| Custom Trunk Example Names | |
|---|---|
| 1. Without Space Character (accepted) | GlobalTrunk |
| 2. With Space Character (not accepted) | Global Trunk |
- Context
Enter the context by which the system sees this Custom Trunk. This will be used when editing the dialplan.
(E.g., If a user sets the context as 'gl_trunk', then, when sending calls to the Trunk, s(he) would use this to refer to the given Trunk).
([a-z][0-9])
