Agents
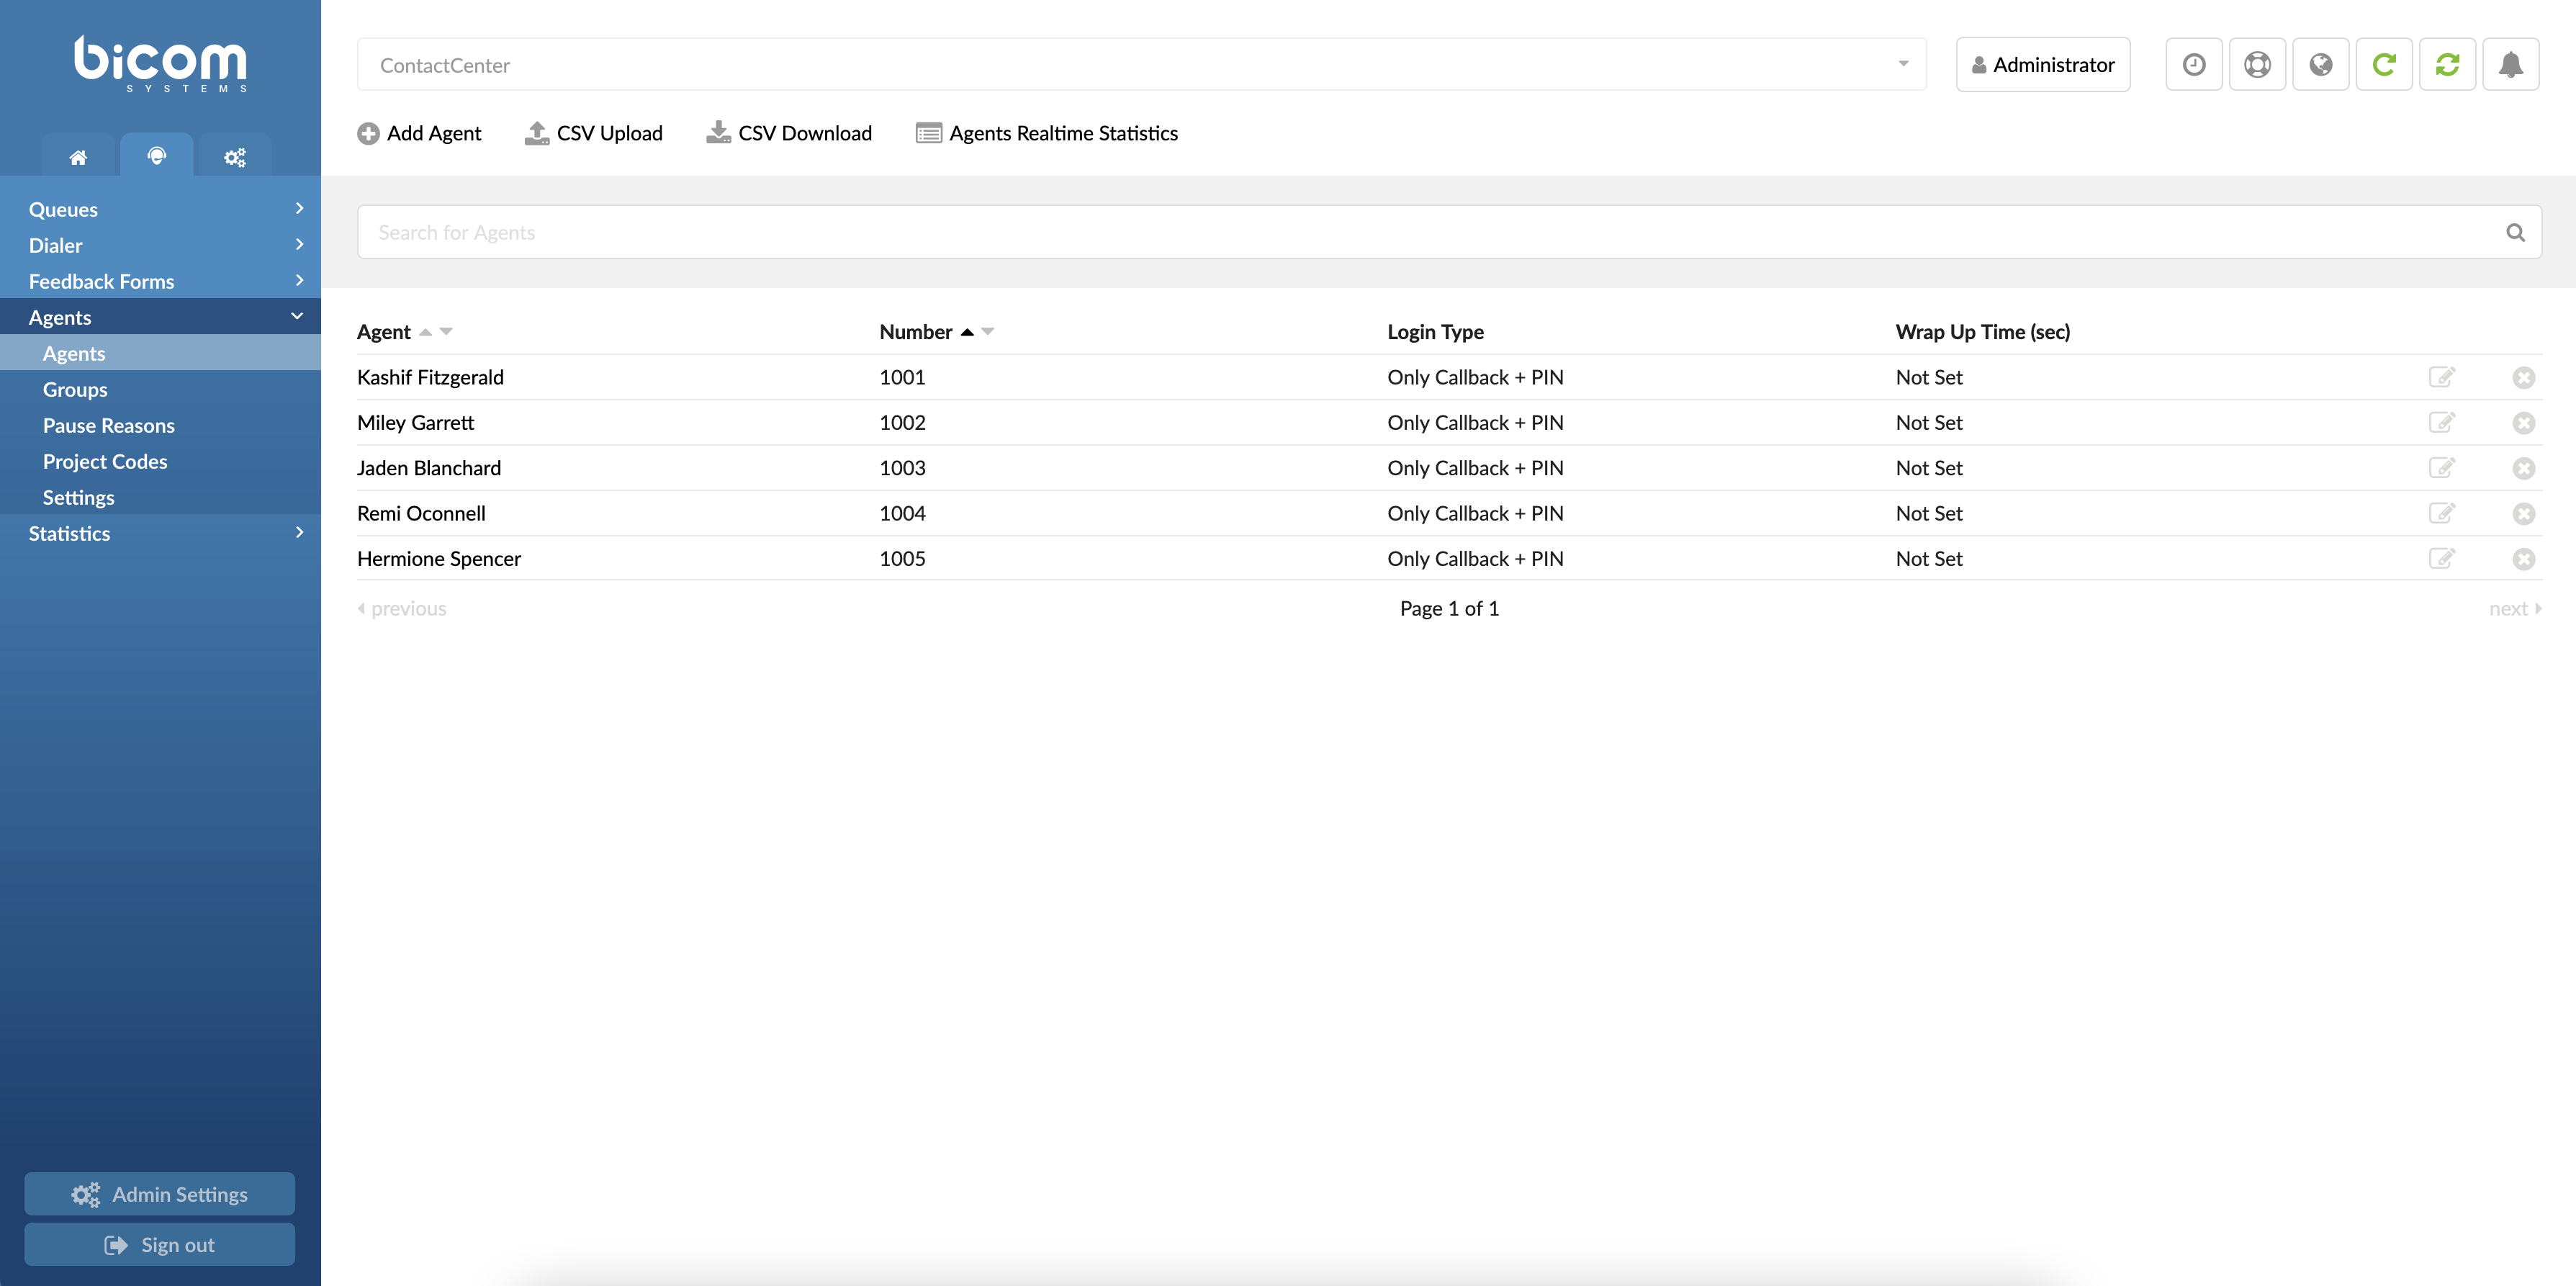
Agents are virtual system extensions. Agents login to agentpool and can be added as queue/campaign members or act independently. This screen lists all system agents with the following details.
¶ Agents
Agents Dashboard
- Agent
Displays the Agent's full name.
(E.g., John Doe)
(Display)
- Number
Displays the Agent's number.
(E.g., 1000)
- Login Type
Displays the type of login that the Agent is using.
(E.g., Callback)
(Display)
- Wrap Up Time (sec)
Displays the pause time in seconds.
(E.g., 20)
(Display)
NOTE: 'Wrap Up Time (sec)' refers to the time given to the Agent before a new call is transferred to their Extension.
 Click this button to edit the Agent configuration.
(Button)
 Click this button to delete the Agent.
(Button)
 Click this button to upload a CSV file.
(Button)
NOTE: Users can add multiple Agents at once by using the 'CSV Upload' option. To successfully upload, they need to provide information for the CSV headers in the CSV file.
The following notes should be taken into consideration when creating a CSV file:
1. CSV Header: LoginType
Users can set one of the three options here: 'dynamic', 'callback', or 'any'.
If 'any' is entered, an Agent can log in as 'callback' or 'dynamic'.
2. CSV Header: Number
a) In case the Agent's number did not exist on the system before the upload, the Agent will be added. Otherwise, if the number existed on the system before uploading the CSV file, the Agent will be updated.
b) The Agent number needs to have four digits.
3. CSV Header: BindExtension
Please check whether the Extension existed on the system before adding it to the CSV file.
4. Populating CSV File
Users can manually add all the necessary data to the CSV file and provide information for seven headers, as listed in the table below. The CSV file must have the following format, and it can be populated as follows:

Once successfully uploaded, the following message will appear: "Imported one record. Skipped 0 records.". Please refer to the screenshot.

NOTE: If users skip entering data for some headers, they must add double quotation marks ("). Please refer to the example where a user only provided data for the 'Name', 'LoginType', 'Number', 'Surename', 'AllowDirectInWhenPaused' and 'WrapUpTime' headers:

If a user does not enter double quotation marks for the entries s(he) would like to skip, the following message will appear: "Imported 0 records. Skipped one record." meaning that the upload was not successful. Please refer to the screenshot.

Entries for the first three headers cannot be skipped when uploading a CSV file. If left empty, the upload will not be successful.
| CSV Header | Meaning | ||
|---|---|---|---|
| Name | Enter the Agent's name | ||
| LoginType | Select the Agent's login type | ||
| Number | Enter the Agent's number | ||
| Surname | Enter the Agent's surname | ||
| PIN | Enter the Agent's PIN | ||
| BindExtension | Enter the Extension Number | ||
| DirectInRingTime | Enter the number of seconds | ||
| AllowDirectInWhenPaused | Select ‘Yes’ to enable calls for an Agent that is on the ‘Pause’ state | ||
| AllowDirectInWhenBusy | Select ‘Yes' to enable calls for an Agent that is already on call/busy | ||
| DirectInBusyDestination | Select busy Destination | ||
| IsVoicemail | Select 'Yes' to redirect calls to Destination Voicemail | ||
| WrapUpTime | Enter the number of seconds |

Click this button to download a CSV file.
(Button)
Please refer to the example of a downloaded CSV file:

¶ Agents Realtime Statistics
Agents Realtime Statistics
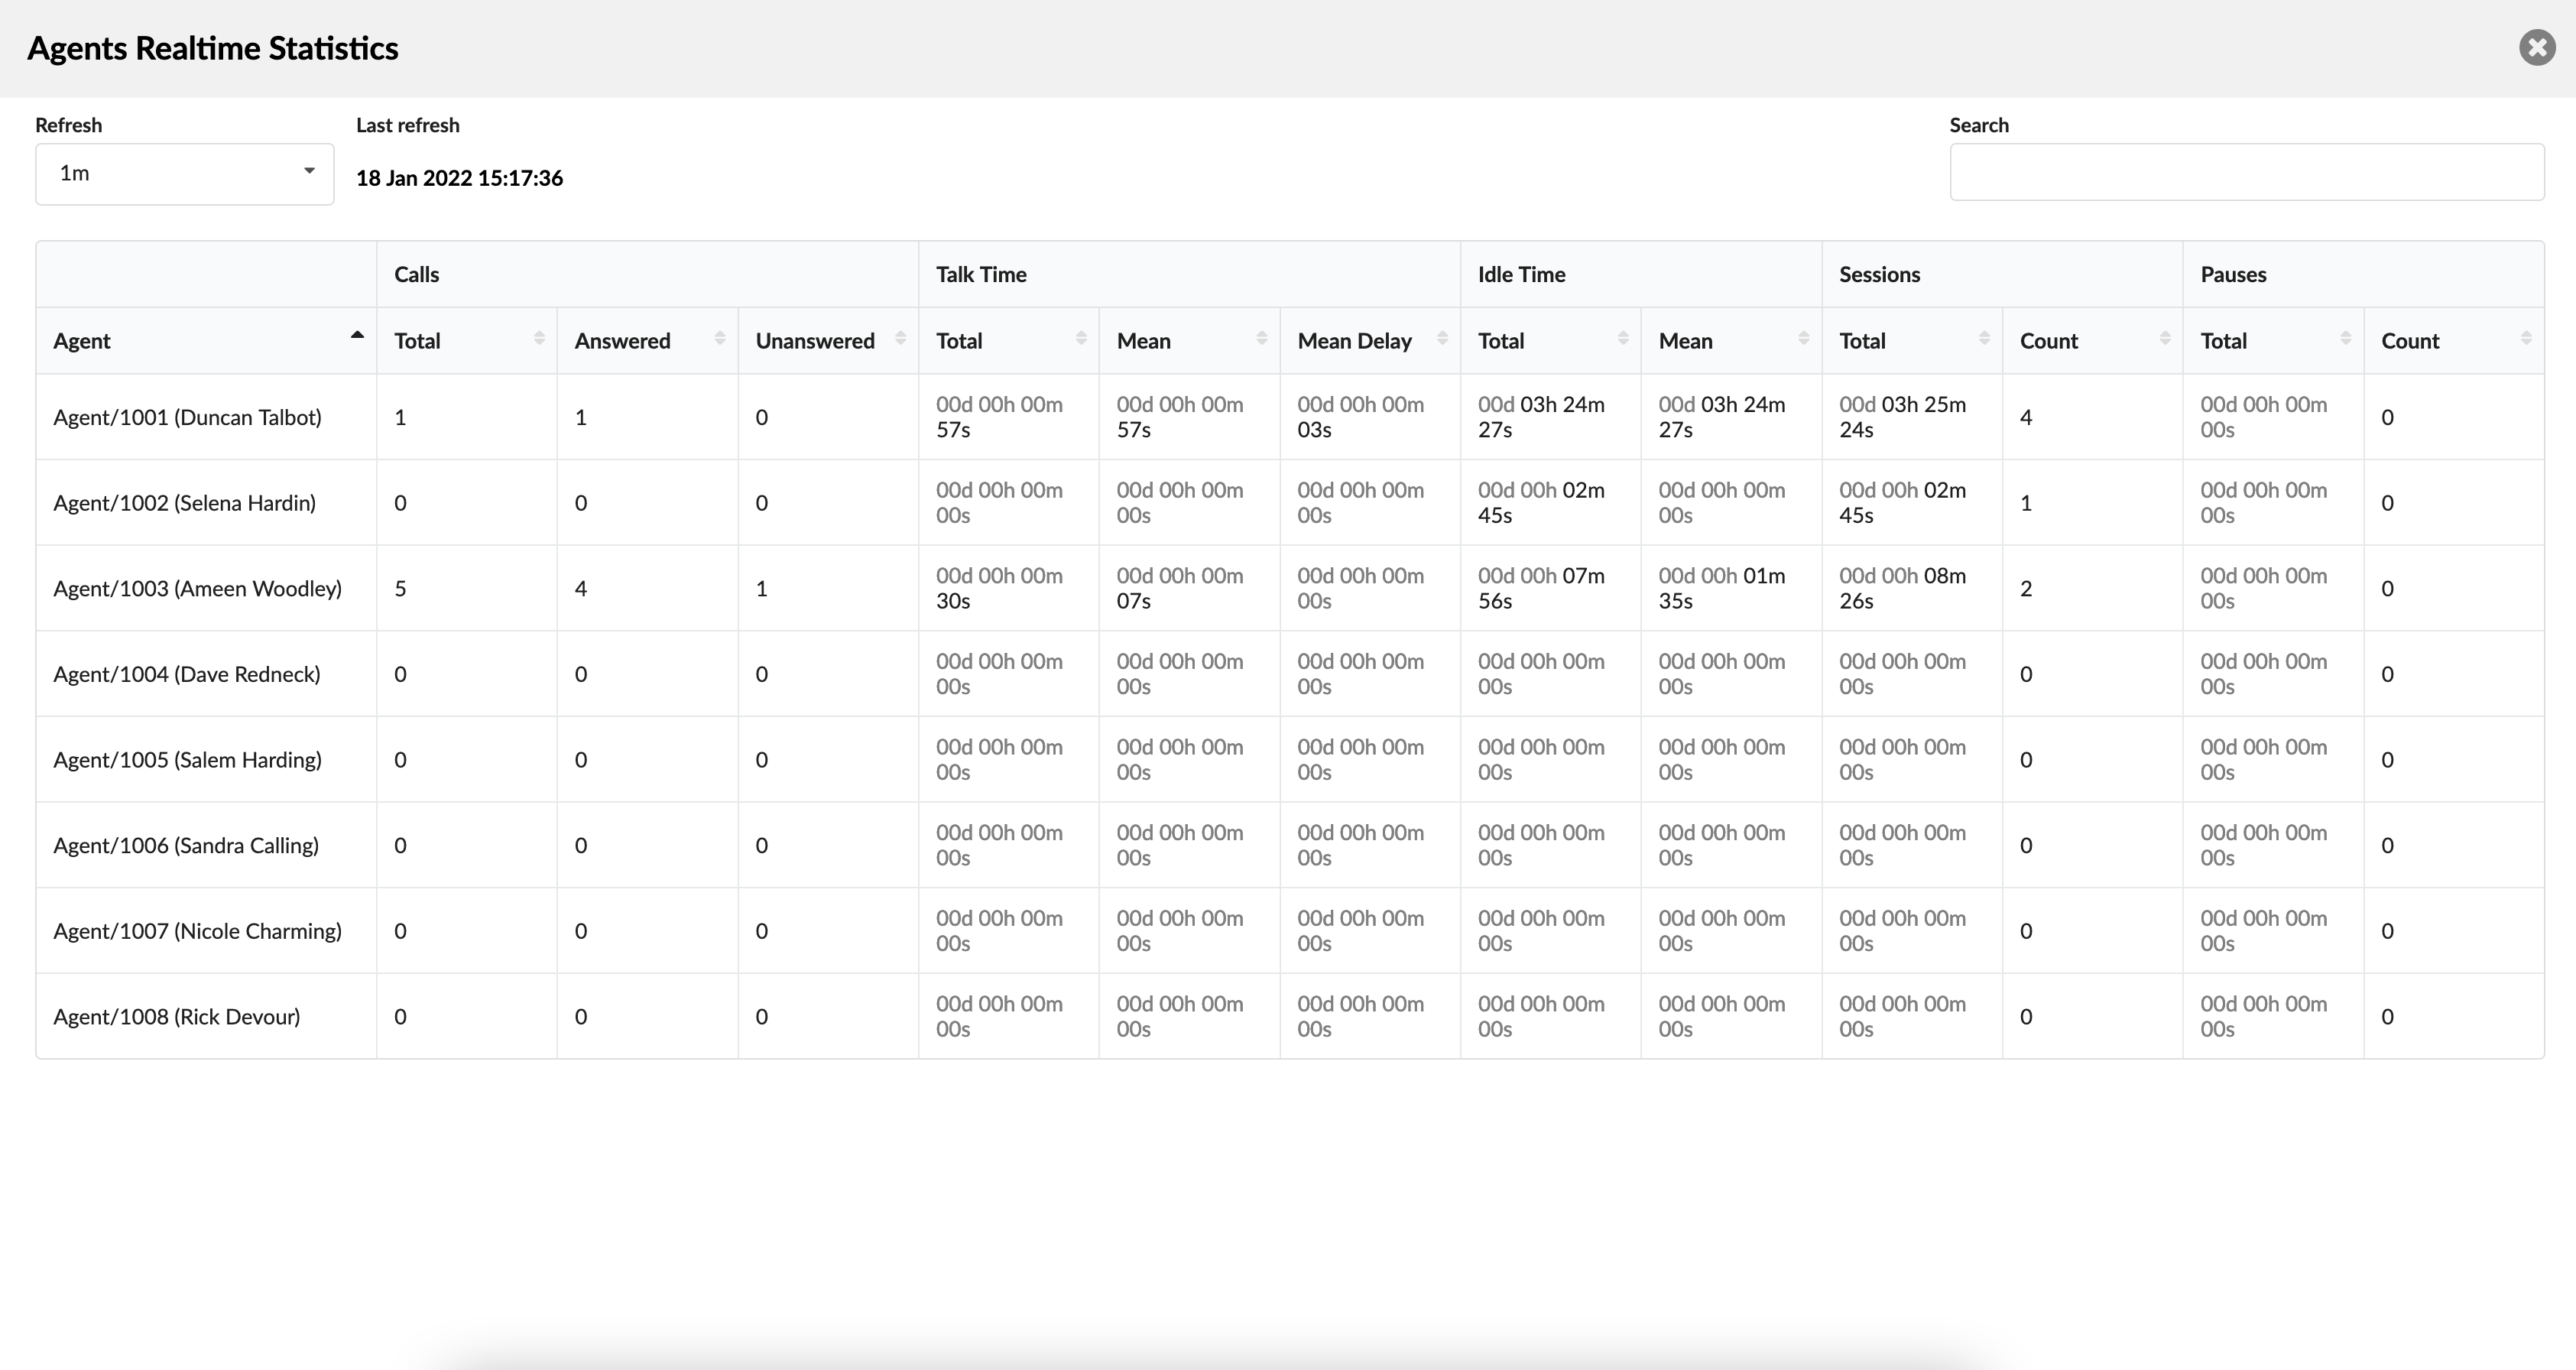
Agent real-time stats include all agent calls (inbound, outbound, direct(in/out) ) in the calculation.
This page will provide a complete overview of Agents, including the agent's total talk time, the time agent spends in an idle state, the sessions the agent has logged in, and the full pause time per agent.
Agent real-time stats are accessible from the gloCOM supervisor or PBXware.
NOTE: Calculations are reset each day starting from midnight.
¶ Search

Search for Agents
Enter the agent number or name for which you want to search.
- Search
Search phrase
(E.g., Provide a search phrase here and hit enter to filter the records)
([a-z][0-9])
¶ Add/Edit Agent
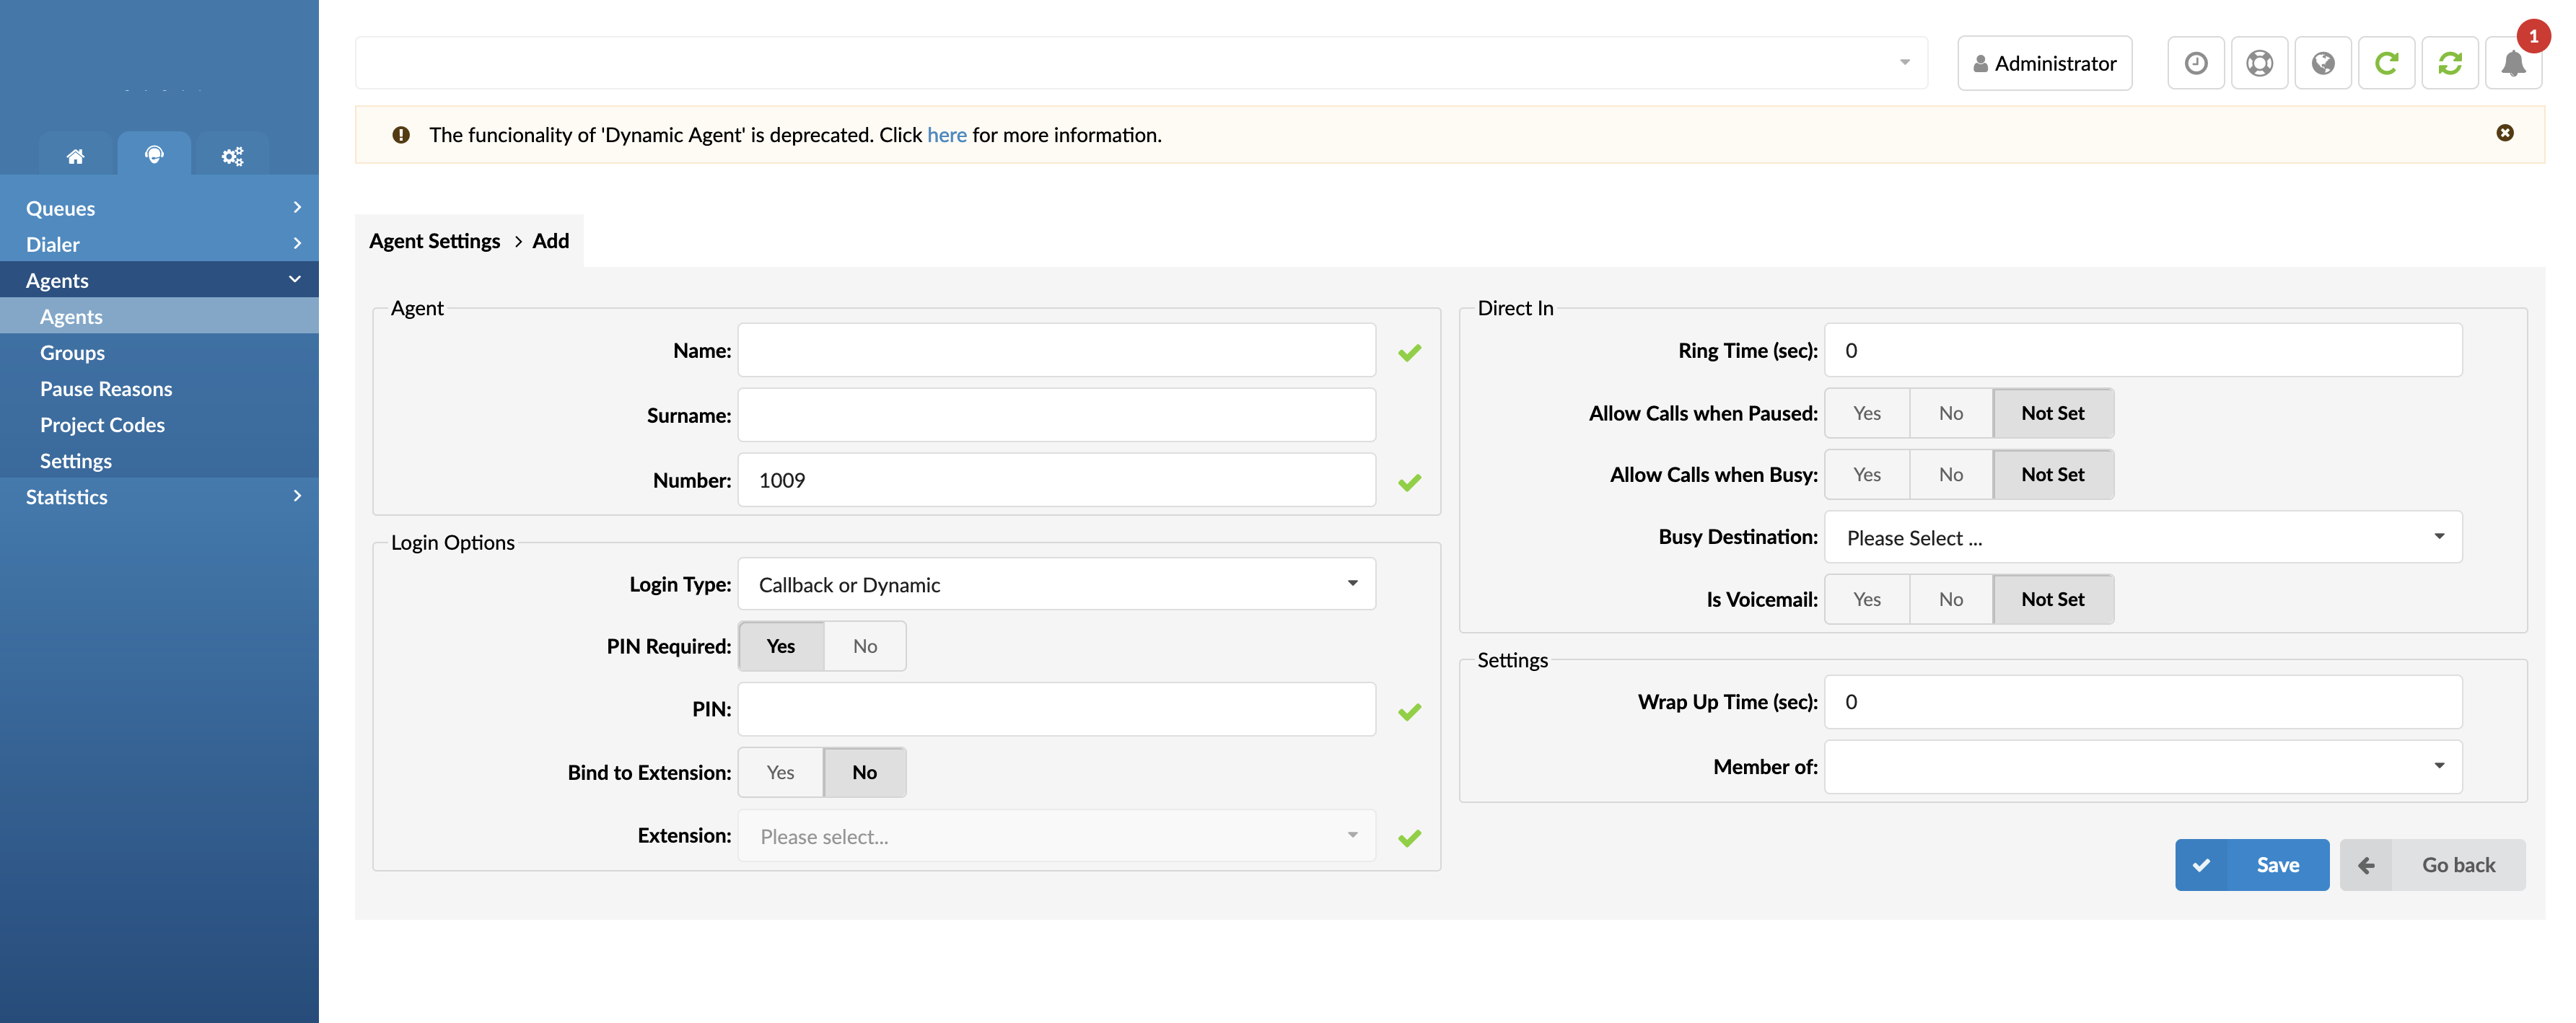
Add Agent
- Name:
Enter the name of an Agent.
(E.g., John)
([a-z])
NOTE: This is used only for more straightforward navigation.
- Surname:
Enter the surname of an Agent.
(E.g., Smith)
([a-z])
NOTE: This is used only for more straightforward navigation.
- Number:
Enter the system's Agent number.
(E.g., 1000)
([0-9])
NOTE: This field is automatically populated by default, but it can be changed if necessary. For example, setting '1008' here will create a new Agent with the same network number. Please note that the Agent number must be unique.
NOTE:
Users can create a new Agent where the number would be automatically assigned, or they should enter a 4-digit number. If this number is already reserved, the system will notify a user via warning message: "Number 1234 is already reserved by (Agent) 'ABC'." and fill this field automatically with the first available number.
¶ Login Options

- Login Type
Select one of the login types from the drop-down menu
(E.g., Callback or Dynamic/Only Callback/Only Dynamic)
(Select box)
NOTE: Please note that an Agent cannot be deleted while logged in. If deleted, a warning message will be displayed.
Types of Agents
Agents can select whether they will be 'Dynamic' or 'Callback'.
1. Dynamic Agents
This type of Agent can log in to a system from any UAD network with the access code *202.
NOTE:
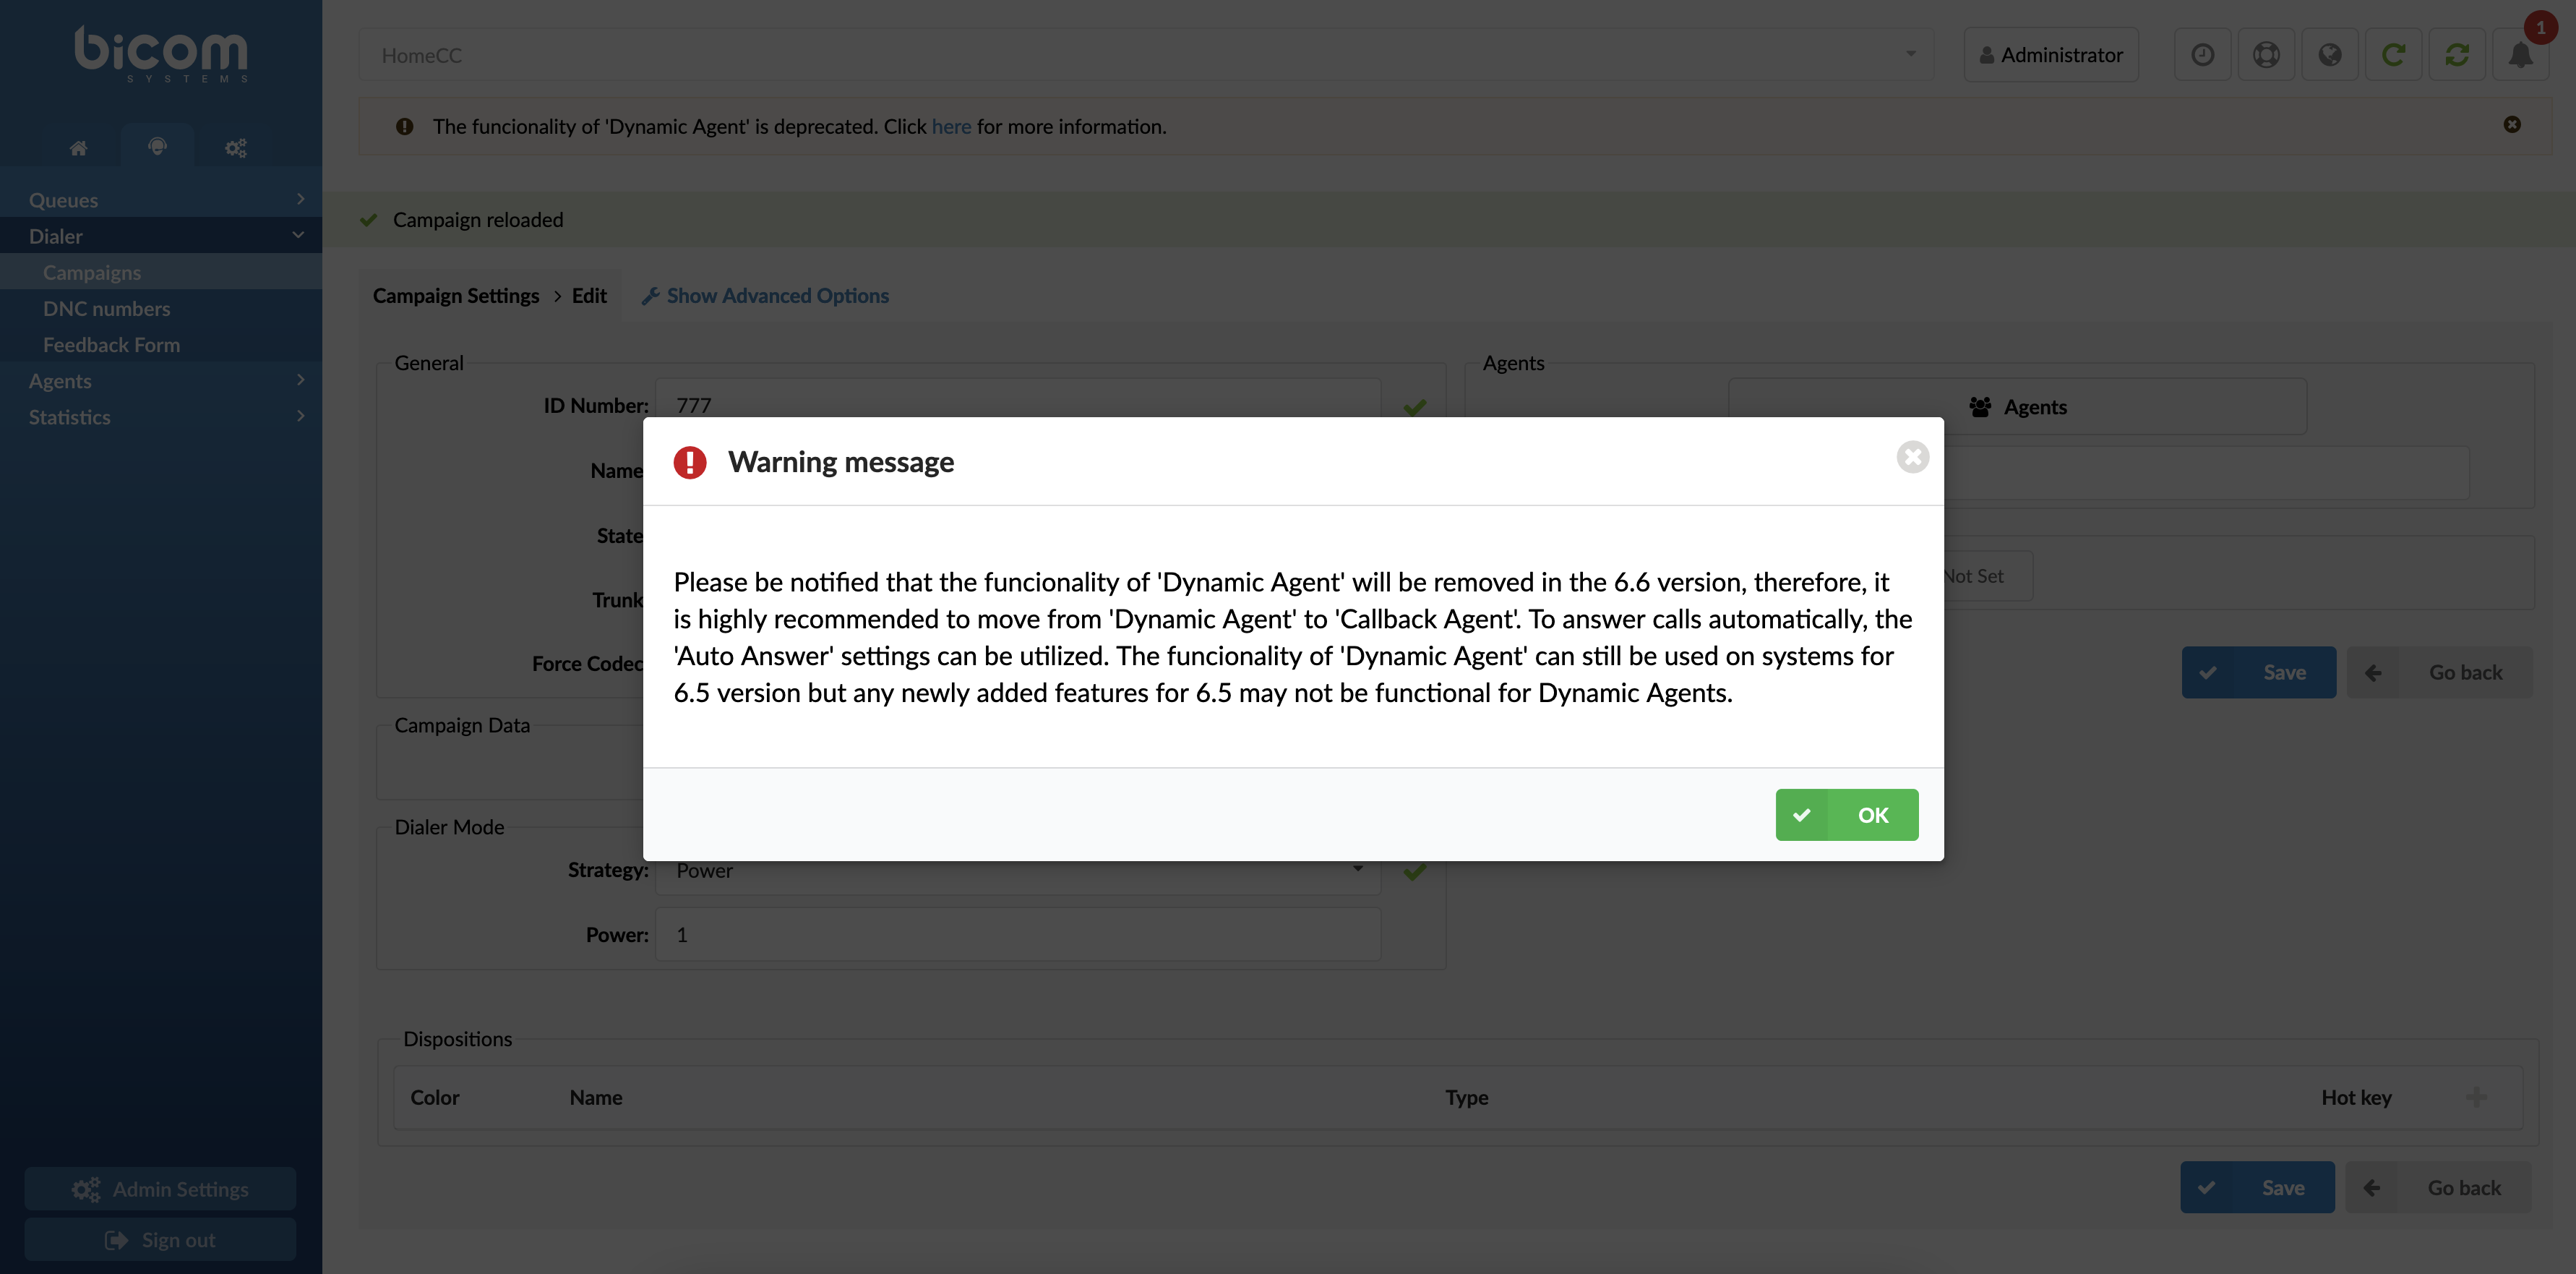
Please be notified that Dynamic Agent will be deprecated in the upcoming version. Therefore, moving from 'Dynamic Agent' to 'Callback Agent' is highly recommended. The 'Auto Answer' settings can be utilized to answer calls automatically.
The ‘Dynamic Agent’ functionality will be deprecated in the 6.6 version. Therefore, it still can be used on systems for the 6.5 version, but any newly added feature for 6.5 may not be functional for Dynamic Agents.
NOTE: The Dynamic Agent is "on a call" all the time, meaning that the Agent's line is always open and receiving calls. Every time a caller hangs up, the Agent hears MoH and gets the next call when it arrives. The Dynamic Agent logs out by hanging up the line. Please note that the Agent has to be created in the 'Agents' section.
2. Callback Agents
This type of Agent can log in to a system by dialing into one system Extensions with the access code *203. By default, the system will prompt for the Agent number, Agent PIN, and the Number where the Agent is currently. This number could be a local Extension or some other remote Destination.
NOTE: The Agent has to be created in the 'Agents' menu. The Callback Agent must log out with '*203' to stop receiving calls.
Apart from the two options mentioned above, Agents can select one of the following:
1. Callback or Dynamic Agents
This type of Agent is left with the choice of whether s(he) will use the '*202' access code and be a Dynamic Agent or use the '*203' access code and be a Callback Agent.
2. Auto Login (Callback)
This type of Agent is a Callback Agent that the system will automatically log in to the Queue/Campaign as soon as s(he) is added to the Queue/Campaign. For this to work, this Agent needs to bind to an Extension to which the system will send the calls.
- PIN Required
Please select whether the Agent will be required to enter their PIN when logging in.
(E.g., Yes/No)
(Options button)
- PIN
Enter the Agent PIN provided by the Agent when logging in.
(E.g., 6583)
([0-9])
- Bind to Extension
Select whether the system will bind this Agent to the Extension specified in the 'Extension' field.
(E.g., Set to 'Yes' if you want the system to allow logins for this Agent only from the Extension entered in the 'Extension' field)
(Options button)
- Extension
Enter the Extension from which the system will only allow logins for this Agent.
(E.g., Set '1543' to limit logins for this Agent only from the '15432' Extension)
([0-9])
¶ Agents Direct in Settings

Agent Direct in Settings
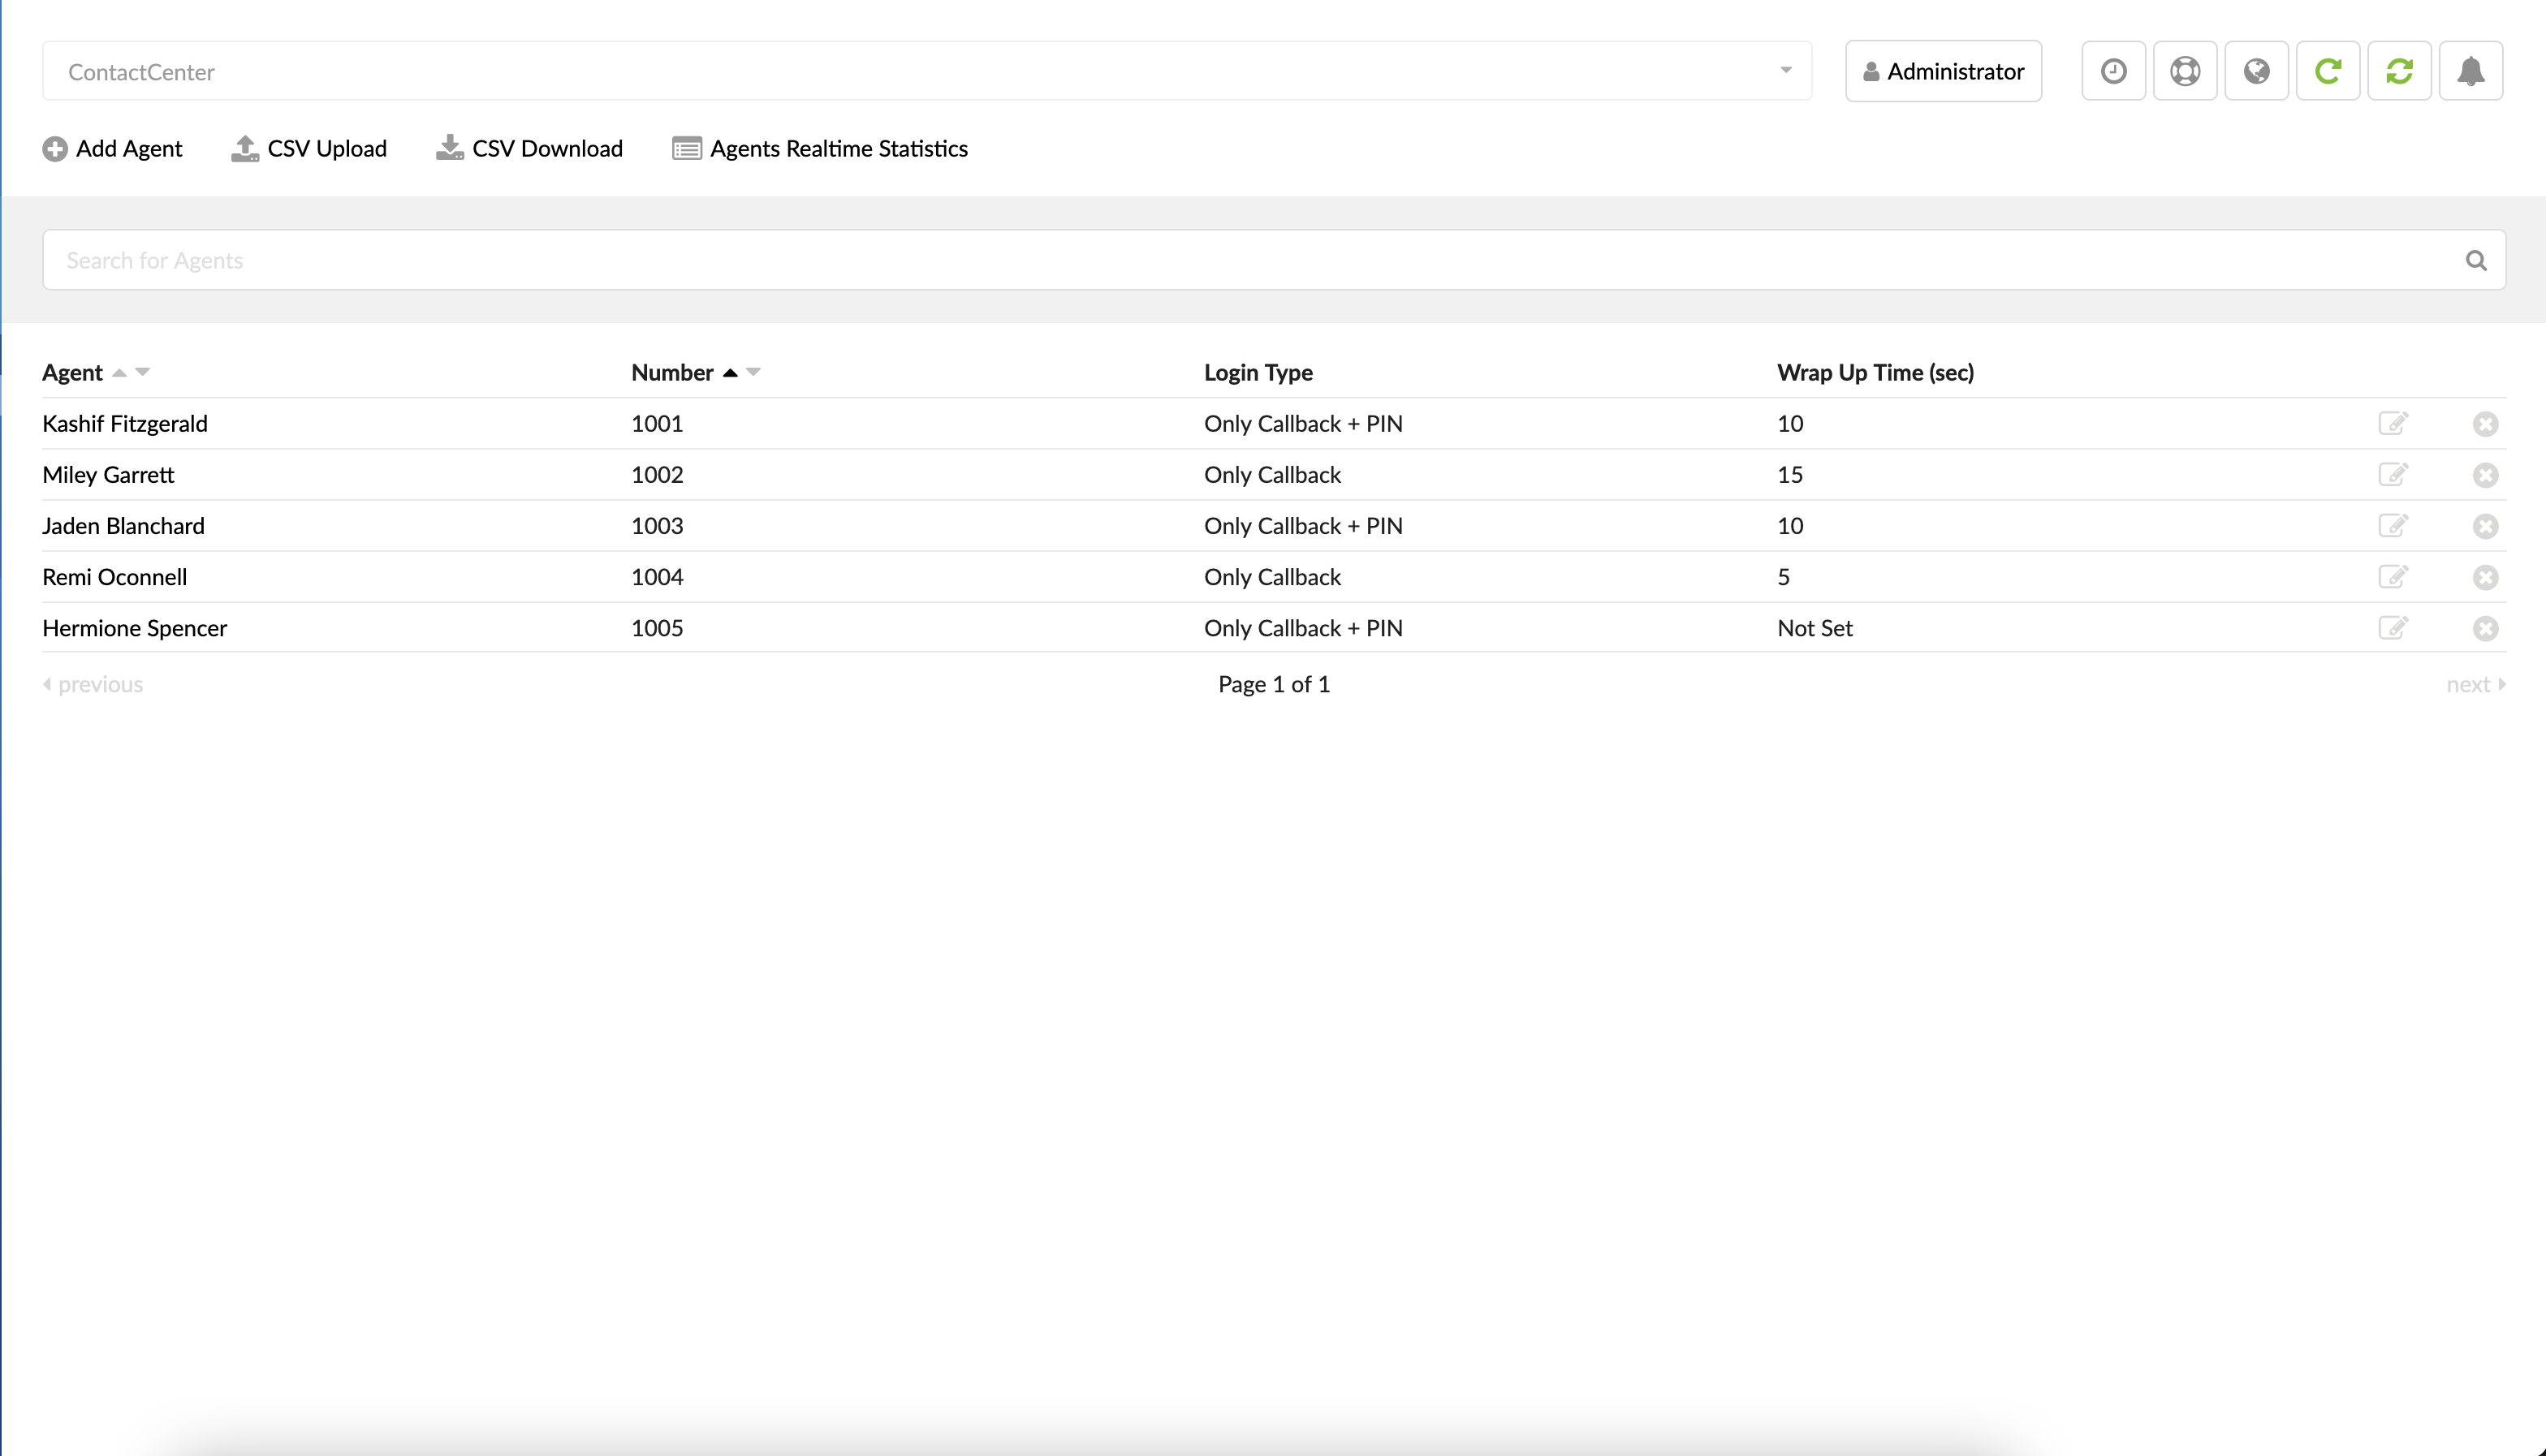
The ‘Not Set’ option is added to Agents Settings. By default, this option is set by the System whereby all configurations from General settings will be in action. Otherwise, all changes to Agent's settings will override the configuration from General settings.
- Ring Time (sec)
This option allows users to set ringing time for ‘Direct In’ calls.
(E.g., 32 Sec)
([0-9])
- Allow Calls when Paused
When this option is set to ‘Yes’, users should be able to call an Agent in the ‘Pause’ state.
(E.g., On/Off)
(Select box)
- Allow Calls when Busy
When this option is set to ‘Yes’, users should be able to call an Agent already on call/busy.
(E.g., On/Off)
(Select box)
- Busy Destination
Direct in busy destination will let users redirect a call to another destination if the Agent is busy.
(E.g., Miley Garrett)
(Select box)
- Is Voicemail
This option will dial the Voicemail of the destination.
(E.g., On/Off)
(Select box)
- Wrap Up Time (sec)

Set a pause in seconds given to the Agent before a new call is transferred to their Extension.
(E.g., 5)
([0-9])
NOTE: This optional number is set for this Agent and overrides the value in 'Settings' → 'General' .
- Member of:
Enter the groups that this Agent belongs to.
(E.g., Group1, Group2)
(Select box)
NOTE: By assigning an Agent to multiple groups, the Agent can log in to various Queues or Campaigns with a single Agent login. Use 'CTRL' + the mouse clicks to select/unselect groups.)
TIP: If updating from an earlier version of PBXware to a newer one, Agents in the system might not work. In that case, users need to re-save every Agent on the system. This is required because there are significant configuration changes in the latest versions of PBXware.
¶ Groups

Agents can be organized into groups to enable easier login into multiple queues and campaigns.
This way, many agents can be added to a list with a single click (by adding agent groups instead of agents one by one). Also, when any system extension logs in as a queue or campaign member, it logs in automatically to all queues and campaigns that the agent is a member of.
Besides adding groups, users can immediately add agents to their preferred groups.
This screen lists all system agent groups with the following details.
- Group:
Group name.
(E.g., 2000)
(Display)
- Agents
A number of agents in the group.
(E.g., 5)
(Display)
 Edits the group configuration.
(E.g., Click to edit the group configuration)
(Button)
 Deletes a group from the system.
(E.g., Click to delete a group from the system)
(Button)
¶ Add/Edit Group

Add Edit Group
- Group Name:
Unique network group identifier.
(E.g., Group 1)
([a-z] [0-9])
- Agents:
You can select multiple agents to be members of this group. Any changes made in this field for existing groups will automatically apply to the Queue/Campaign where this group was added.
(E.g., Adding 'Sales' here will create a 'Sales' group. You can add members of this group using the Agents field or selecting this group under 'Agents: Member of' to assign the user to this group)
(Select box)
NOTE: To ensure easier organization, users can now see the number of Agents present in each Group and edit the Group accordingly to their needs by clicking the Edit button. If any changes are made to Agent Groups, they are also immediately applied to Queues and Campaigns where this Group is used.
 Furthermore, users can now see all Agents inside one Agent Group and have the choice to remove or add Agents to the Group, as presented here.
¶ Pause Reasons

When an Agent needs to stop receiving calls but does not want to log off, they can pause. They will stop receiving calls until they unpause.
NOTE: When it comes to outbound calls, an Agent can make an outbound call while paused, but please note that the Agent Pause Statistics will be affected. Commonly, when an Agent goes on a pause, the report displays one pause. However, if an Agent makes an outbound call while paused, the report will display one additional pause for every outbound call made in this case.
In addition, the Agent can provide a pause reason code to indicate the reason for being on pause. This reason code is logged with their pause event.
To enable/disable this feature, the Agent should dial the *204 access code and type the code for their Pause Reason.
¶ Add/Edit Pause Reason
¶ General

- Name:
Set a name of a Pause Reason.
(E.g., Lunch break)
([a-z][0-9])
- Code:
Enter a short code of a Pause Reason.
(E.g., 123)
([0-9])
- Description
Provide a short description of a Pause Reason
(E.g., Went out for lunch break)
([a-z][0-9])
- Billable
Define whether a pause will be billed to an Agent
(E.g., Yes/No/Not Set)
(Options button)
- Payable
Define whether a pause is paid to an Agent
(E.g., Yes/No/Not Set)
(Options button)
 Click this button to edit the configuration for Pause Reason.
(Button)
 Click this button to delete a specific Pause Reason from the system.
(Button)
NOTE: Users can see if the Agent is on pause and their pause reason in the 'Monitor' section under 'Queues'.
NOTE: In gloCOM - the Agent Edition, the Agent can use this feature by clicking the pause button next to the Agent number. By choosing the right pause reason, the Agent will be paused.
¶ Project Codes

An agent can now make a direct outcall and associate it with Project defined on the server. Each Project can have a different Caller Id, so when the agent dials with that project, it will use a caller id predefined.
¶ Add/Edit Project Code
¶ General
- Name:
Project code name, used only for more straightforward navigation.
(E.g., Marketing)
([a-z 0-9])
- Code:
A number that uniquely identifies the project. It cannot be changed on edit.
(E.g., 555)
([0-9])
- CallerID
Each Project can have a defined different Caller Id, so when the agent dials with that project, it will use a caller id predefined.
(E.g., John Doe(1000))
 Edits Project Code configuration
(E.g., Click to edit Project Code configuration)
(Button)
 Deletes Project Code from the system
(E.g., Click to delete Project Code from the system)
(Button)
¶ Settings
¶ General
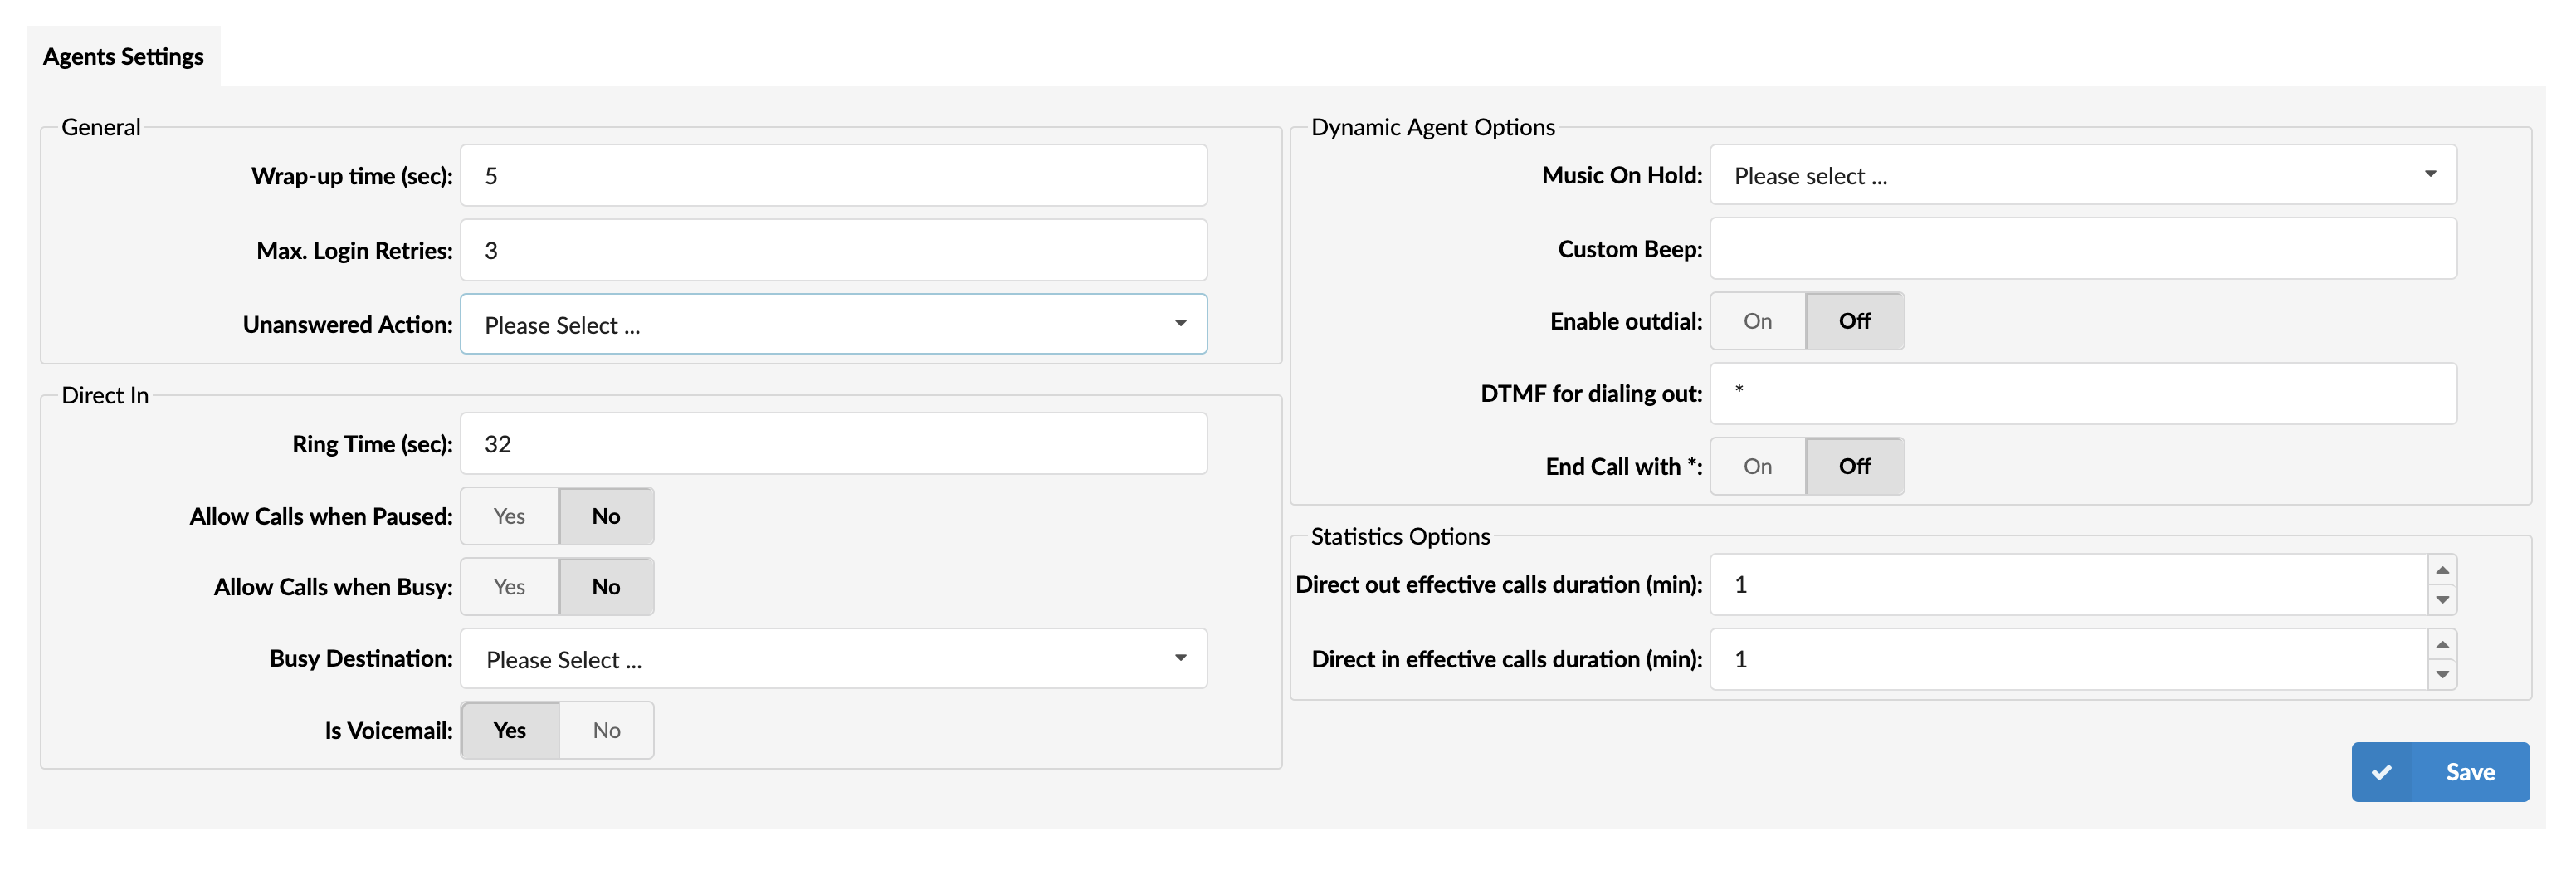
Agents General Settings
- Wrap-up time (sec)
Define a pause in seconds given to the Agent before a new call is transferred to their Extension.
(E.g., Agent Smith ends a Queue call. A pause in seconds is enforced so the Agent can prepare themself for a new call.)
([0-9])
- Max. Login Retries
Define the number of times the Agent can try to log in before s(he) receives a notification that the attempts have failed.
(E.g., 3)
([0-9])
- Unanswered Action:
Select 'Auto Logoff' or 'Auto Pause' for an Agent in a Queue.
(E.g., Auto Pause)
(Select box)
¶ Direct In

With this option, the user would be able to set up separate ring times for Agent 'Direct In' calls, and also would be able to set the last Destination once the ring time is reached. Additionally, the user could select the Destination where the Caller will be routed if the Agent is paused/out.
- Ring Time (sec)
This option allows users to set ringing time for ‘Direct In’ calls.
(E.g., 25 Sec)
([0-9])
- Allow Calls when Paused
When this option is set to ‘Yes’, users should be able to call an Agent in the ‘Pause’ state.
(E.g., On/Off)
(Select box)
- Allow Calls when Busy
When this option is set to ‘Yes’, users should be able to call an Agent already on call/busy.
(E.g., On/Off)
(Select box)
- Busy Destination
Direct in busy destination will let users redirect a call to another destination if the Agent is busy.
(E.g., Hermione Spencer)
(Select box)
- Is Voicemail
This option will dial the Voicemail of the destination.
(E.g., On/Off)
(Select box)
NOTE: Dispositions from ‘General’ settings will not override configurations from ‘Agents’ settings. Therefore, they will be considered a ‘Default’ state if a subsidiary configuration is not set on ‘Agents’ settings.
¶ Dynamic Agent Options

- Music On Hold
Set the Music On Hold class played to Agents
(E.g., Select 'Default' to play all of the sound files located in that class to the Agent who is waiting for new calls)
(Select box)
- Custom Beep
Set the sound file name to be played to the Agent before a call is transferred to them from the Queue.
(E.g., Type 'arlington' to play the arlington.gsm sound file to the Agent)
([a-z][0-9])
- Enable outdial
Select whether to enable or disable outdial.
(E.g., On/Off)
(Select box)
- DTMF for dialing out
Assign DTMF to dial out.
(E.g., *)
([a-z][0-9])
NOTE: The default DTMF is *.
- End Call with *:
Enable or disable an Agent to end a call with '*'.
(E.g., On/Off)
(Select box)
¶ Statistics Options

- Direct out effective calls duration (min)
Set a duration of a call in minutes that can be reported as an effective outgoing call.
(E.g., 2)
([0-9])
NOTE: Users can find this information under the Agent 'Direct out' report.
- Direct-in effective calls duration (min)
Set a duration of a call in minutes that can be reported as an effective incoming call.
(E.g., 2)
([0-9])
NOTE: Users can find this information under the Agent 'Direct in' report.

