¶ Provider
To be able to create trunk first you will need to create a Provider first.
In your PBXware GUI go to:
Settings -> Providers -> Add Custom Provider
Select VOIP for Type and SIP for Protocol.
Enter name of your provider in field Name.
NOTE: Settings we use in this example are most common settings used for SIP trunks, please be aware that your provider might request different settings. In case your trunk is not working after you finished all the steps explained in this how to, please contact your provider to see if there are any additional options that have to be enabled/disabled in order for your trunk to work. In PBXware 3.8 User Type for trunk must be set to peer
Insert these values in associated fields, make a selection in radio buttons or select them from a drop down list:
¶ General
.
- User Type: peer
- DTMF Mode: rfc2833
- Country: Select your country from the drop down list
- National dialing code: (enter your country national dialing code: 0 for most countries 1 for US)
- International dialing code: (enter your country national dialing code: 00 for most countries 011 for US)
- E164 Accepted: No
- Pass-thru mode: Yes
- Leave National Code: No
- Local Area Code: No
- Authentication
- Host: (enter the IP address/domain you got from your provider)
- Auth: (enter authorization credentials you got from your provider)
- Register: Not required
- Insecure: very
.
¶ Codecs
Select only codecs you will use. Most commonly used codecs are G.711 ulaw, G.711 alaw G.729 and GSM. G.729 codec is commercial and license must be purchased from Digium. Also, G.729 codec must be installed on PBXware in order to be used. Checking G.729 will take effect only if codec is already installed.
- Video Support: Yes
- Auto-Framing (RTP Packetization): No
For more information on how to install G.729 codec please check our HOWTO g729 Manual Install
Save your provider.
.
¶ Trunk
Now you will need to create a trunk. Go to Trunks and click Add Trunk.

¶ Add new trunk
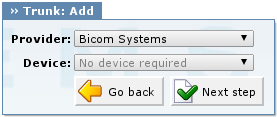
Select provider you created from the Provider drop down list and click Next step button.
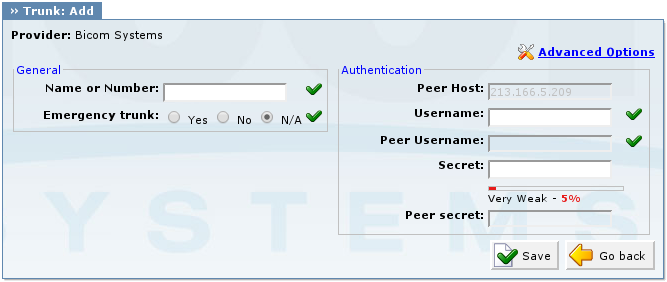
You will see basic settings window.
¶ General

Basic settings
- Name or number: Enter-trunks-name
- Emergency Trunk: Yes/No
NOTE: If this value is set to yes, this trunk will be set as a default trunk for calls to emergency services, for example 911. Be carefull when setting emergency trunk value, specially with multiple trunks set up on your system. In case of emergency, you don't want to make a call to Emergency services in another country.
In order for this to work, you will have to enter Emergency Services numbers in
Settings -> Servers/Tenants -> Edit server/Edit each Tenant -> Locality (section) -> Emergency Services)
¶ Authentication
- Username: Insert Username you received from your provider.
- Secret: Insert Secret you received from your provider.
NOTE: Some providers use different methods of authentication so Secret might not be provided.
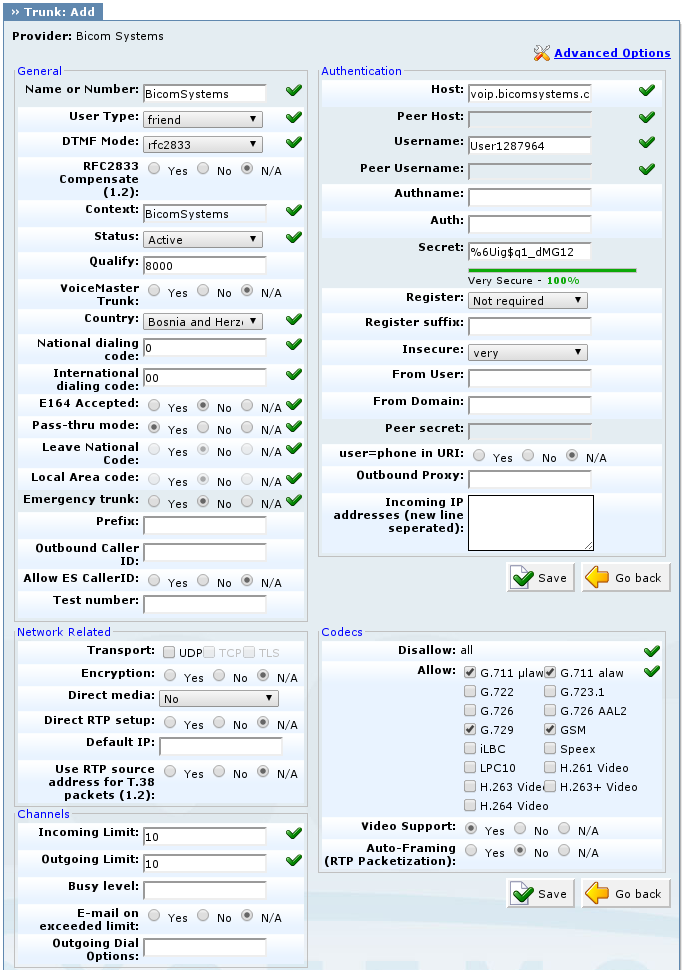
Now, you will need to add few more things in order for your trunk to be able to connect to your provider so click Advanced Options.
General

Advanced settings
- Qualify: 8000 (This is suggested value only. Default value is 2000.)
Channels
- Incoming Limit:
- Outgoing Limit:
These values define how many concurrent calls, both inbound and outbound, can be made through this trunk.
Authentication
- Register: Not required
Click Save button to accept changes and create your trunk.
NOTE: If your providers requirements match settings used in this HowTo, after you save your new trunk you should be able to make outbound calls.
To be able to receive inbound calls you will have to create DID.
For more information on DIDs check DID section in our PBXware Administration Manual.
.